介绍

Apache Flink 是知名的流计算引擎,在事件驱动、流批分析等场景都均有广泛的应用。AutoMQ 是一款极速弹性的云原生 Kafka,通过对 Kafka 存储层做了云原生化的改造带来了 10 倍以上的成本降低和弹性优势。得益于 AutoMQ 对 Kafka 100% 兼容的特性,其可以非常轻松利用 Kafka 生态已有的工具读写 Flink。 本文将通过一个 WordCount 的例子来说明 Flink 如何从 AutoMQ 的 Topic 中读取数据进行数据分析然后再重新将结果写回到 AutoMQ 中。

环境准备

本文档采用的 Flink 版本为 v1.19.0。首先参考 Flink First Step 官方文档部署一个 v1.19.0 Flink 服务。

安装和启动 AutoMQ

参考 Linux 主机部署多节点集群▸ 文档部署一套 AutoMQ 集群。本例中使用的 AutoMQ 版本为 v1.0.4。

准备测试主题和数据

创建一个 topic to-flink 用于保存需要导入到 flink 进行分析计算的数据:

### 本地安装的 AutoMQ 默认端口为9094
bin/kafka-topics.sh --create --topic to-flink --bootstrap-server localhost:9094 

使用命令行工具往其中写入一批计算 word count 的数据:

bin/kafka-console-producer.sh --topic to-flink --bootstrap-server localhost:9094

写入的数据如下,输入完毕后可以按 Ctrl+C 退出生产者:

apple
apple
banana
banana
banana
cherry
cherry
pear
pear
pear
lemon
lemon
mango
mango
mango

最后我们希望通过 Flink 计算后得到的结果应该是:

apple 2
banana 3
cherry 2
pear 3
lemon 2
mango 3

写入完毕后我们可以尝试消费下,确认写入成功:

bin/kafka-console-consumer.sh --topic to-flink --from-beginning --bootstrap-server localhost:9094

创建一个 topic 用于接受 flink 计算后的结果

bin/kafka-topics.sh --create --topic from-flink --bootstrap-server localhost:9094 

得益于 AutoMQ 对 Kafka 完全的兼容性,此处我们可以直接使用 Flink 提供的 Kafka Connector 来编写 source 和 sink 的代码,从 AutoMQ 的 Topic 中加载数据。

POM 依赖


....
<dependency>
    <groupId>org.apache.flink</groupId>
    <artifactId>flink-java</artifactId>
    <version>1.19.0</version>
</dependency>
<dependency>
    <groupId>org.apache.flink</groupId>
    <artifactId>flink-streaming-java</artifactId>
    <version>1.19.0</version>
</dependency>

<dependency>
    <groupId>org.apache.flink</groupId>
    <artifactId>flink-clients</artifactId>
    <version>1.19.0</version>
</dependency>
<dependency>
    <groupId>org.apache.flink</groupId>
    <artifactId>flink-connector-kafka</artifactId>
    <version>1.17.2</version>
</dependency>

....

<!-- shade 插件支持下build jar -->
<plugin>
    <groupId>org.apache.maven.plugins</groupId>
    <artifactId>maven-shade-plugin</artifactId>
    <version>3.5.2</version>
    <executions>
        <execution>
            <phase>package</phase>
            <goals>
                <goal>shade</goal>
            </goals>
            <configuration>
                <finalName>automq-wordcount-flink-job</finalName>
                <filters>
                    <filter>
                        <artifact>*:*</artifact>
                        <excludes>
                            <exclude>META-INF/*.SF</exclude>
                            <exclude>META-INF/*.DSA</exclude>
                            <exclude>META-INF/*.RSA</exclude>
                        </excludes>
                    </filter>
                </filters>
                <transformers>
                    <transformer implementation="org.apache.maven.plugins.shade.resource.ManifestResourceTransformer">
                        <mainClass>com.automq.example.flink.WordCount</mainClass>
                    </transformer>
                </transformers>
            </configuration>
        </execution>
    </executions>
</plugin>

以下 Java 代码分别用 KafkaSource 和 KafkaSink 定义了一个 AutoMQ source 和 sink。首先会从 to-flink 这个主题中读取我们提前准备好的“水果列表”测试数据。然后创建了一个 DataStream 来完成 WordCount 的计算工作并且将结果 sink 到 AutoMQ 的主题 from-flink 中。

/*
 * Licensed to the Apache Software Foundation (ASF) under one or more
 * contributor license agreements.  See the NOTICE file distributed with
 * this work for additional information regarding copyright ownership.
 * The ASF licenses this file to You under the Apache License, Version 2.0
 * (the "License"); you may not use this file except in compliance with
 * the License.  You may obtain a copy of the License at
 *
 *     http://www.apache.org/licenses/LICENSE-2.0
 *
 * Unless required by applicable law or agreed to in writing, software
 * distributed under the License is distributed on an "AS IS" BASIS,
 * WITHOUT WARRANTIES OR CONDITIONS OF ANY KIND, either express or implied.
 * See the License for the specific language governing permissions and
 * limitations under the License.
 */

package com.automq.example.flink.WordCount;

import org.apache.flink.api.common.eventtime.WatermarkStrategy;
import org.apache.flink.api.common.functions.FlatMapFunction;
import org.apache.flink.api.common.serialization.SimpleStringSchema;
import org.apache.flink.api.java.tuple.Tuple2;
import org.apache.flink.connector.kafka.sink.KafkaRecordSerializationSchema;
import org.apache.flink.connector.kafka.sink.KafkaSink;
import org.apache.flink.connector.kafka.source.KafkaSource;
import org.apache.flink.connector.kafka.source.enumerator.initializer.OffsetsInitializer;
import org.apache.flink.streaming.api.datastream.DataStream;
import org.apache.flink.streaming.api.environment.StreamExecutionEnvironment;
import org.apache.flink.util.Collector;

/**
 * This is a re-write of the Apache Flink WordCount example using Kafka connectors.
 * Find the reference example at https://github.com/redpanda-data/flink-kafka-examples/blob/main/src/main/java/io/redpanda/examples/WordCount.java
 */
public class WordCount {
    
    final static String TO_FLINK_TOPIC_NAME = "to-flink";
    final static String FROM_FLINK_TOPIC_NAME = "from-flink";
    final static String FLINK_JOB_NAME = "WordCount";
    
    public static void main(String[] args) throws Exception {
        // Use your AutoMQ cluster's bootstrap servers here
        final String bootstrapServers = args.length > 0 ? args[0] : "localhost:9094";
        
        // Set up the streaming execution environment
        final StreamExecutionEnvironment env = StreamExecutionEnvironment.getExecutionEnvironment();
        
        KafkaSource<String> source = KafkaSource.<String>builder()
                .setBootstrapServers(bootstrapServers)
                .setTopics(TO_FLINK_TOPIC_NAME)
                .setGroupId("automq-example-group")
                .setStartingOffsets(OffsetsInitializer.earliest())
                .setValueOnlyDeserializer(new SimpleStringSchema())
                .build();
        
        KafkaRecordSerializationSchema<String> serializer = KafkaRecordSerializationSchema.builder()
                .setValueSerializationSchema(new SimpleStringSchema())
                .setTopic(FROM_FLINK_TOPIC_NAME)
                .build();
        
        KafkaSink<String> sink = KafkaSink.<String>builder()
                .setBootstrapServers(bootstrapServers)
                .setRecordSerializer(serializer)
                .build();
        
        DataStream<String> text = env.fromSource(source, WatermarkStrategy.noWatermarks(), "AutoMQ Source");
        
        // Split up the lines in pairs (2-tuples) containing: (word,1)
        DataStream<String> counts = text.flatMap(new Tokenizer())
                // Group by the tuple field "0" and sum up tuple field "1"
                .keyBy(value -> value.f0)
                .sum(1)
                .flatMap(new Reducer());
        
        // Add the sink to so results
        // are written to the outputTopic
        counts.sinkTo(sink);
        
        // Execute program
        env.execute(FLINK_JOB_NAME);
    }
    
    /**
     * Implements the string tokenizer that splits sentences into words as a user-defined
     * FlatMapFunction. The function takes a line (String) and splits it into multiple pairs in the
     * form of "(word,1)" ({@code Tuple2<String, Integer>}).
     */
    public static final class Tokenizer
            implements
                FlatMapFunction<String, Tuple2<String, Integer>> {
        
        @Override
        public void flatMap(String value, Collector<Tuple2<String, Integer>> out) {
            // Normalize and split the line
            String[] tokens = value.toLowerCase().split("\\W+");
            
            // Emit the pairs
            for (String token : tokens) {
                if (token.length() > 0) {
                    out.collect(new Tuple2<>(token, 1));
                }
            }
        }
    }
    
    // Implements a simple reducer using FlatMap to
    // reduce the Tuple2 into a single string for
    // writing to kafka topics
    public static final class Reducer
            implements
                FlatMapFunction<Tuple2<String, Integer>, String> {
        
        @Override
        public void flatMap(Tuple2<String, Integer> value, Collector<String> out) {
            // Convert the pairs to a string
            // for easy writing to Kafka Topic
            String count = value.f0 + " " + value.f1;
            out.collect(count);
        }
    }
}
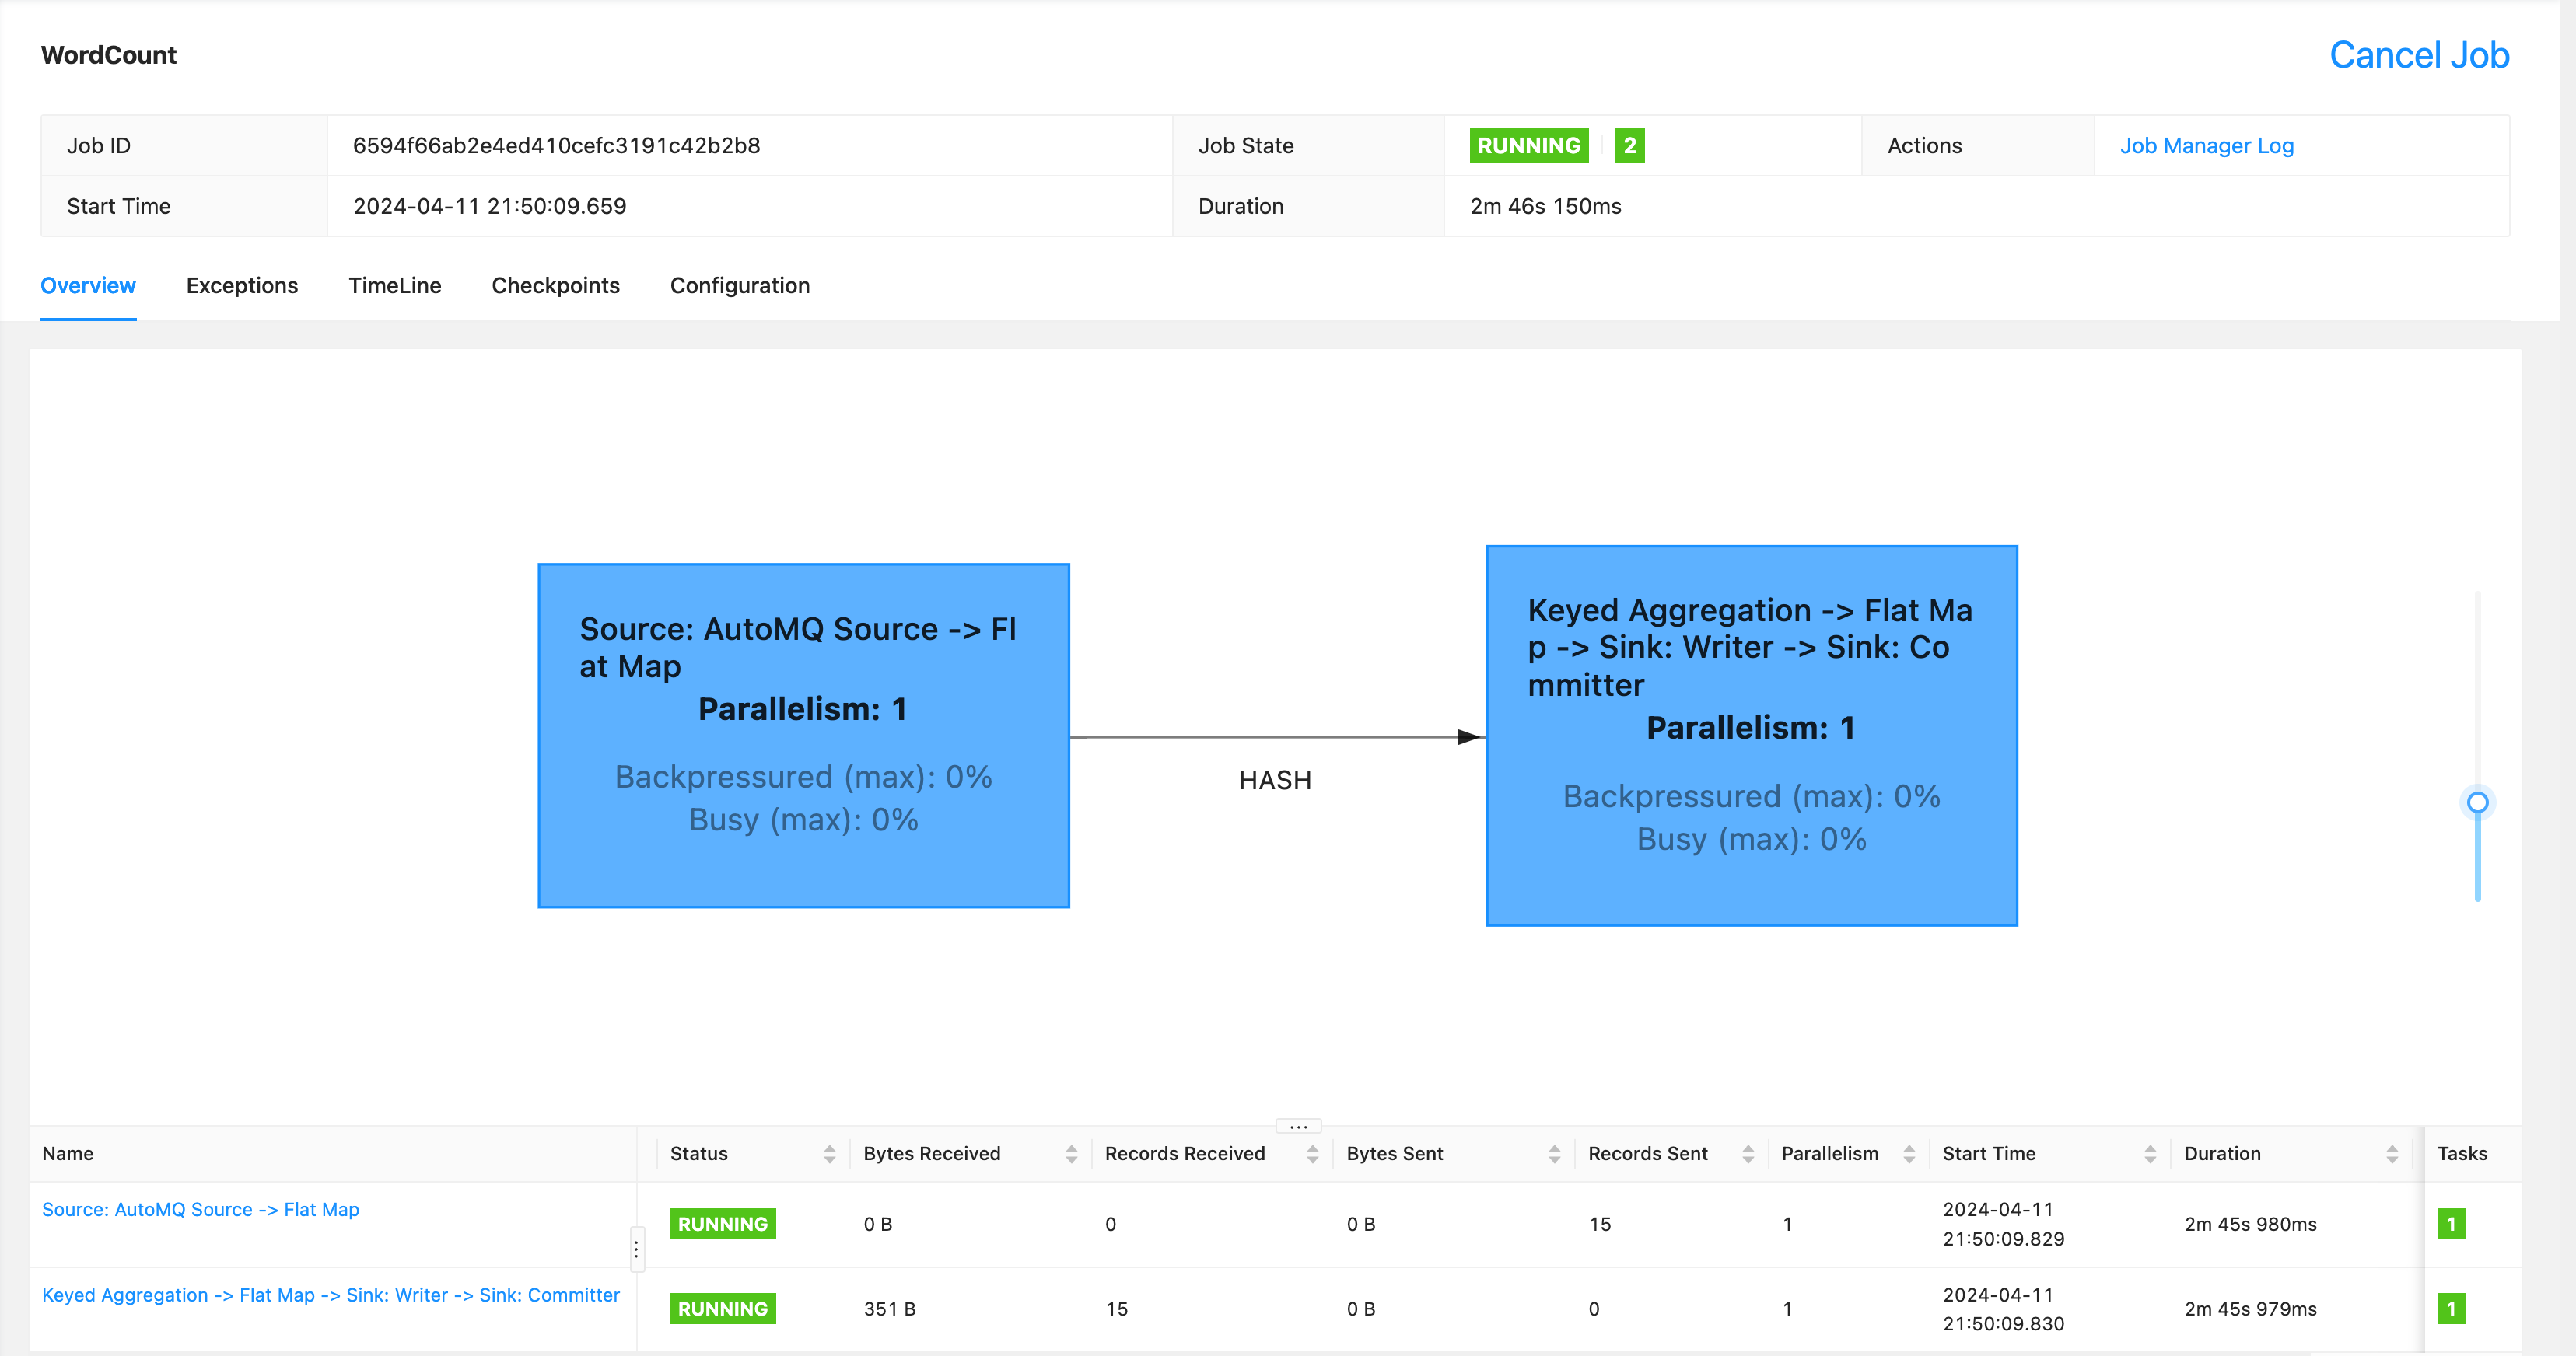
以下代码通过 mvn build 以后会生成一个 automq-wordcount-flink-job.jar 也就是我们需要提交给 Flink 的 job 了。 执行如下命令提交任务 jar 给 flink,通过控制台我们可以看到 15 条数据已经被接受处理。

./bin/flink run automq-wordcount-flink-job.jar

检验分析结果

使用 AutoMQ 解压后的 Kafka bin 工具从 from-flink 中消费数据,查看结果:

bin/kafka-console-consumer.sh --topic from-flink --from-beginning --bootstrap-server localhost:9094

可以看到输出的结果如下。因为是按照流式处理,并且没有设置水位和窗口计算,所以整个 word count 每一次的计算结果都打印出来了。

apple 1
apple 2
banana 1
banana 2
banana 3
cherry 1
cherry 2
pear 1
pear 2
pear 3
lemon 1
lemon 2
mango 1
mango 2
mango 3

我们接着再往 to-flink 主题写 5 条数据,观察流处理的结果:

bin/kafka-console-producer.sh --topic to-flink --bootstrap-server localhost:9094

写入的数据为

apple
banana
cherry
pear
lemon

然后我们可以看到刚才消费 from-flink 的主题输入了以下正确的 word count 结果

apple 3
banana 4
cherry 3
pear 4
lemon 3

在控制台上我们也可以看到有 20 条数据被正确接受和处理:

总结

本文演示了 AutoMQ 是如何集成 Flink 来完成一个 Word Count 的分析流程。关于 Kafka Connector 的更多配置和使用可以参考 Flink 官方文档 Apache Kafka Connector