Deploy to Tencent Cloud TKE
Refer to Overview▸, AutoMQ supports deployment on Kubernetes. This article details the installation process for deploying AutoMQ via Tencent Cloud's TKE platform.
In this article, references to AutoMQ product service provider, AutoMQ service provider, and AutoMQ specifically refer to AutoMQ HK Limited and its affiliates.
Operating Procedures
Step 1: Install the Environment Console
Refer to Overview▸, AutoMQ can be deployed on TKE clusters. For TKE deployment, it is necessary to first install the AutoMQ console and then manage TKE using the console interface to deploy the cluster on TKE.
Tencent Cloud supports installation environments through cloud application consoles. See Install Env via Tencent Marketplace▸.
After the AutoMQ console is installed, you need to obtain the environment console address, initial username, and password from the console interface.
Note:
Deploying the AutoMQ data-plane cluster requires downloading Docker images and Helm Chart artifacts from the public network. Thus, it needs VPC environment support to access the public network via SNAT or other methods. Instructions for configuring public SNAT are available in the appendix of this document Install Env via Tencent Marketplace▸.
Step 2: Create a CAM Role
AutoMQ data plane clusters require a separate node pool, which needs to bind an independent CAM role for access to cloud resource permissions verification. Therefore, before creating the TKE cluster, you need to go to the CAM console to create a custom role. The steps are as follows:
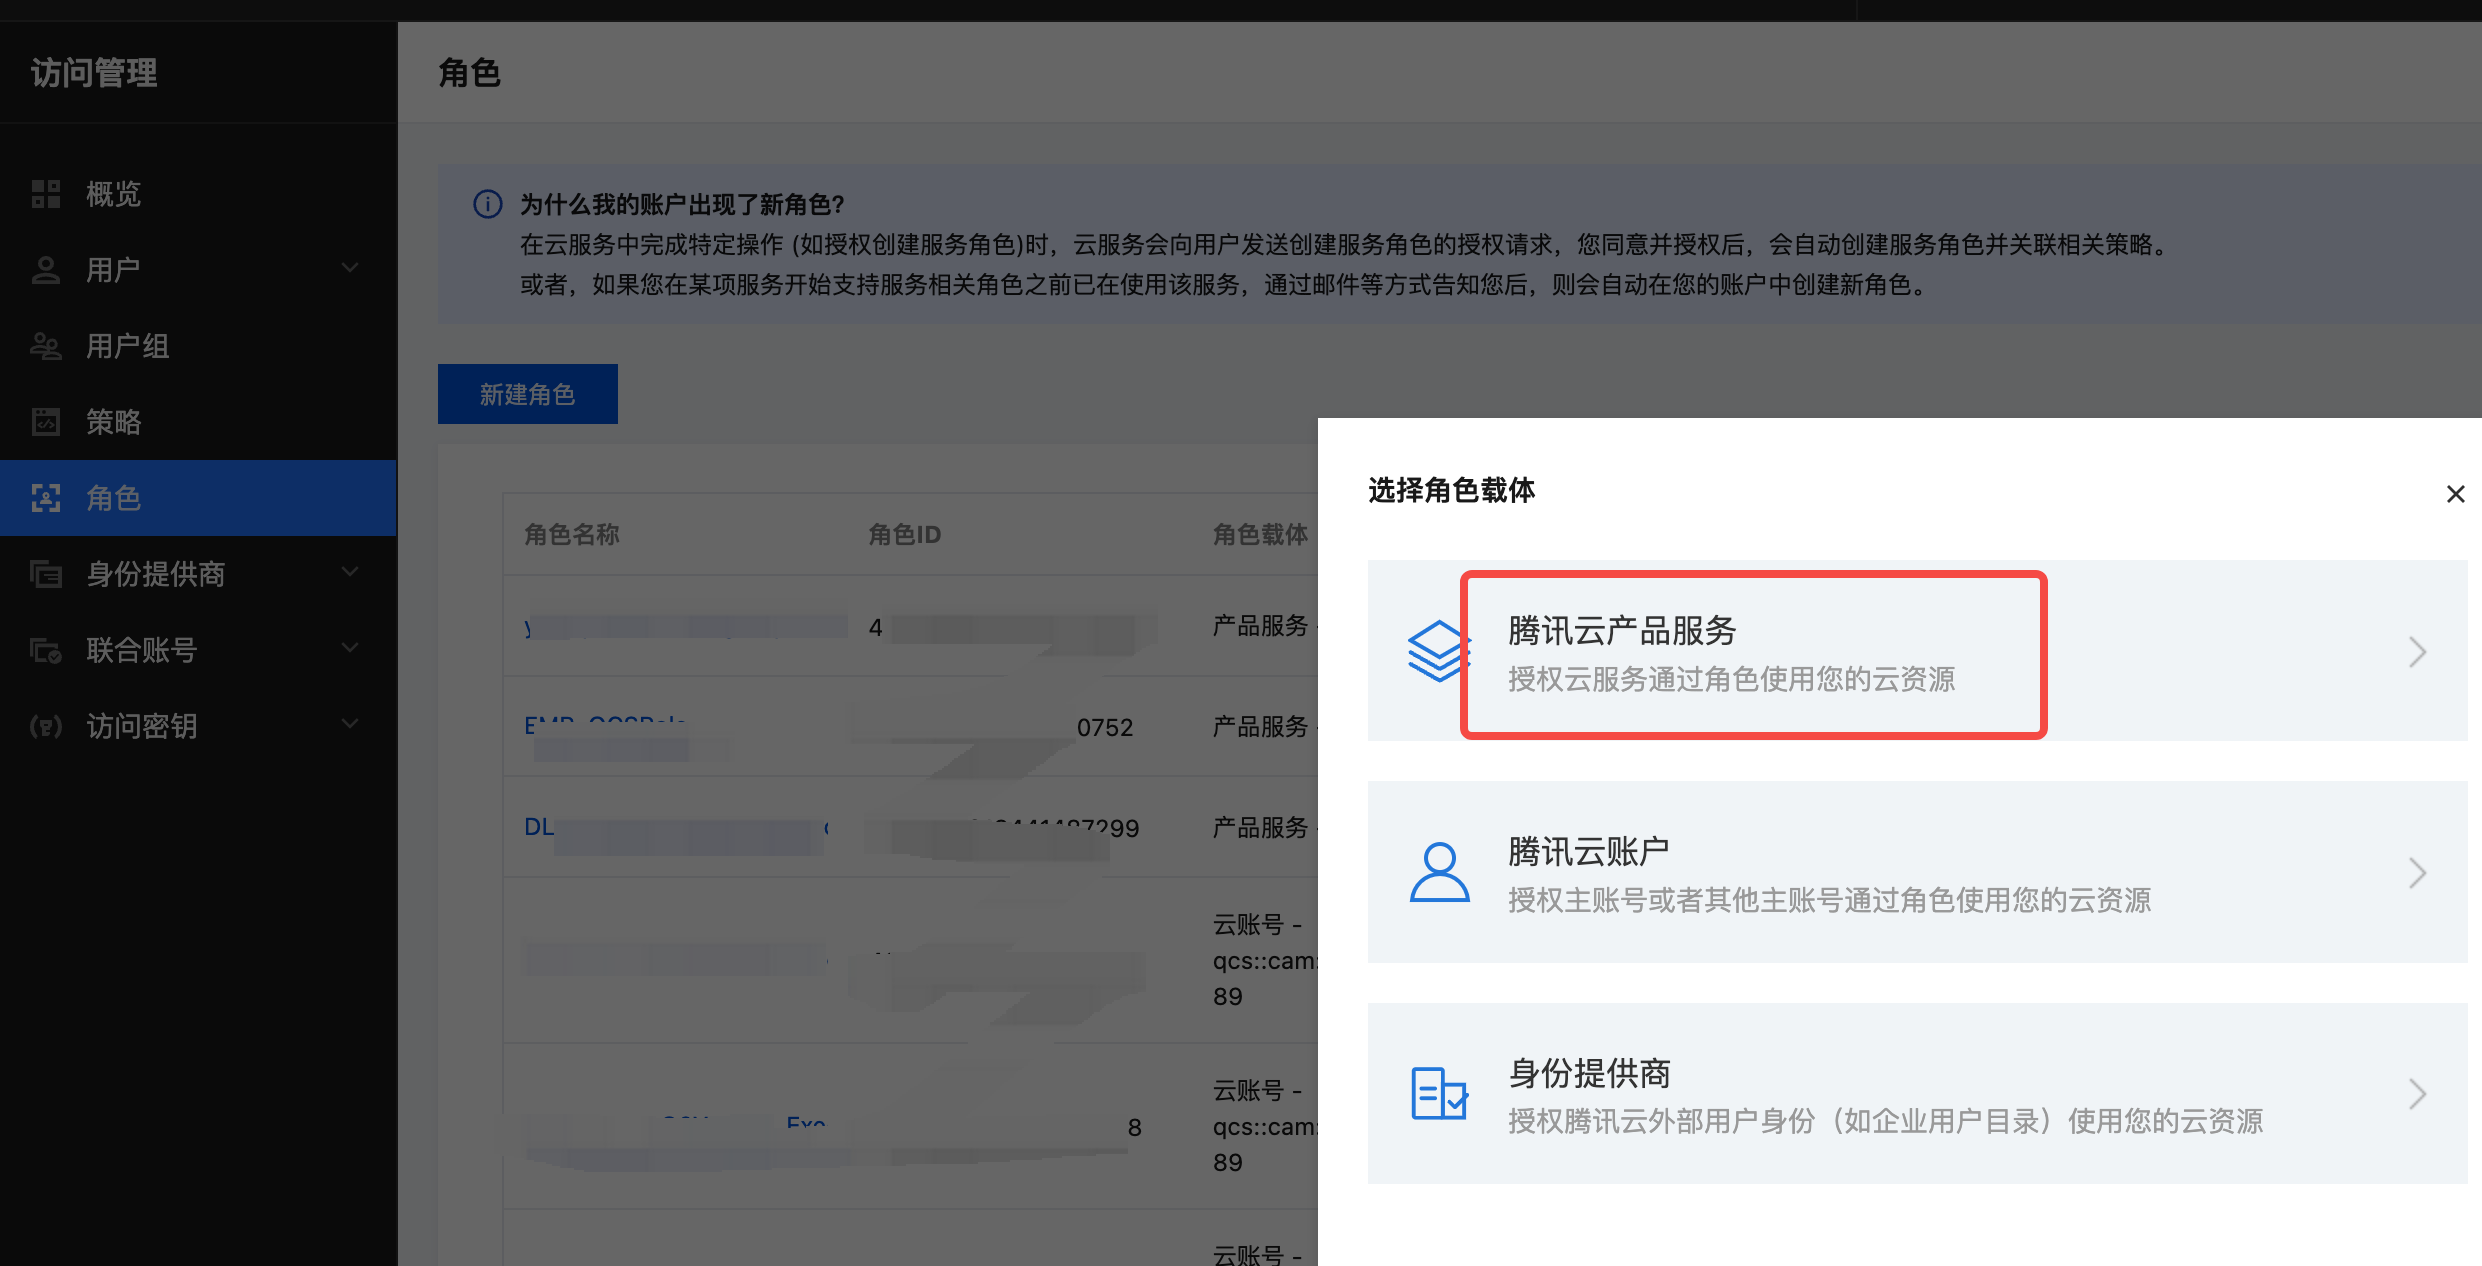
- Go to the CAM Console, click on roles, Create role, select Tencent Cloud Product Service.
- Select the product service Cloud Virtual Machine (CVM).
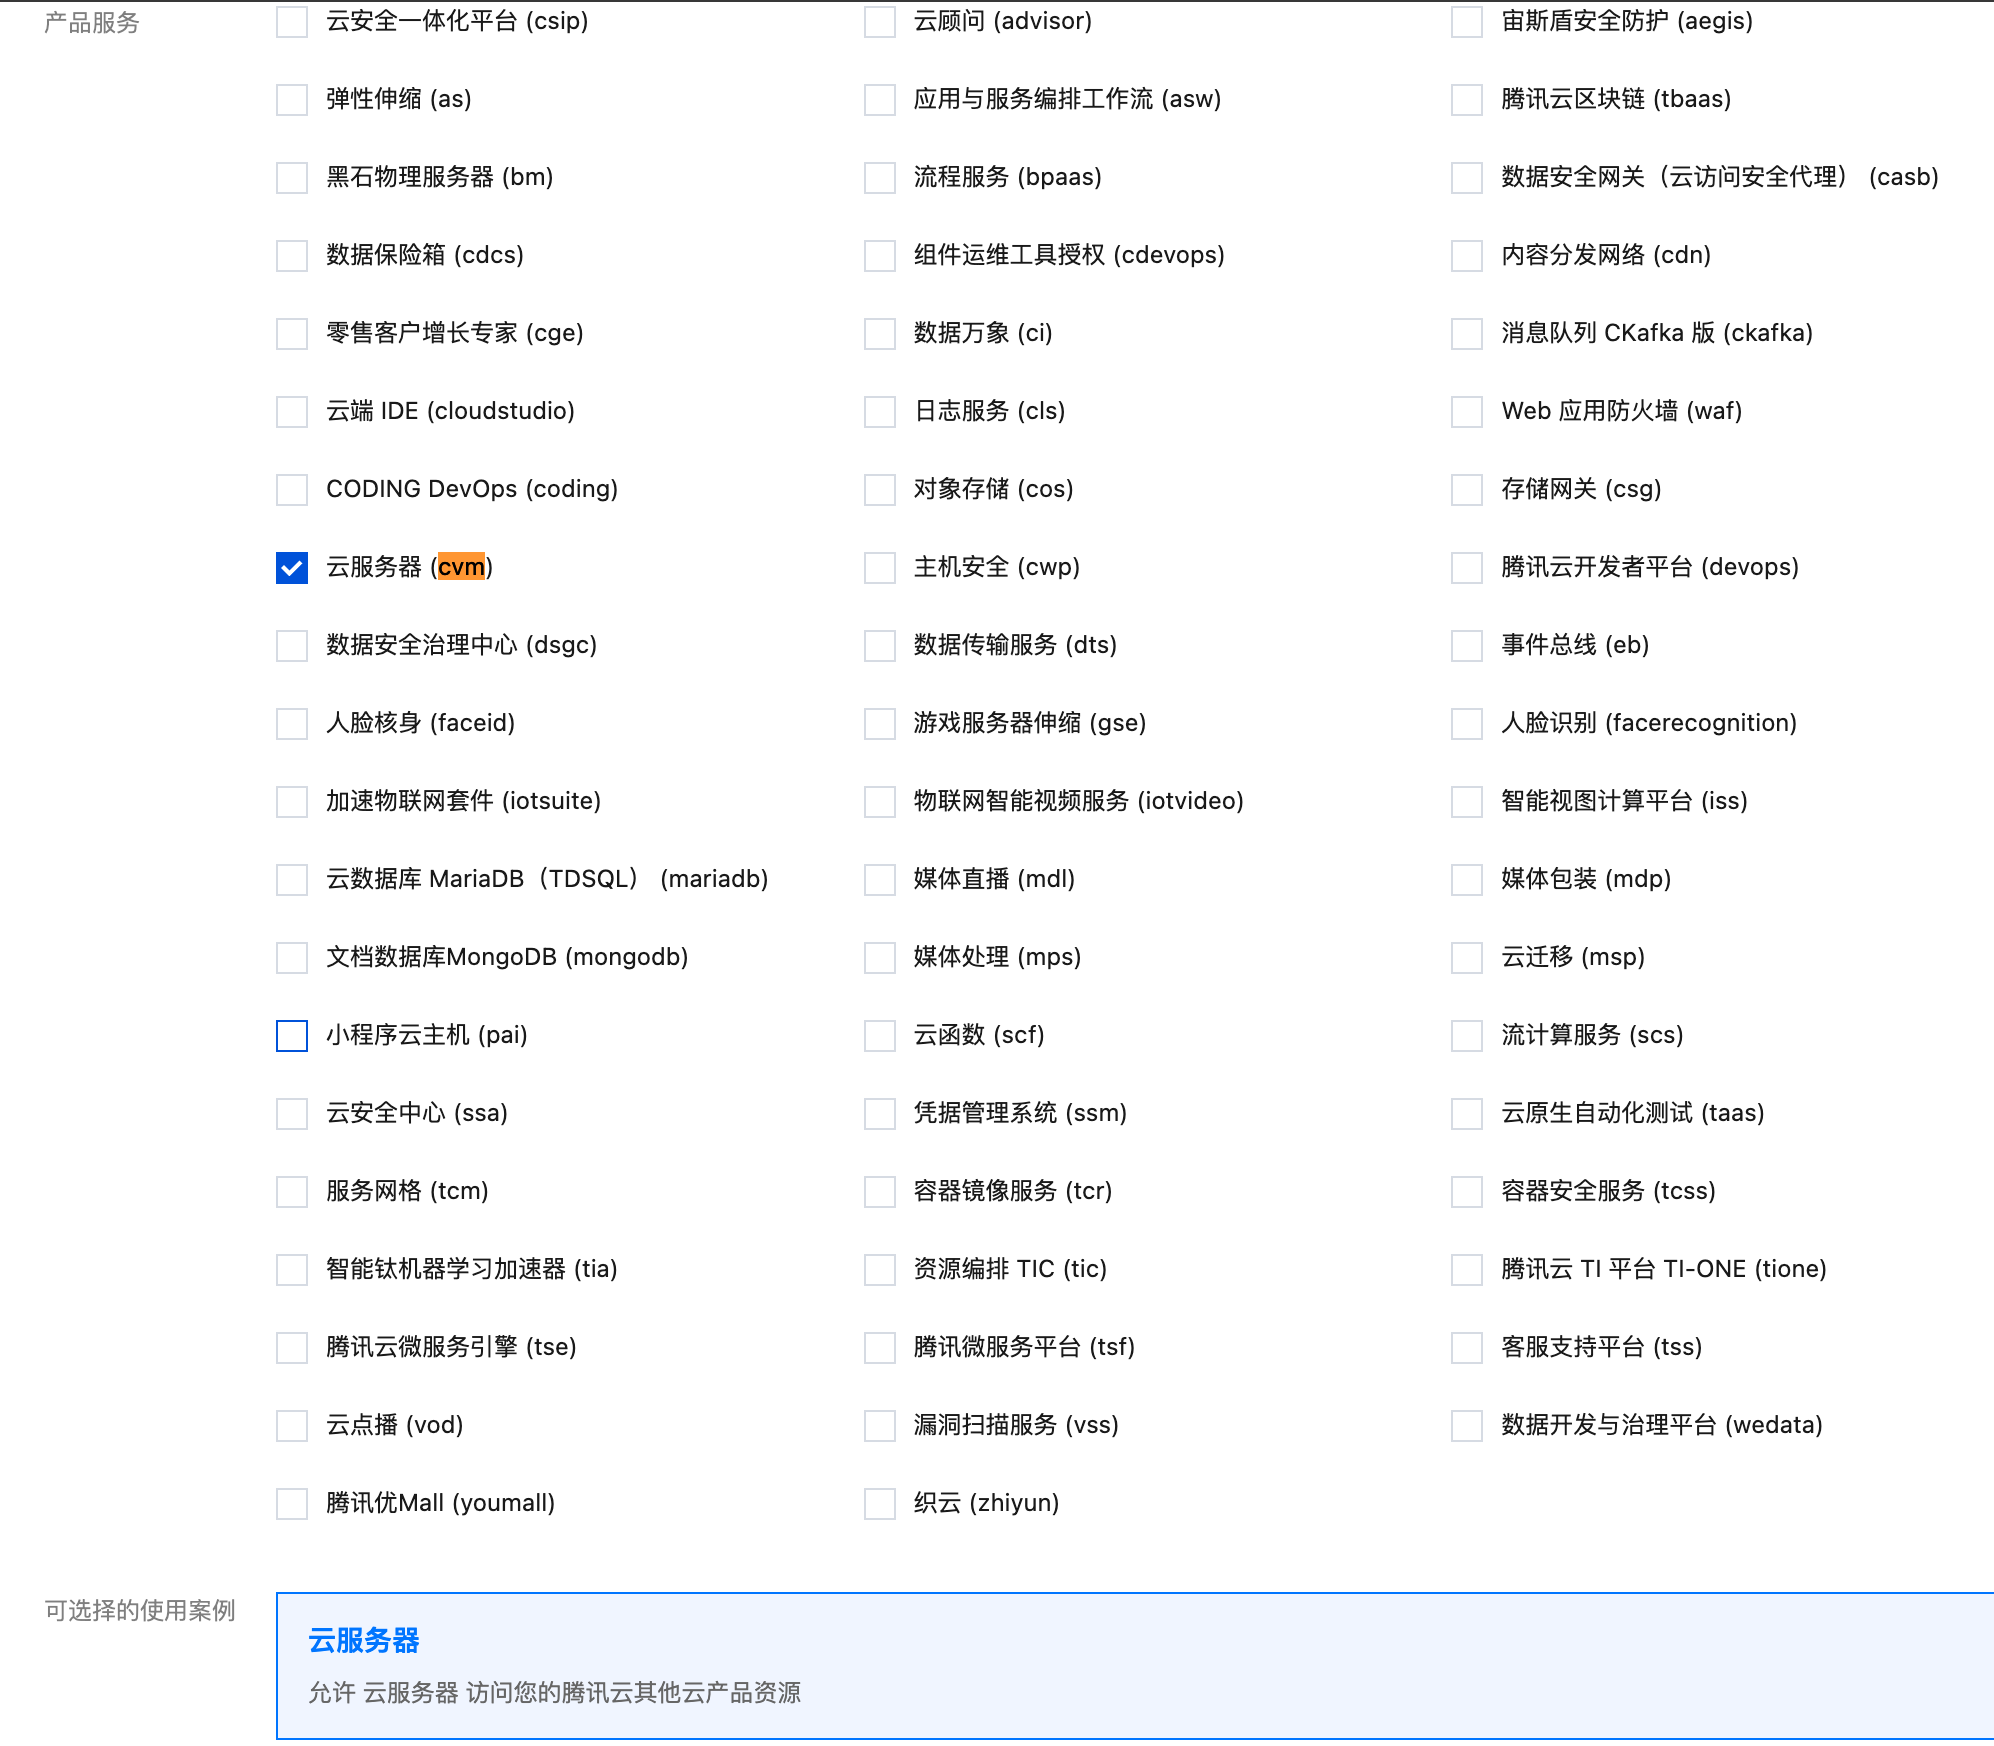
- Enter a custom role name, click complete, and create the custom role. Record the role name, as it will be needed in step 4 when configuring the TKE dedicated node pool with the role name.
Step 3: Create TKE Cluster
Refer to Overview▸, users must pre-create dedicated TKE clusters assigned for AutoMQ usage. Users can go to the Tencent Cloud TKE product console and follow the steps provided below.
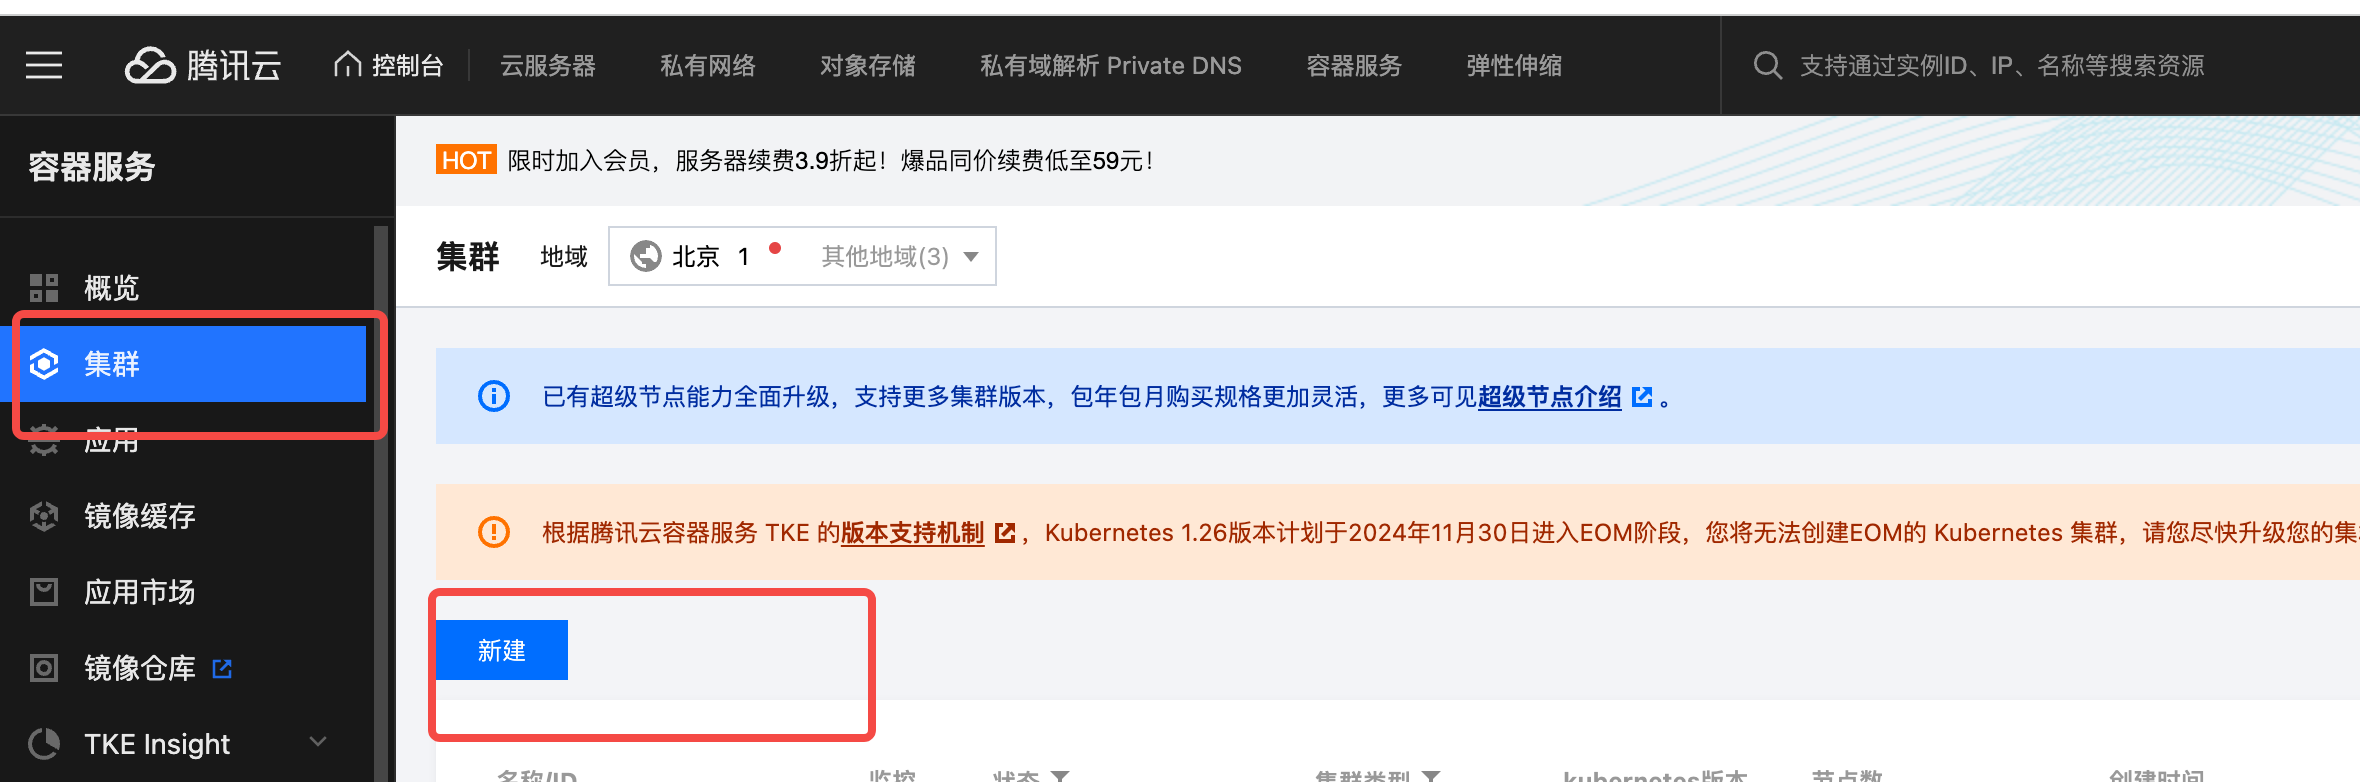
- Log in to the Tencent Cloud TKE Console. Click Create Cluster.
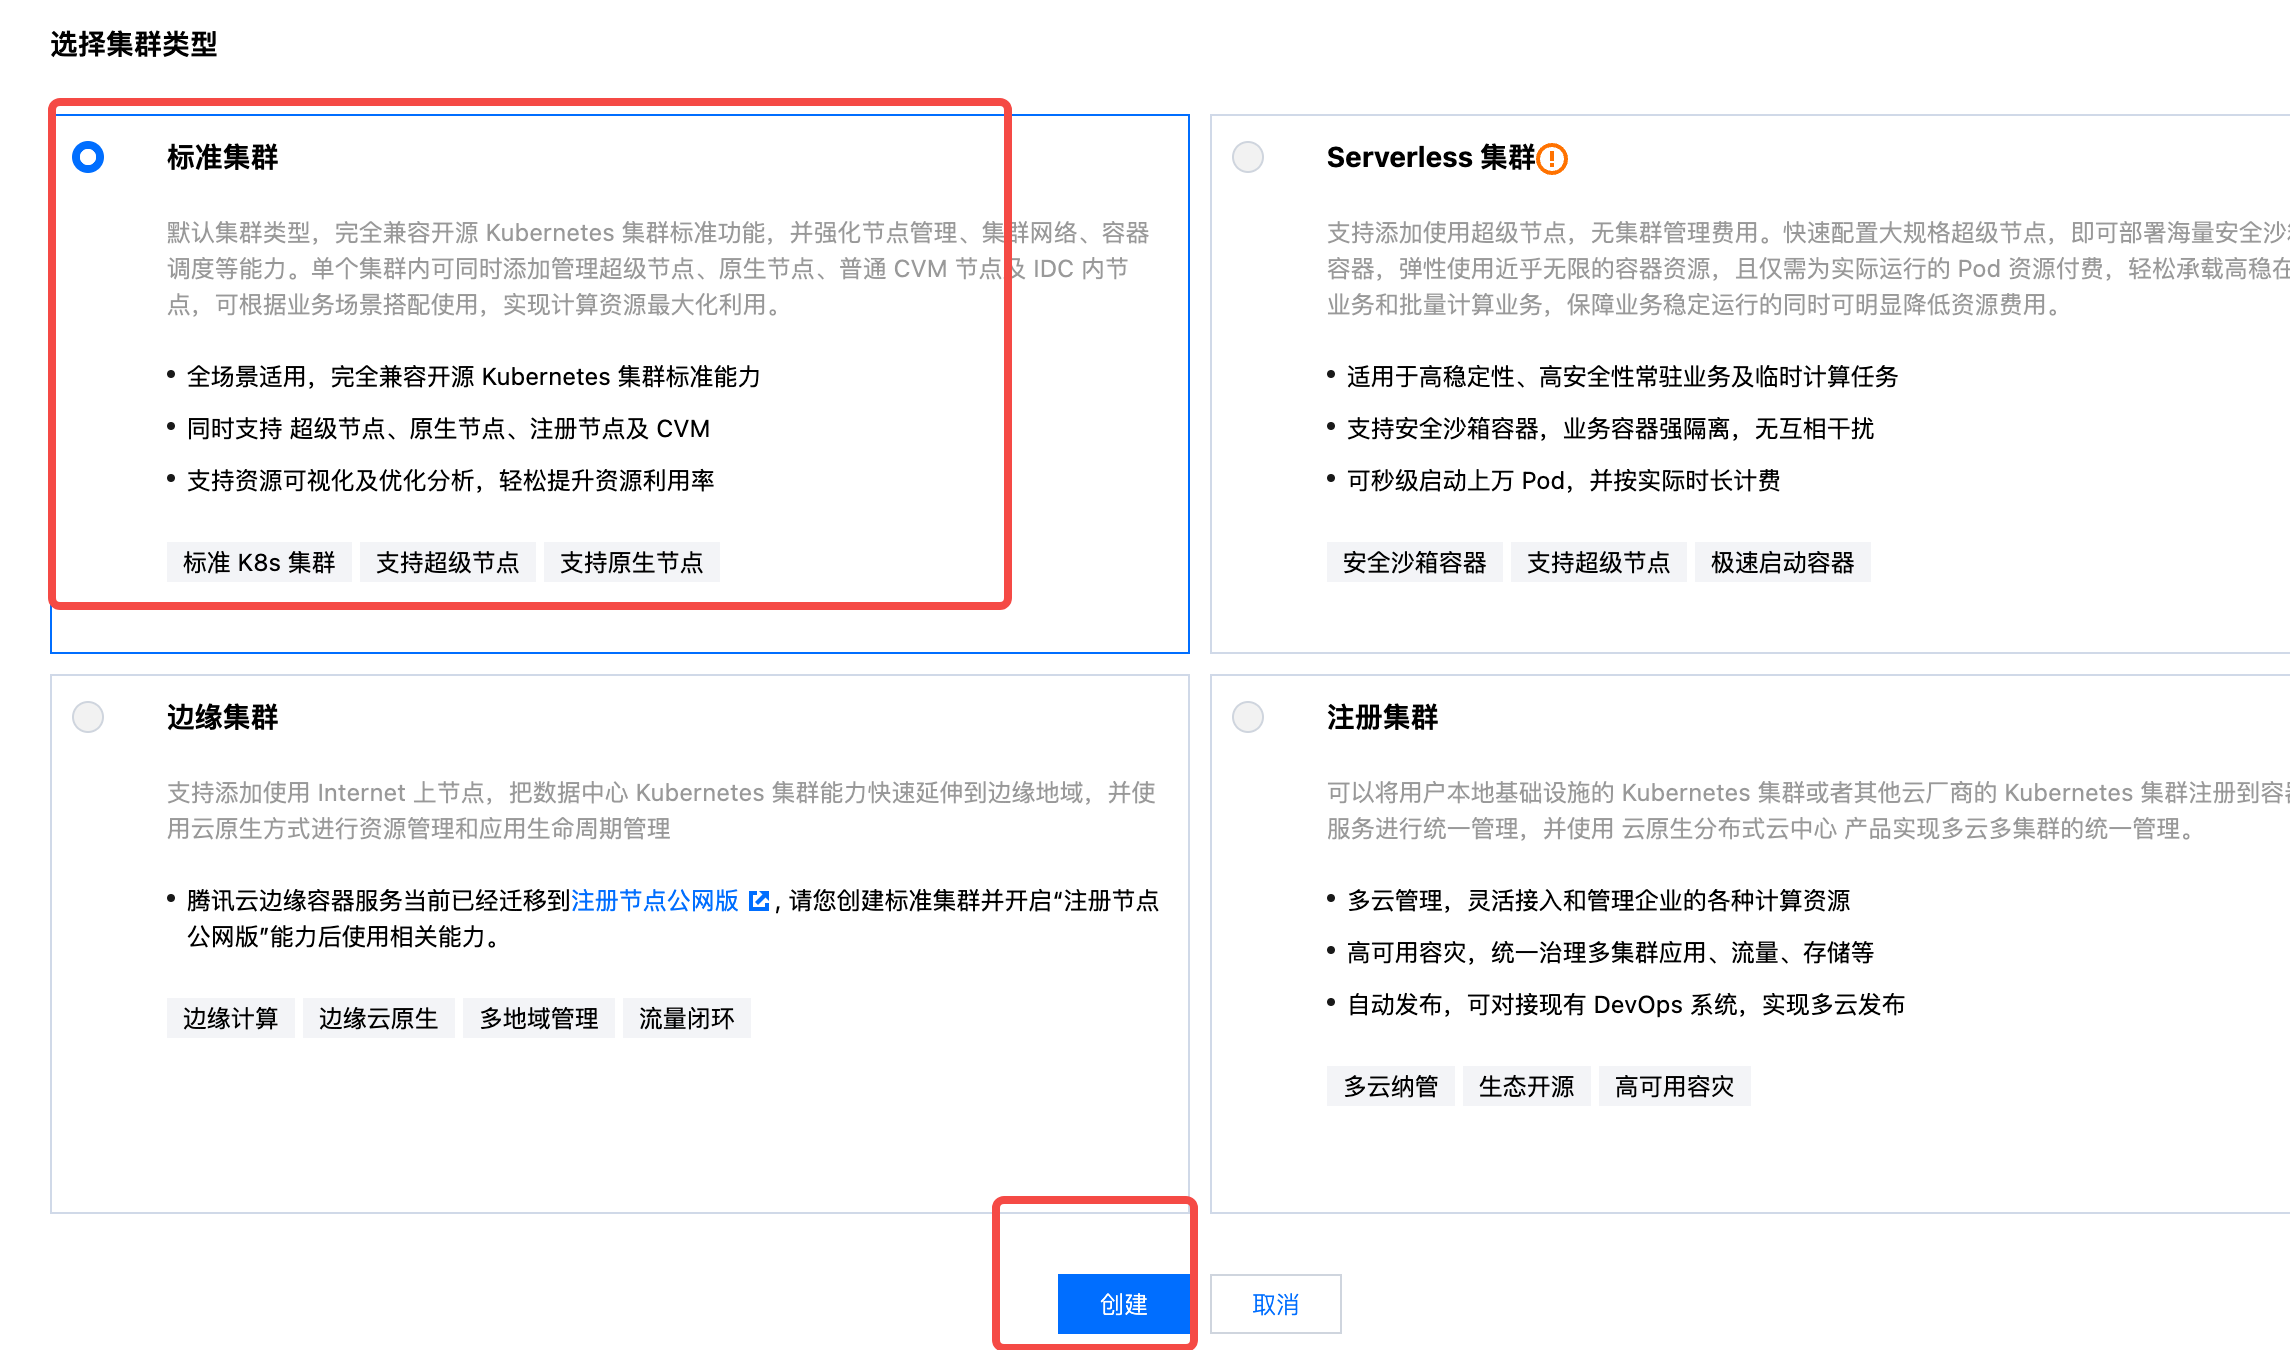
- Select the cluster type as Standard Cluster.
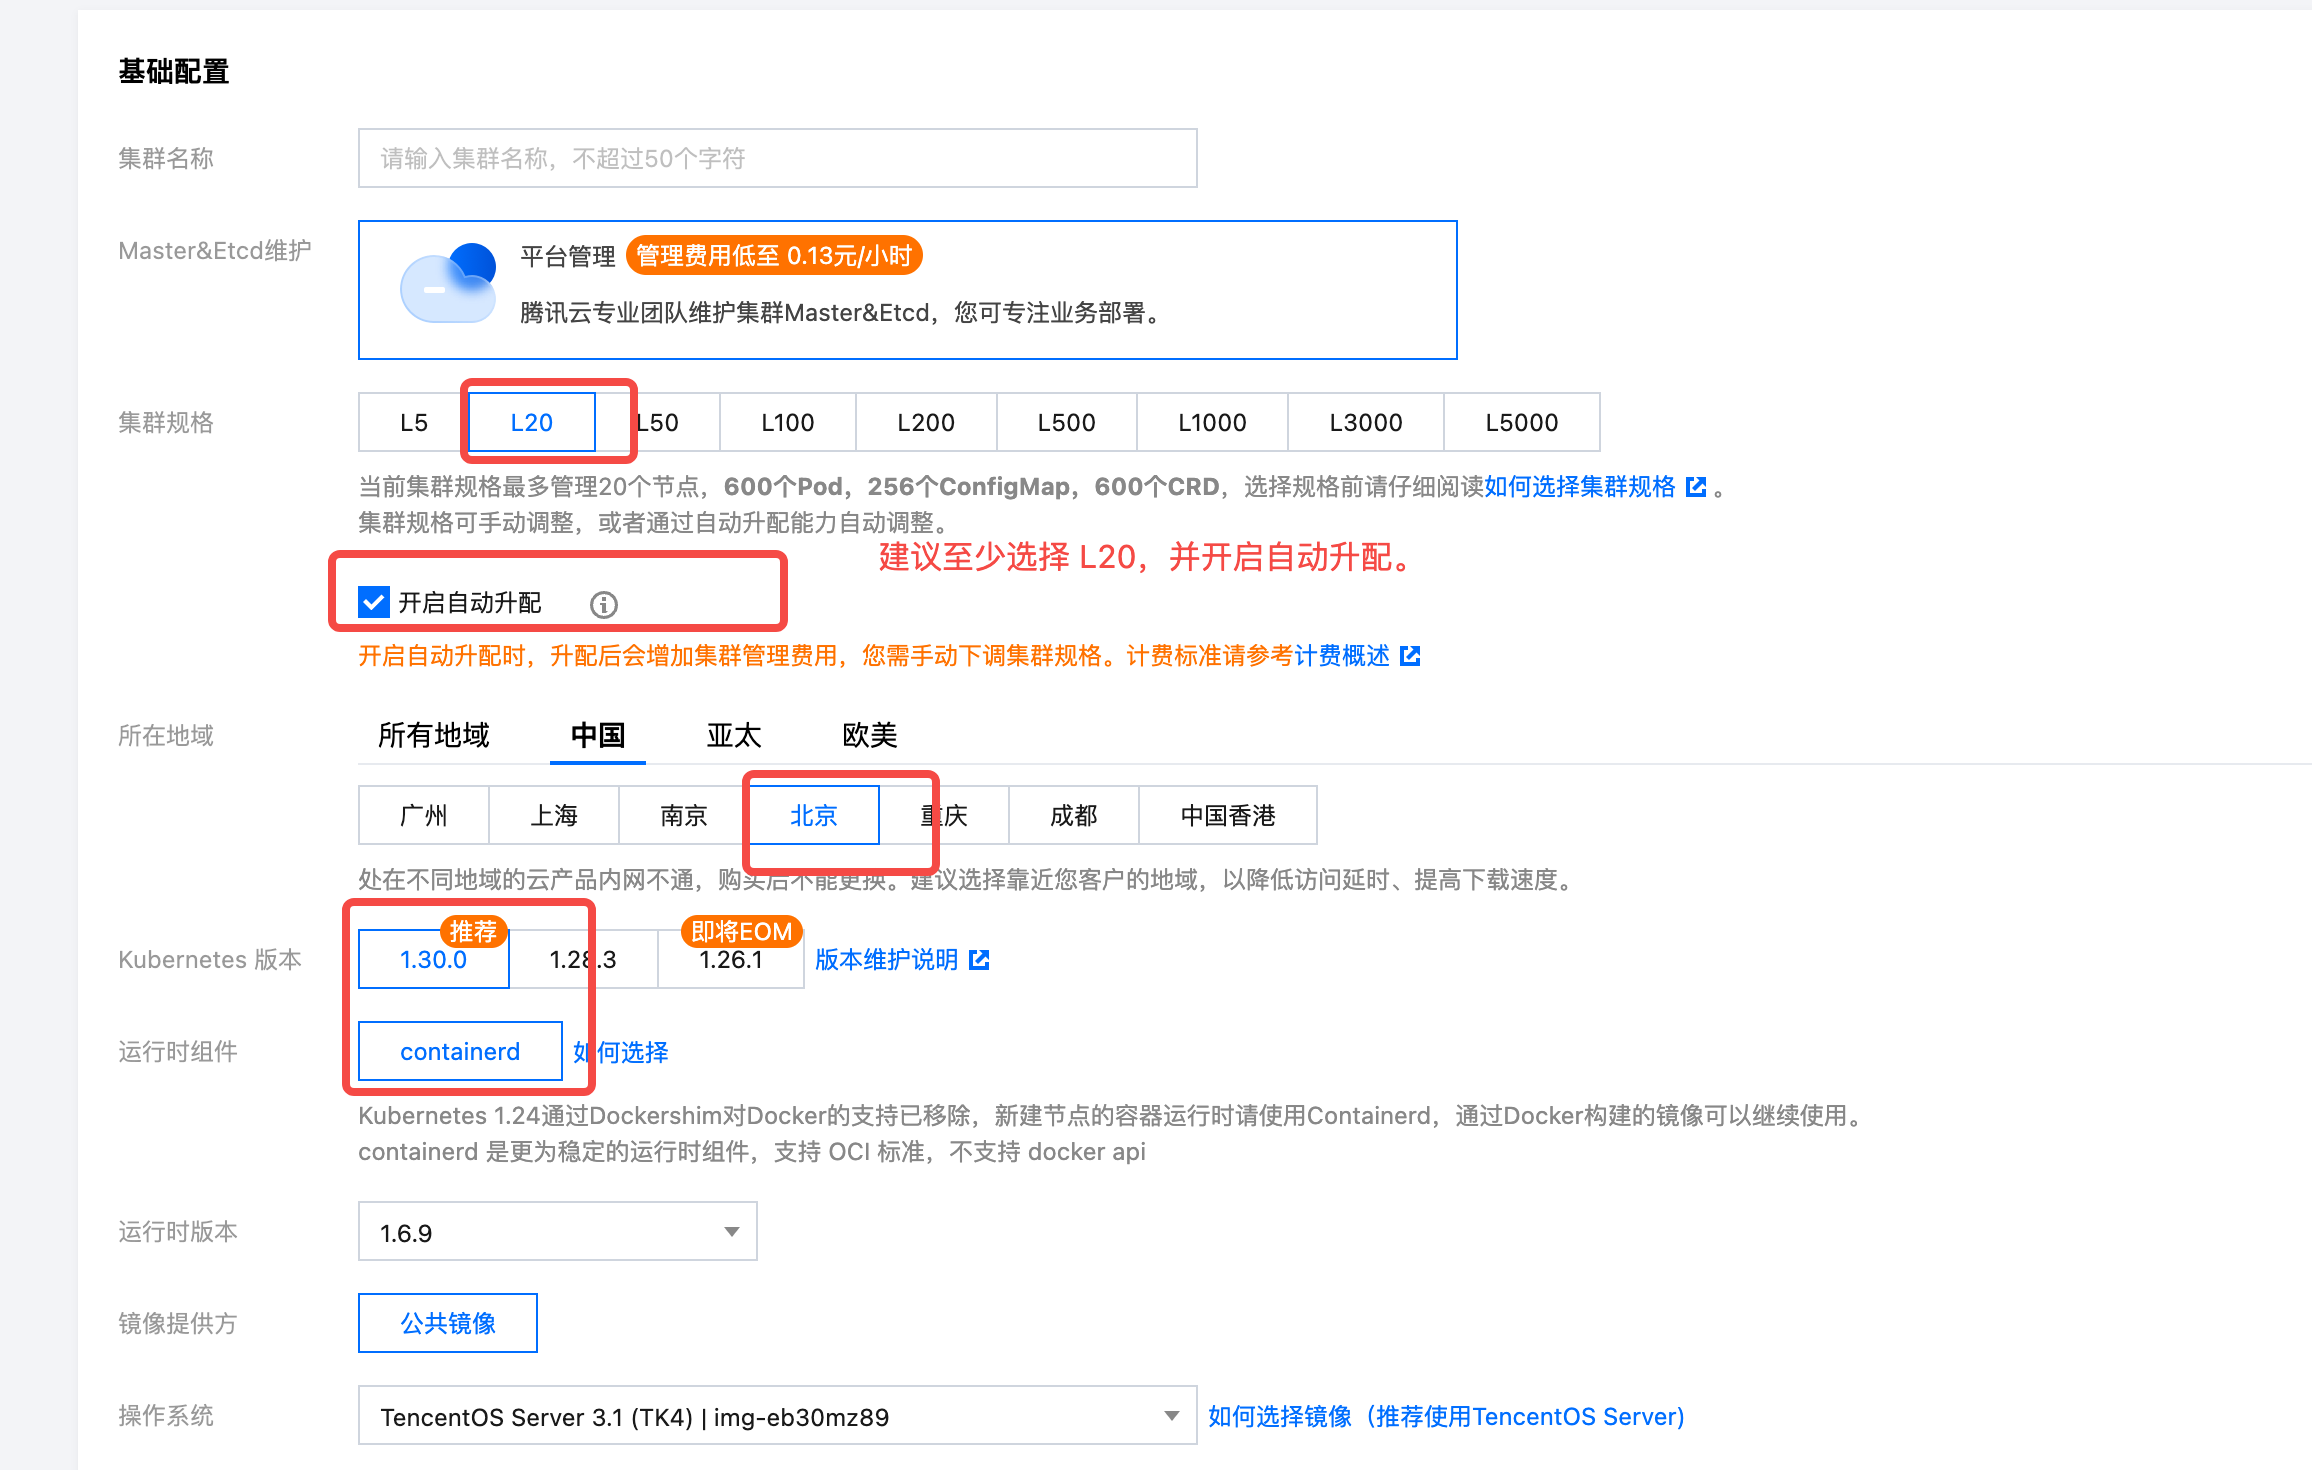
- Fill in the basic configuration. Pay attention to the cluster specifications and other information. It is recommended to select at least L20 and enable automatic scaling. Keep other parameters at their default values.
It is recommended to select at least L20 to manage around 20 nodes and enable automatic scaling. This prevents issues with TKE capacity limitations affecting scaling operations.
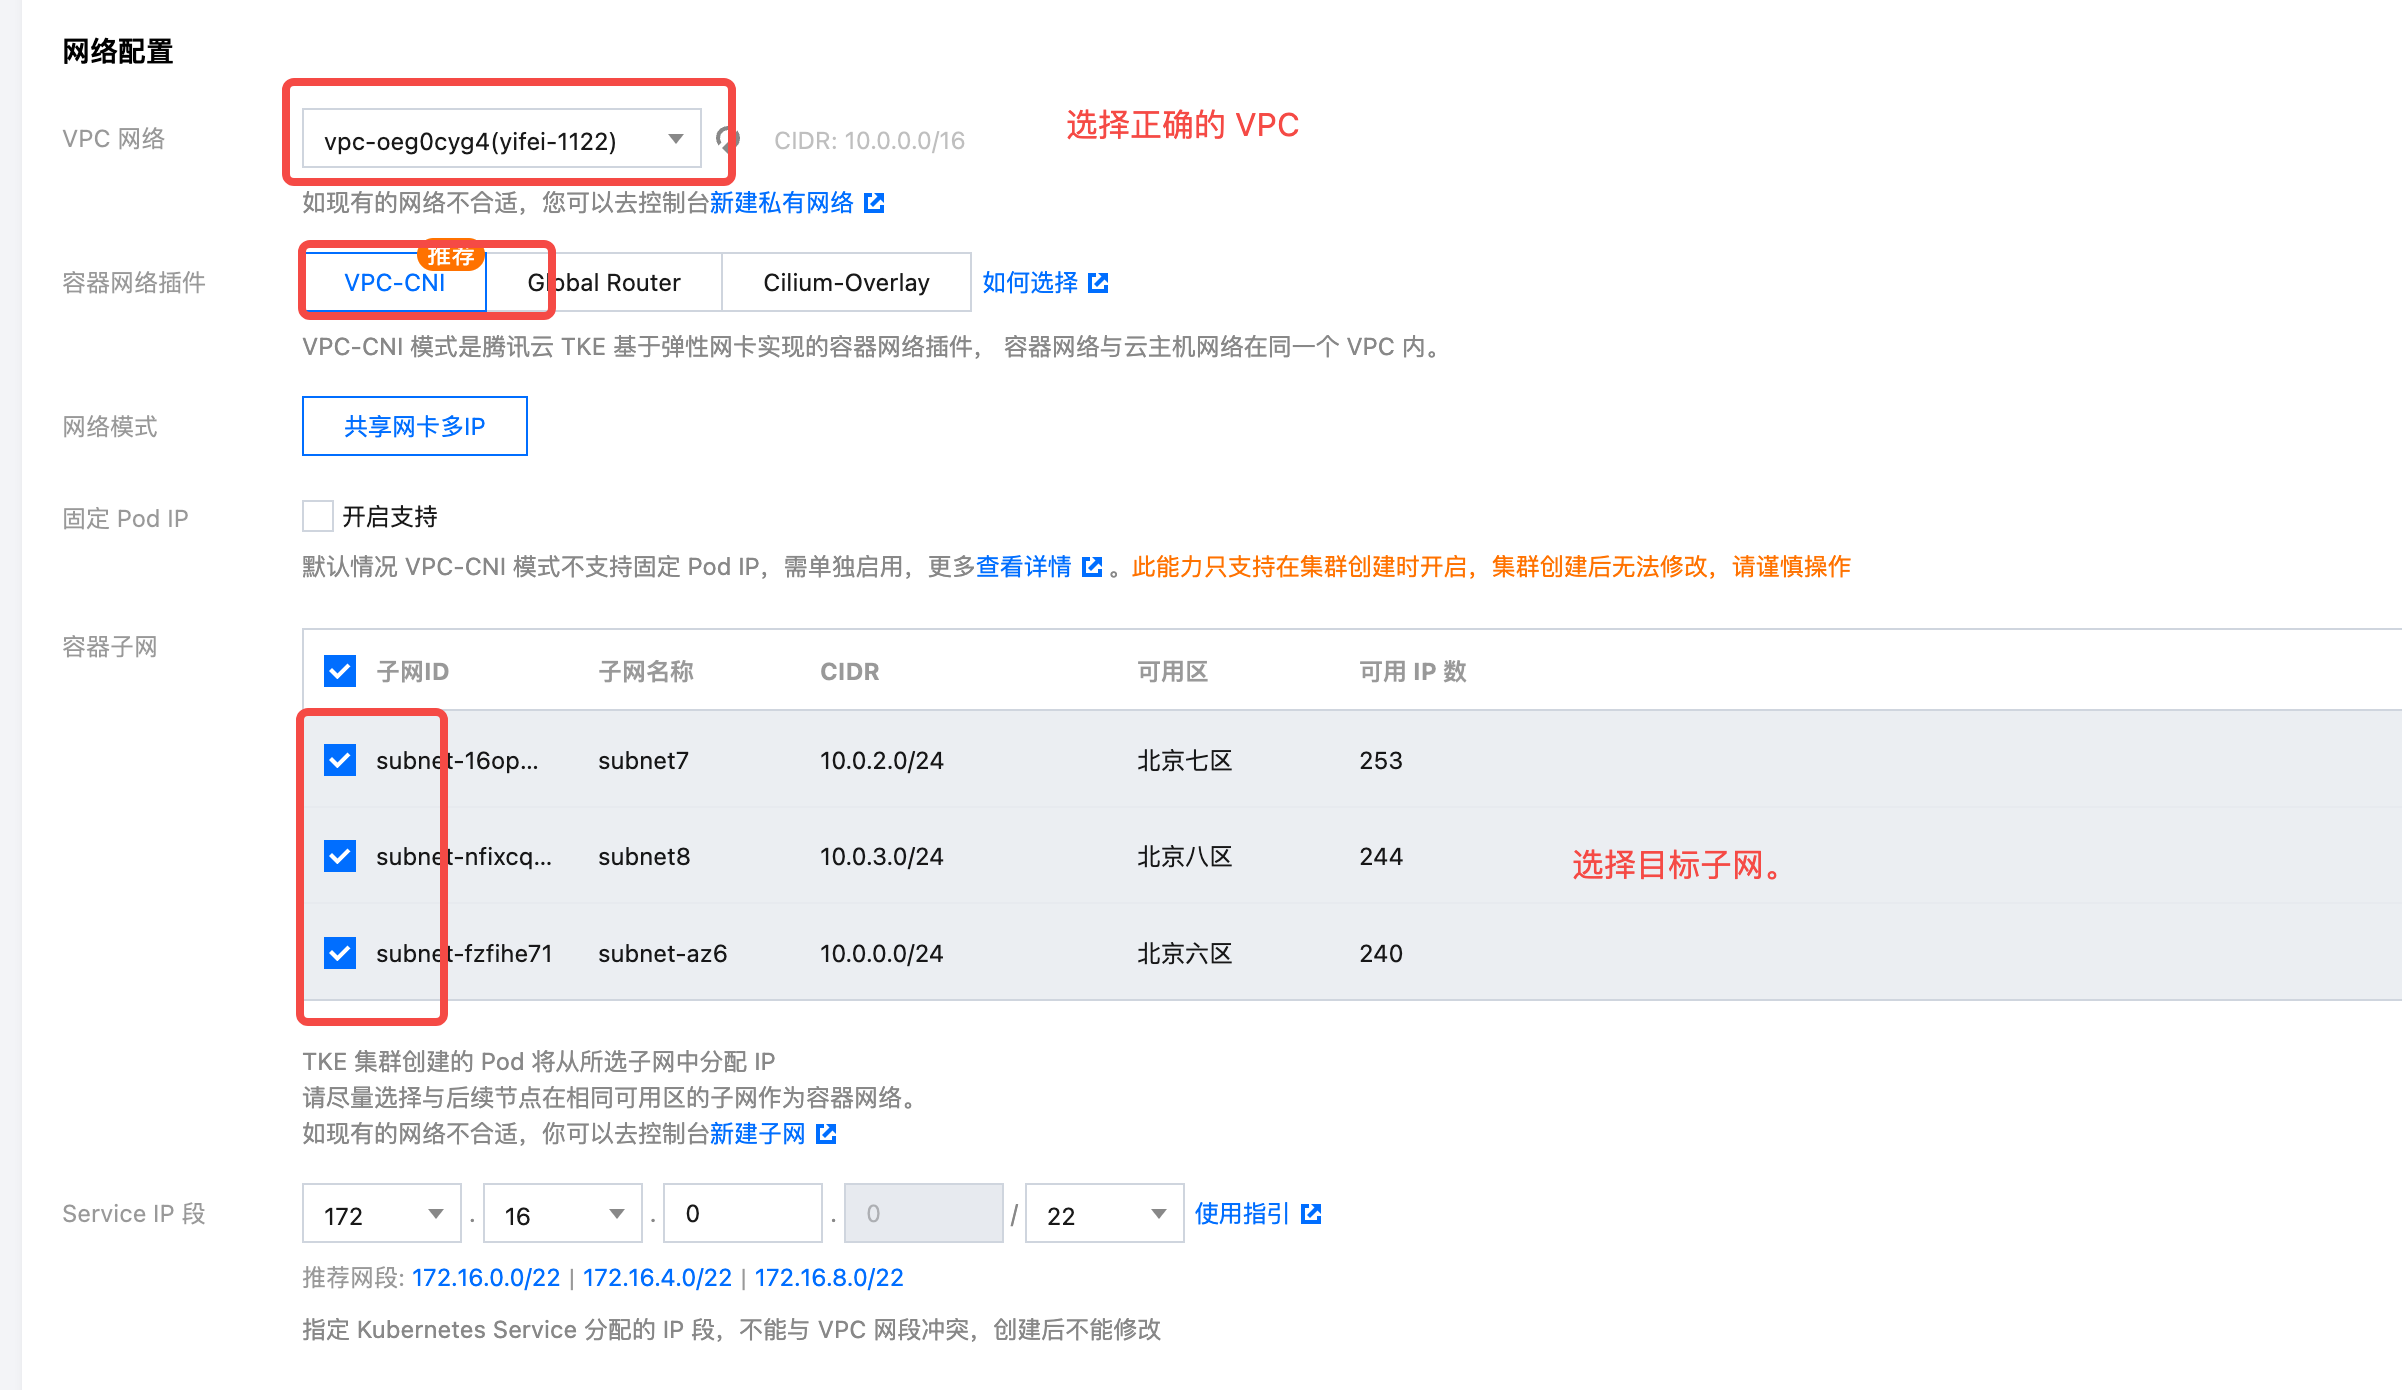
- Fill in network configuration. Select the correct VPC, choose the recommended VPC-CNI as the network plugin, and select the container subnets for all required availability zones.
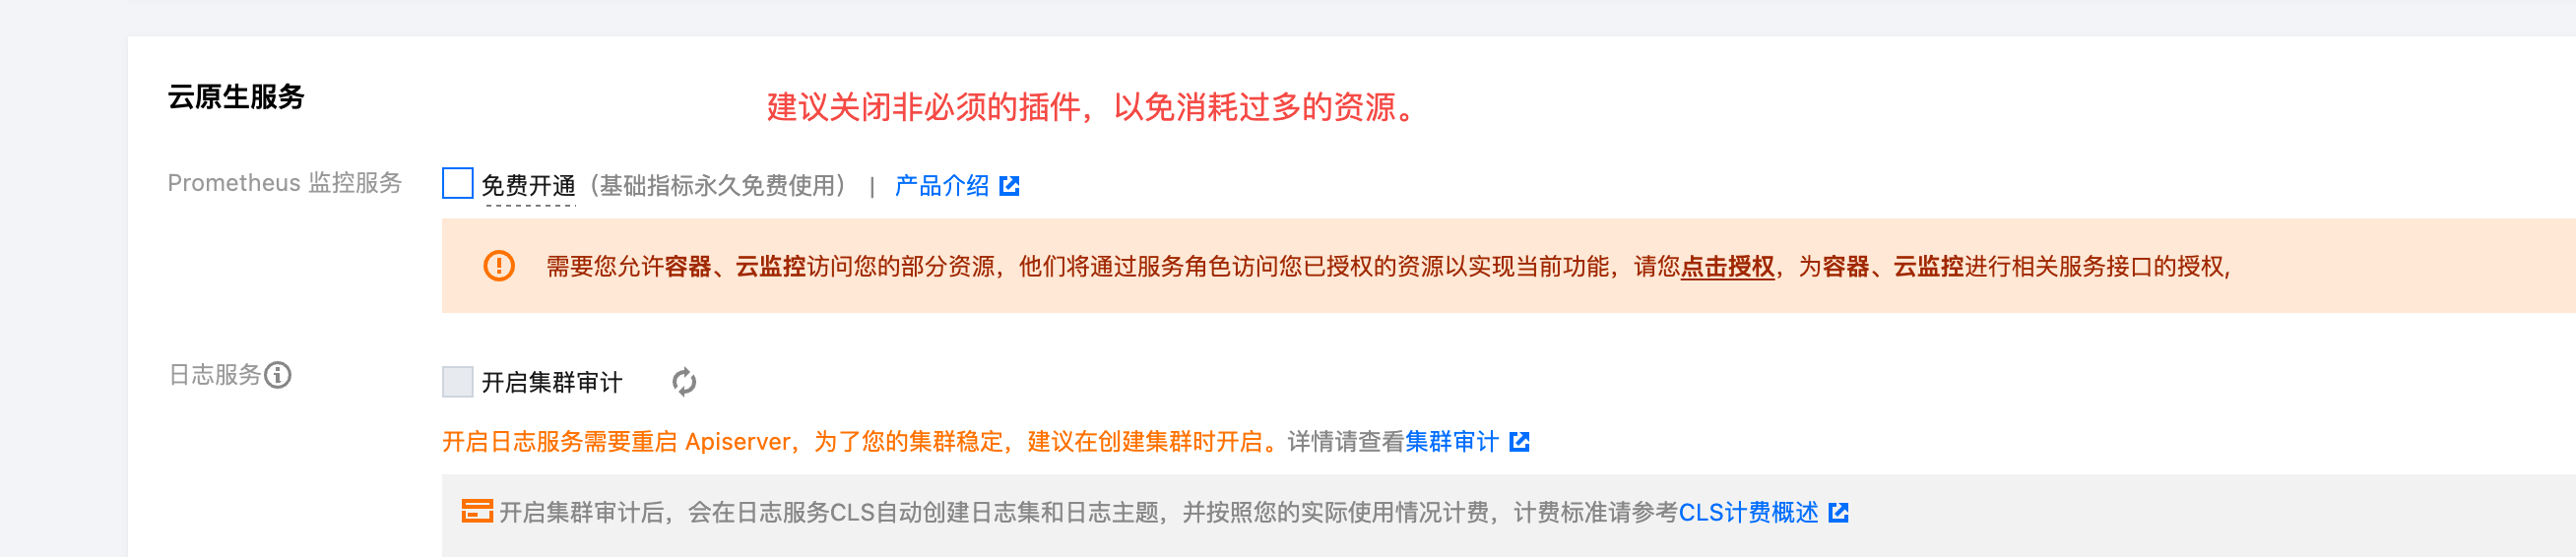
- Click Next, disable non-essential Prometheus plugins, and complete the creation.
Step 4: Create TKE Public Node Pool
Refer to Overview▸, users need to create a public node pool for TKE clusters to deploy TKE system components. Follow the steps below to create a node pool that meets the requirements.
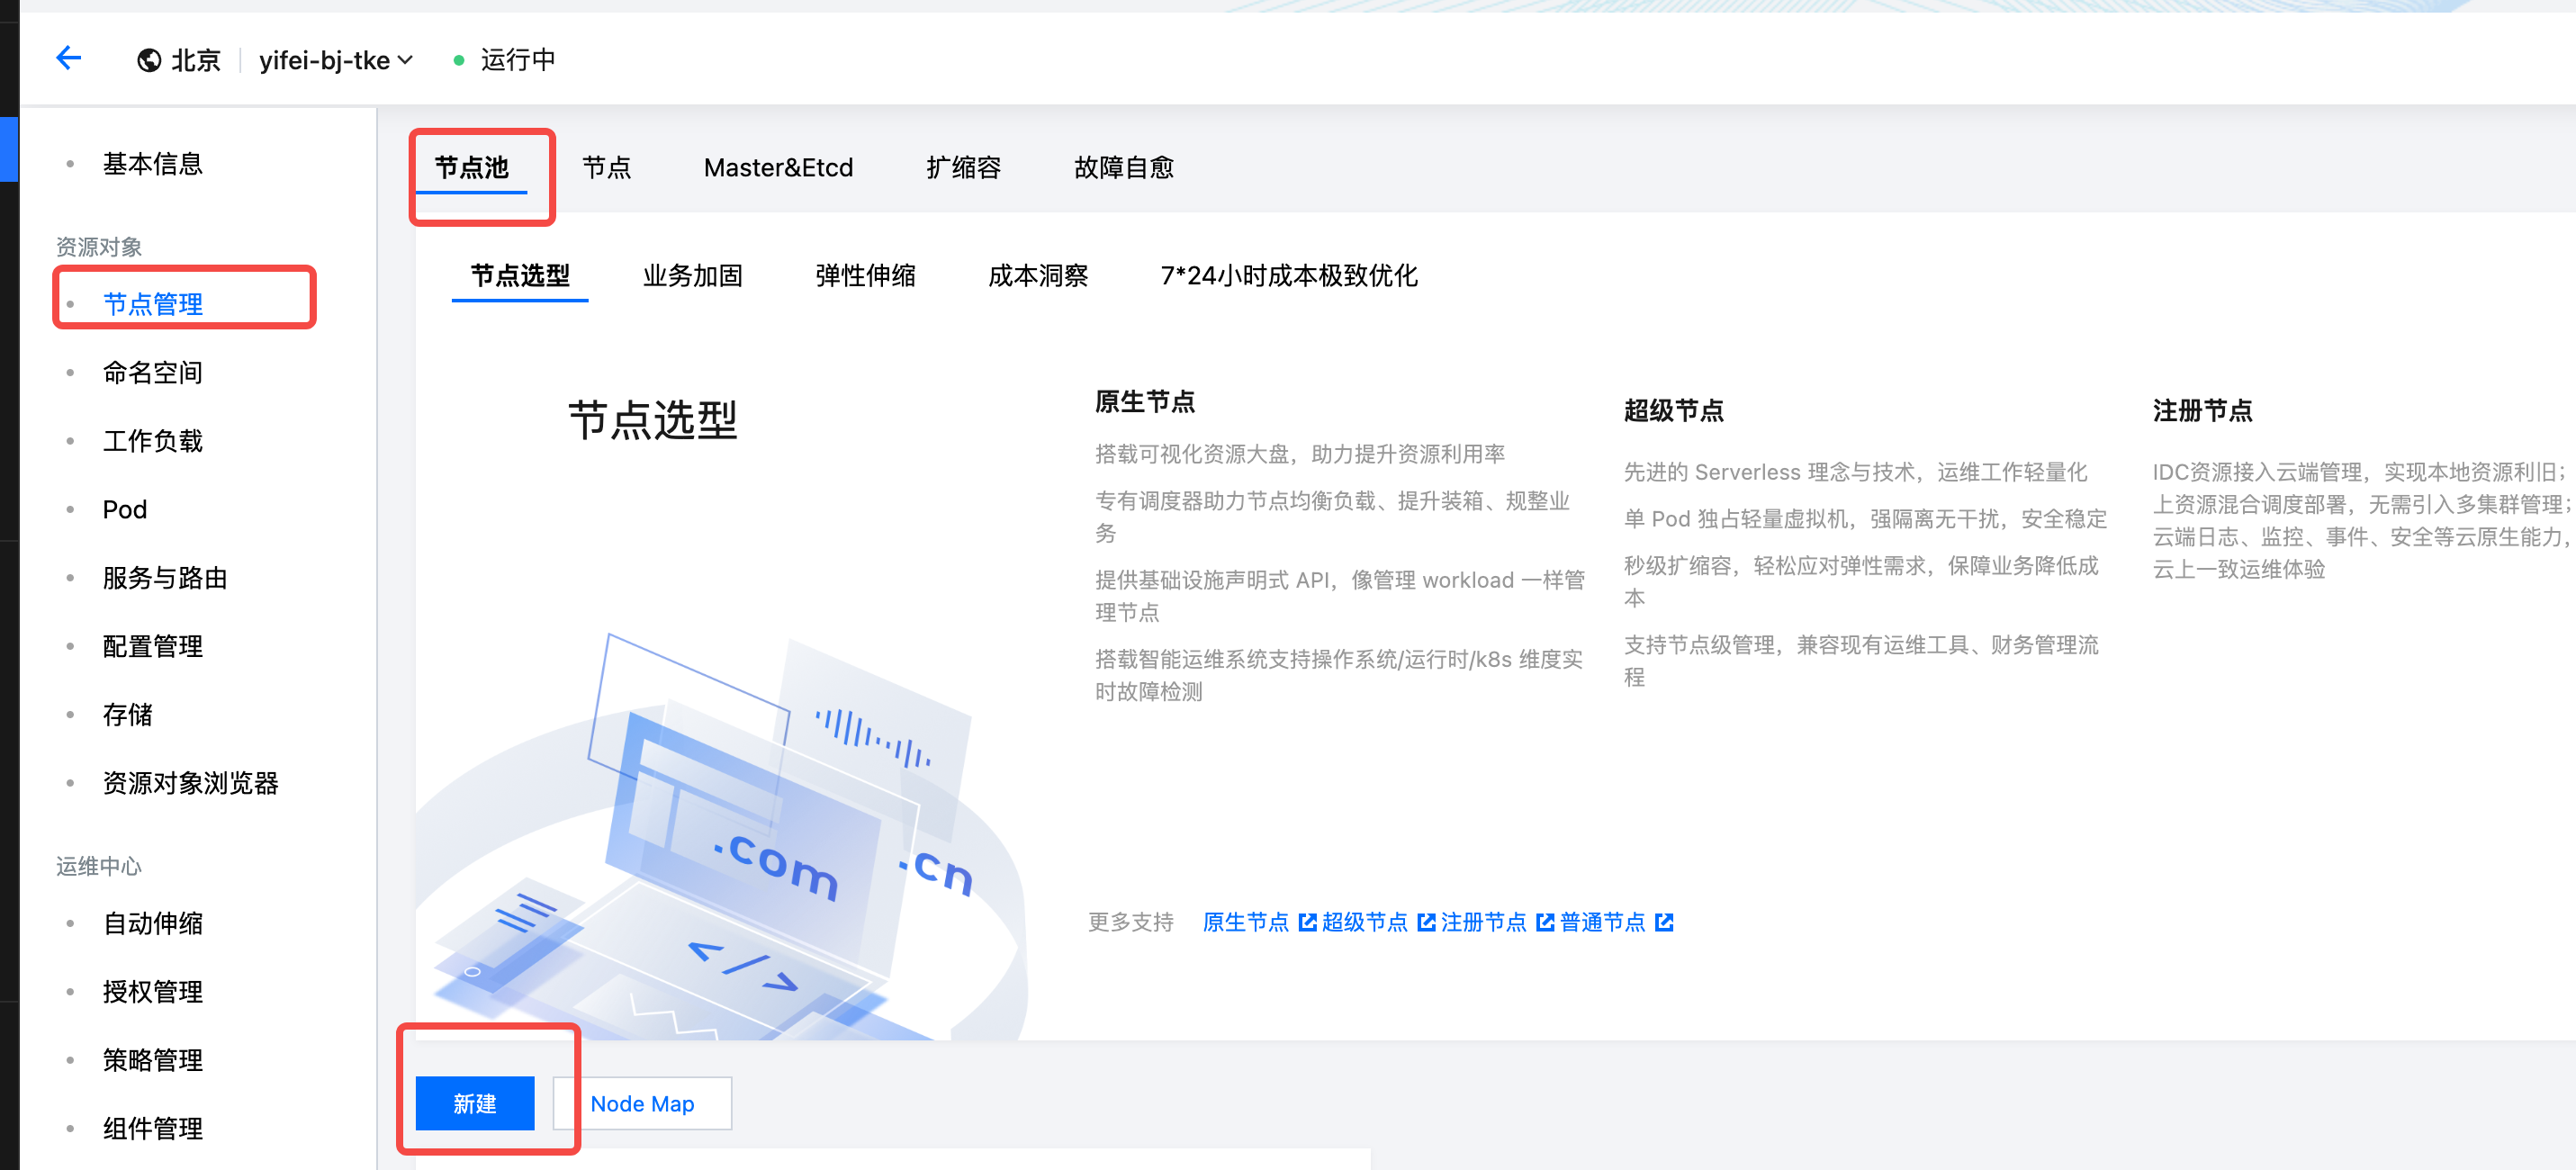
- Go to the details of the TKE cluster created in step 2, click on the Nodes menu, and select Create Node Pool.
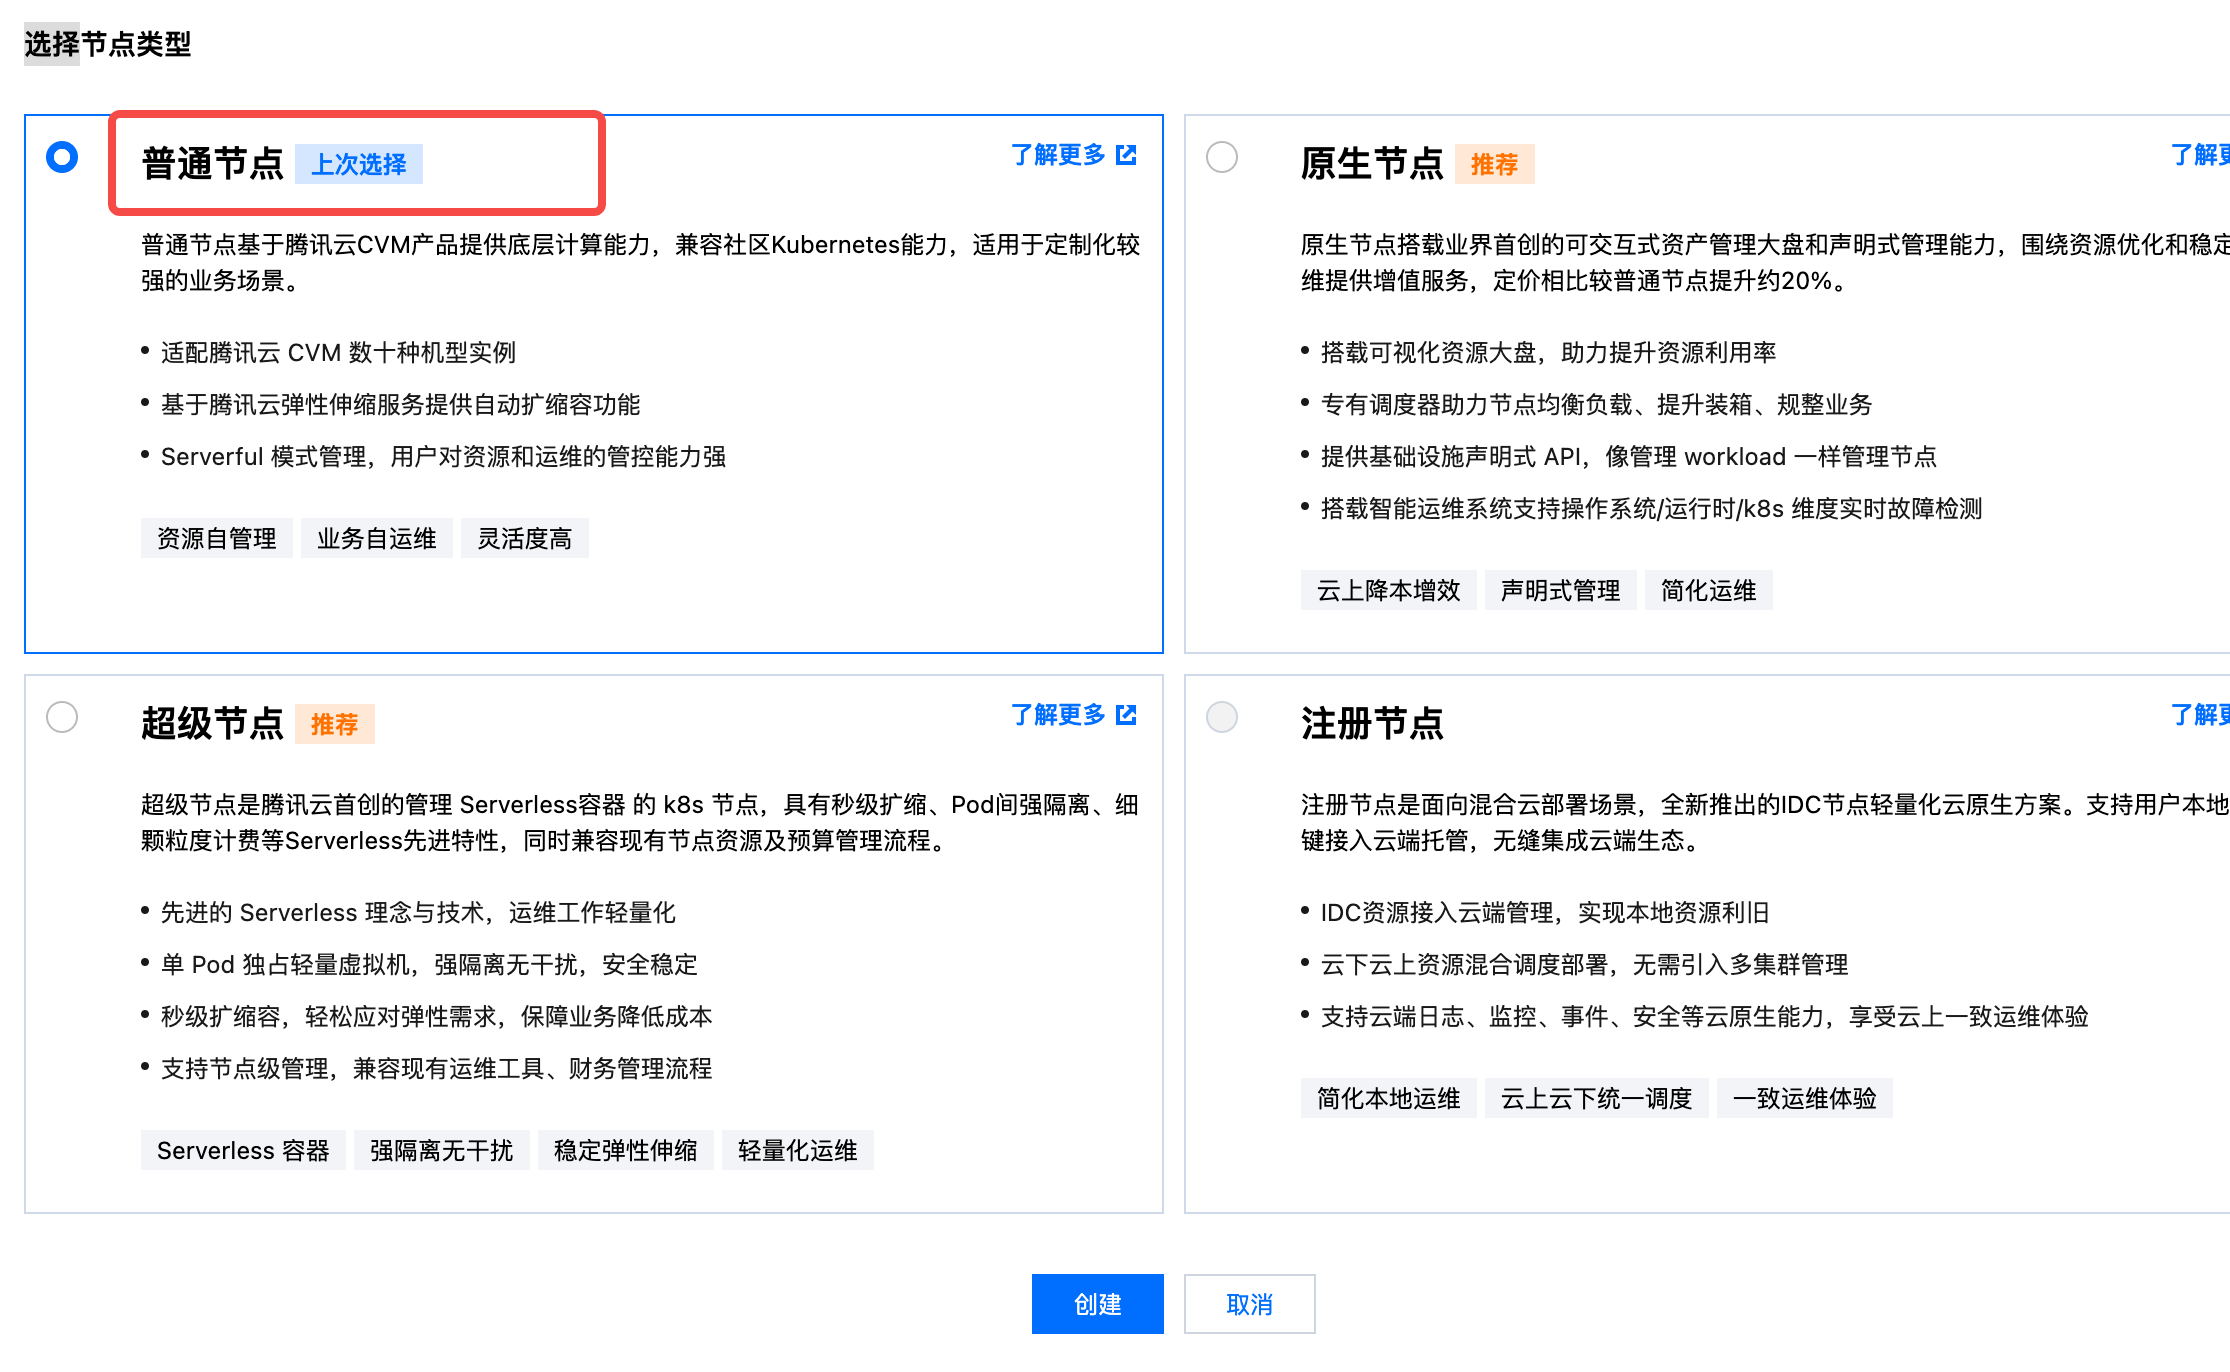
- Choose the General Node Pool type, refer to the documentation below to set custom parameters and complete the node pool creation. For parameters not specified in the table, please follow the default recommended values.
| Set Parameter | Value Description |
|---|---|
| Node Pool Name |
|
| Instance Configuration |
|
| Initial Number of Nodes |
|
Step 5: Create a Dedicated AutoMQ TKE Node Pool
Refer to Overview▸, users need to create a dedicated node pool for AutoMQ to allocate machines for instance deployments. Follow the steps below to create a node pool that meets the requirements and complete the authorization delegation.
- Go to the details of the TKE cluster created in step 2, click on the Nodes menu, and select Create Node Pool.

- Choose the General Node Pool type, refer to the documentation below to set custom parameters and complete the node pool creation. For parameters not specified in the table, please follow the default recommended values.

When creating a node pool, only single availability zone or three availability zones are supported. If other numbers of availability zones are selected, instances cannot be created later.
| Set Parameter | Value Description |
|---|---|
| Node Pool Name |
|
| Machine Configuration |
Note: AutoMQ must run on a VM of the specified machine type, if you select a non-predefined machine type when creating a node pool, the node pool will not be usable afterwards. |
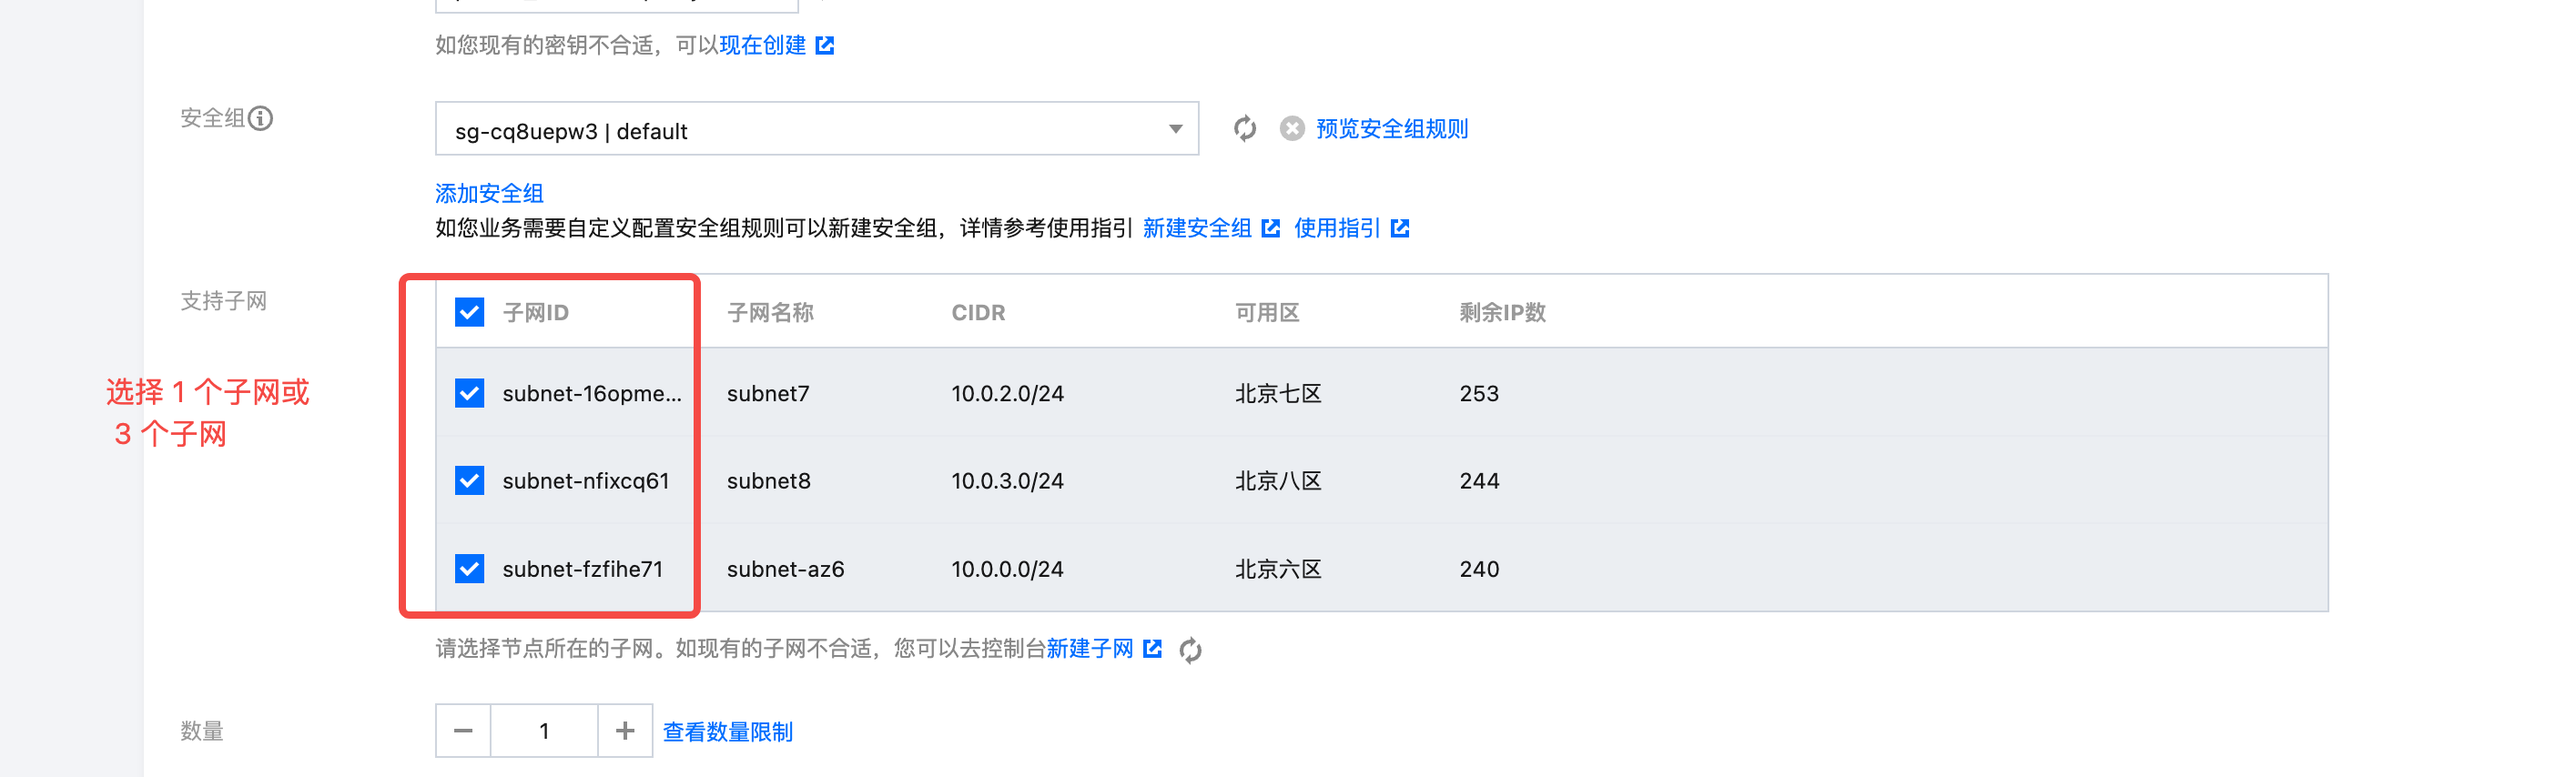
| Supported Subnet |
Note: AutoMQ requires the availability zone and node pool created subsequently to be completely consistent. Therefore, if you need to create a single availability zone AutoMQ cluster, create a single availability zone node pool here; if you need to create a three availability zone AutoMQ cluster, create a three availability zone node pool here. The two cannot be mixed. |
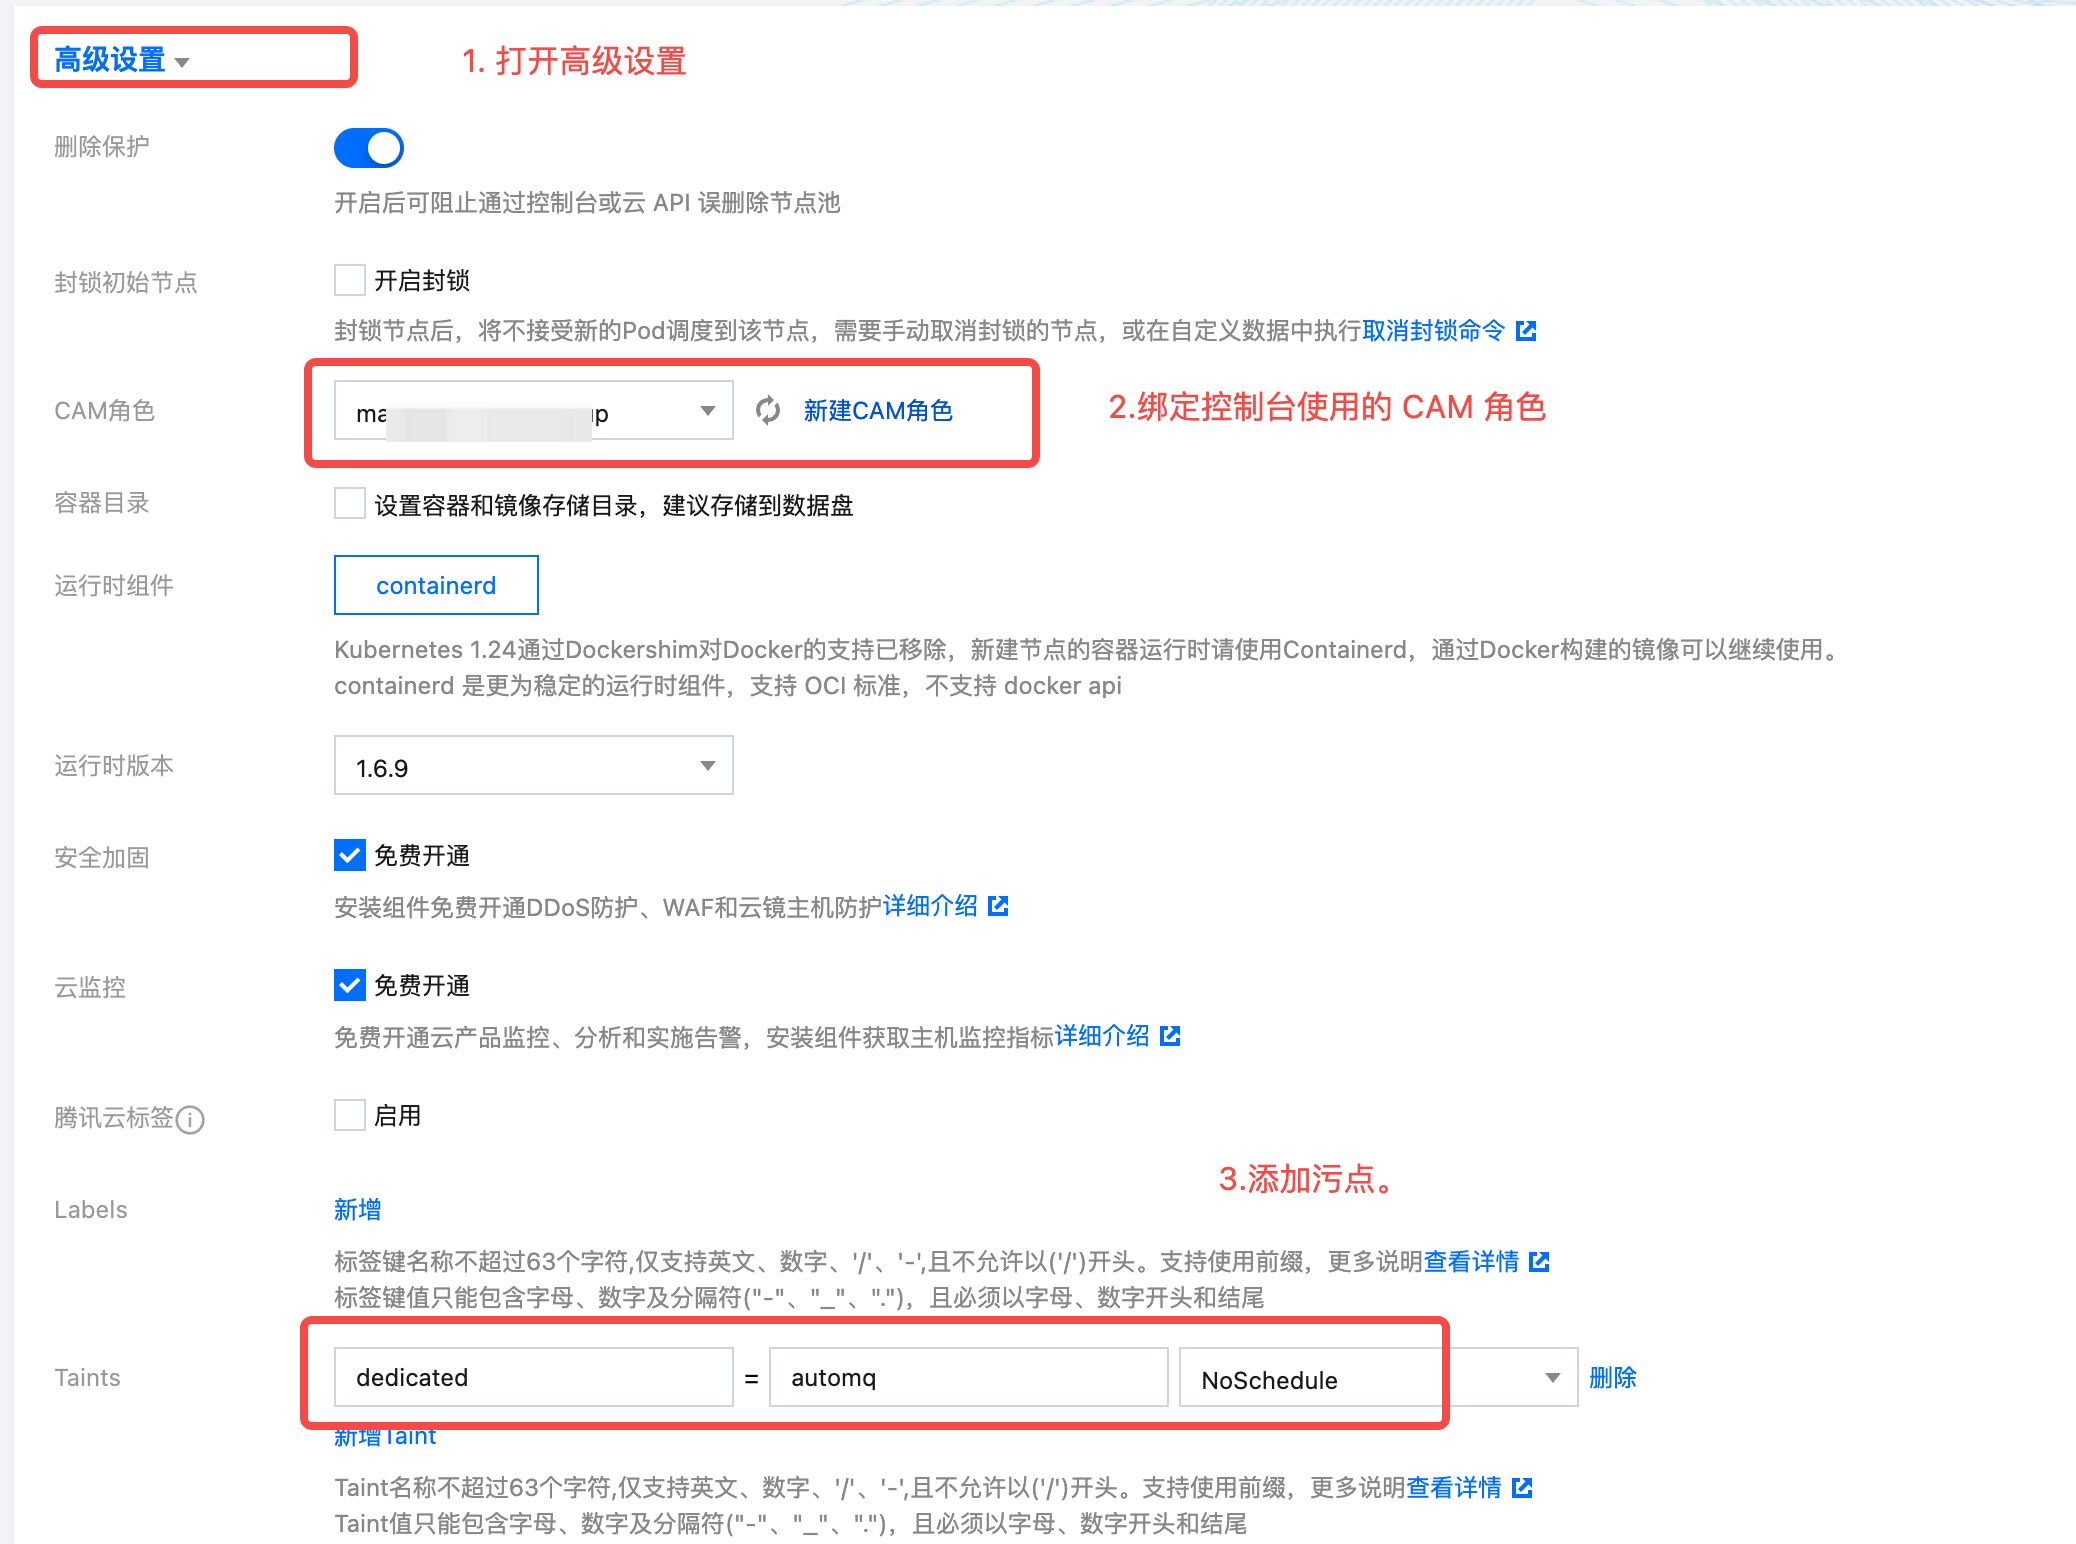
| CAM Role |
|
| Taints |
|
- Node Startup Configuration: Select one or three subnets, with an initial quantity of 1.
- Fill in the Operations Settings: Enable elastic scaling, set the number of nodes to at least 1, and adjust the elastic upper limit to match the TKE cluster specifications and the anticipated scale of machines to deploy AutoMQ. For instance creation strategy, choose multi-zone distribution.

Step 5: Bind CAM roles to the node pool using information from output parameters after installing the console. Then click to create the node pool and add the exclusive taint for AutoMQ. The key of the taint is dedicated, the value is automq, and the effect is NO_SCHEDULE.
- Create a Placeholder Deployment for the AutoMQ node group to speed up Failover during node failure scenarios.
Working Principle:
The purpose of Placeholder Deployment is to deploy a low-priority "placeholder" application on the nodes of a Kubernetes cluster to preemptively occupy several nodes. This allows for rapid recovery when a node hosting the AutoMQ cluster's Pod fails, as the nodes occupied by this Placeholder can be quickly reclaimed.
Placeholder Deployment can be managed via the kubectl command or the Kubernetes console.
First, click the link to download the priority declaration file named automq-low-priority.yaml, and then execute the following command to create the priority declaration.
kubectl apply -f automq-low-priority.yaml
Next, click the link to download the automq-tke-placeholder.yaml file. Modify the parameters based on the actual deployed node pool:
-
metadata.name: It's recommended to change it to a meaningful placeholder name, such asplaceholder-for-nodegroup-A.
-
replicas: This is the placeholder pod reservation count, which defaults to 1. If you are deploying across multiple availability zones (AZs), it is recommended to reserve one machine per AZ, meaning you should set the count to the number of AZs. -
affinity.nodeAffinity: This is used to select nodes for the Placeholder deployment. You need to adjust thematchExpressionswithin thekeyandvaluesto accurately match the node pool of AutoMQ. The example YAML file provides two options for node selection.-
eks.tke.cloud.tencent.com/nodegroup-id: Use theeks.tke.cloud.tencent.com/nodegroup-idtag on TKE to filter specific node pools. -
node.kubernetes.io/instance-type: Use thenode.kubernetes.io/instance-typetag on TKE to filter for specific instance types.
-
-
resources:-
The limits for CPU/memory should correspond with the specific specifications of the Node Group, such as 2C16G.
-
The CPU/memory requests are slightly below the specific specifications of the Node Group, typically occupying about 3/4 of the capacity. This allows the Placeholder Pod to be scheduled onto additional Nodes and ensures exclusive access, preventing unexpected use by other Pods in the cluster. This helps avoid scheduling failures due to insufficient resources during actual Failover.
-
Parameters that need modification can be found in the following YAML file:
metadata:
  # TODO: Replace with Your Custom Name
  name: {Replace with your custom placeholder deployment name}
spec:
  # TODO: Replace with Your Custom Node Nums
  replicas: 1
    spec:
      affinity:
        nodeAffinity:
          requiredDuringSchedulingIgnoredDuringExecution:
            nodeSelectorTerms:
              - matchExpressions:
                - key: eks.tke.cloud.tencent.com/nodegroup-id
                  operator: In
                  values:
                  # TODO: Replace with Your Custom Node Pool Name
                  - "Replace with your custom Node Pool Name"
                - key: node.kubernetes.io/instance-type
                  operator: In
                  values:
                  # TODO: Replace with Your Custom Node Pool VM Size
                  - "Replace with your custom Node Pool VM Size"
      containers:
        - name: placeholder
          resources:
          # TODO: Replace with Your Custom Memory and CPU Size
            limits:
              cpu: 2000m
              memory: 16Gi
            requests:
              cpu: 1000m
              memory: 12Gi
After completing the modifications, execute the following command to install the Placeholder.
kubectl apply -f automq-tke-placeholder.yaml
Once executed, use the following command to check the status of the Placeholder Pod. Ensure its status is Running and verify that it is scheduled onto the expected node.
kubectl get pods -l app=low-priority-placeholder -o wide
Step 6: Enter the Environment Console and Create the Deployment Configuration
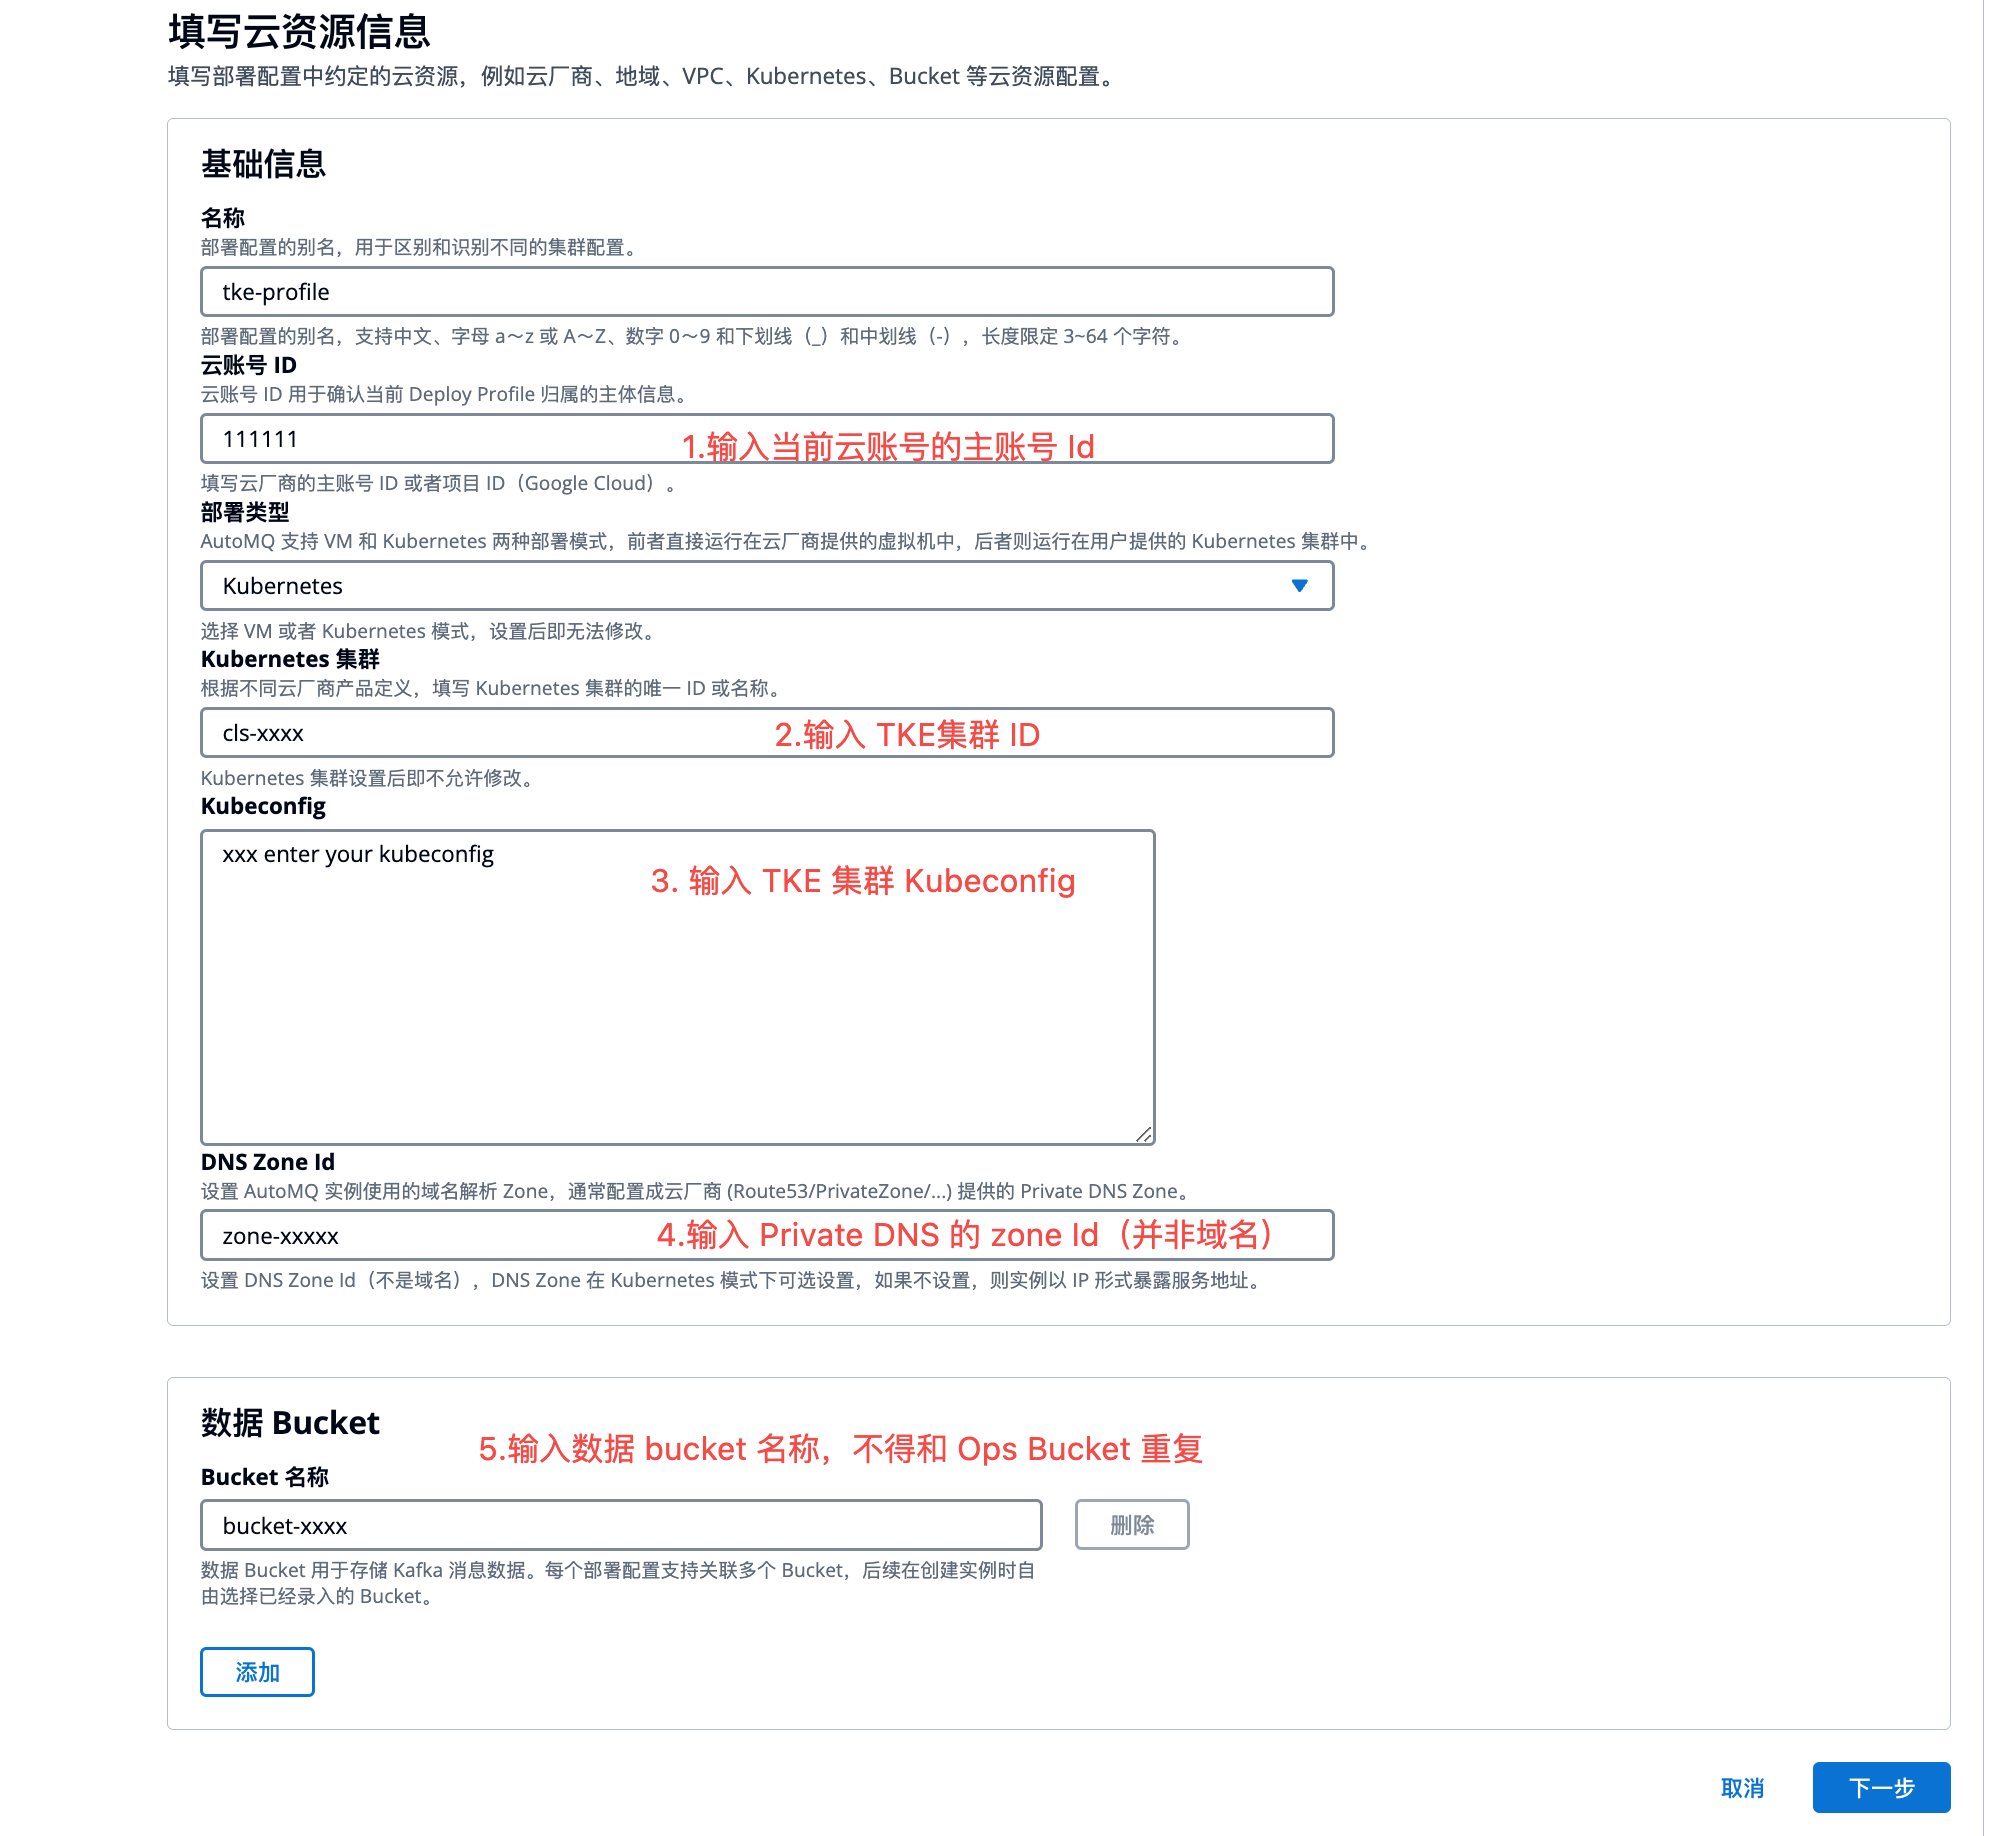
When first entering the AutoMQ BYOC Console, you need to create a deployment configuration to set up information for the Kubernetes cluster and OBS Bucket, among other details, before you can create an instance.
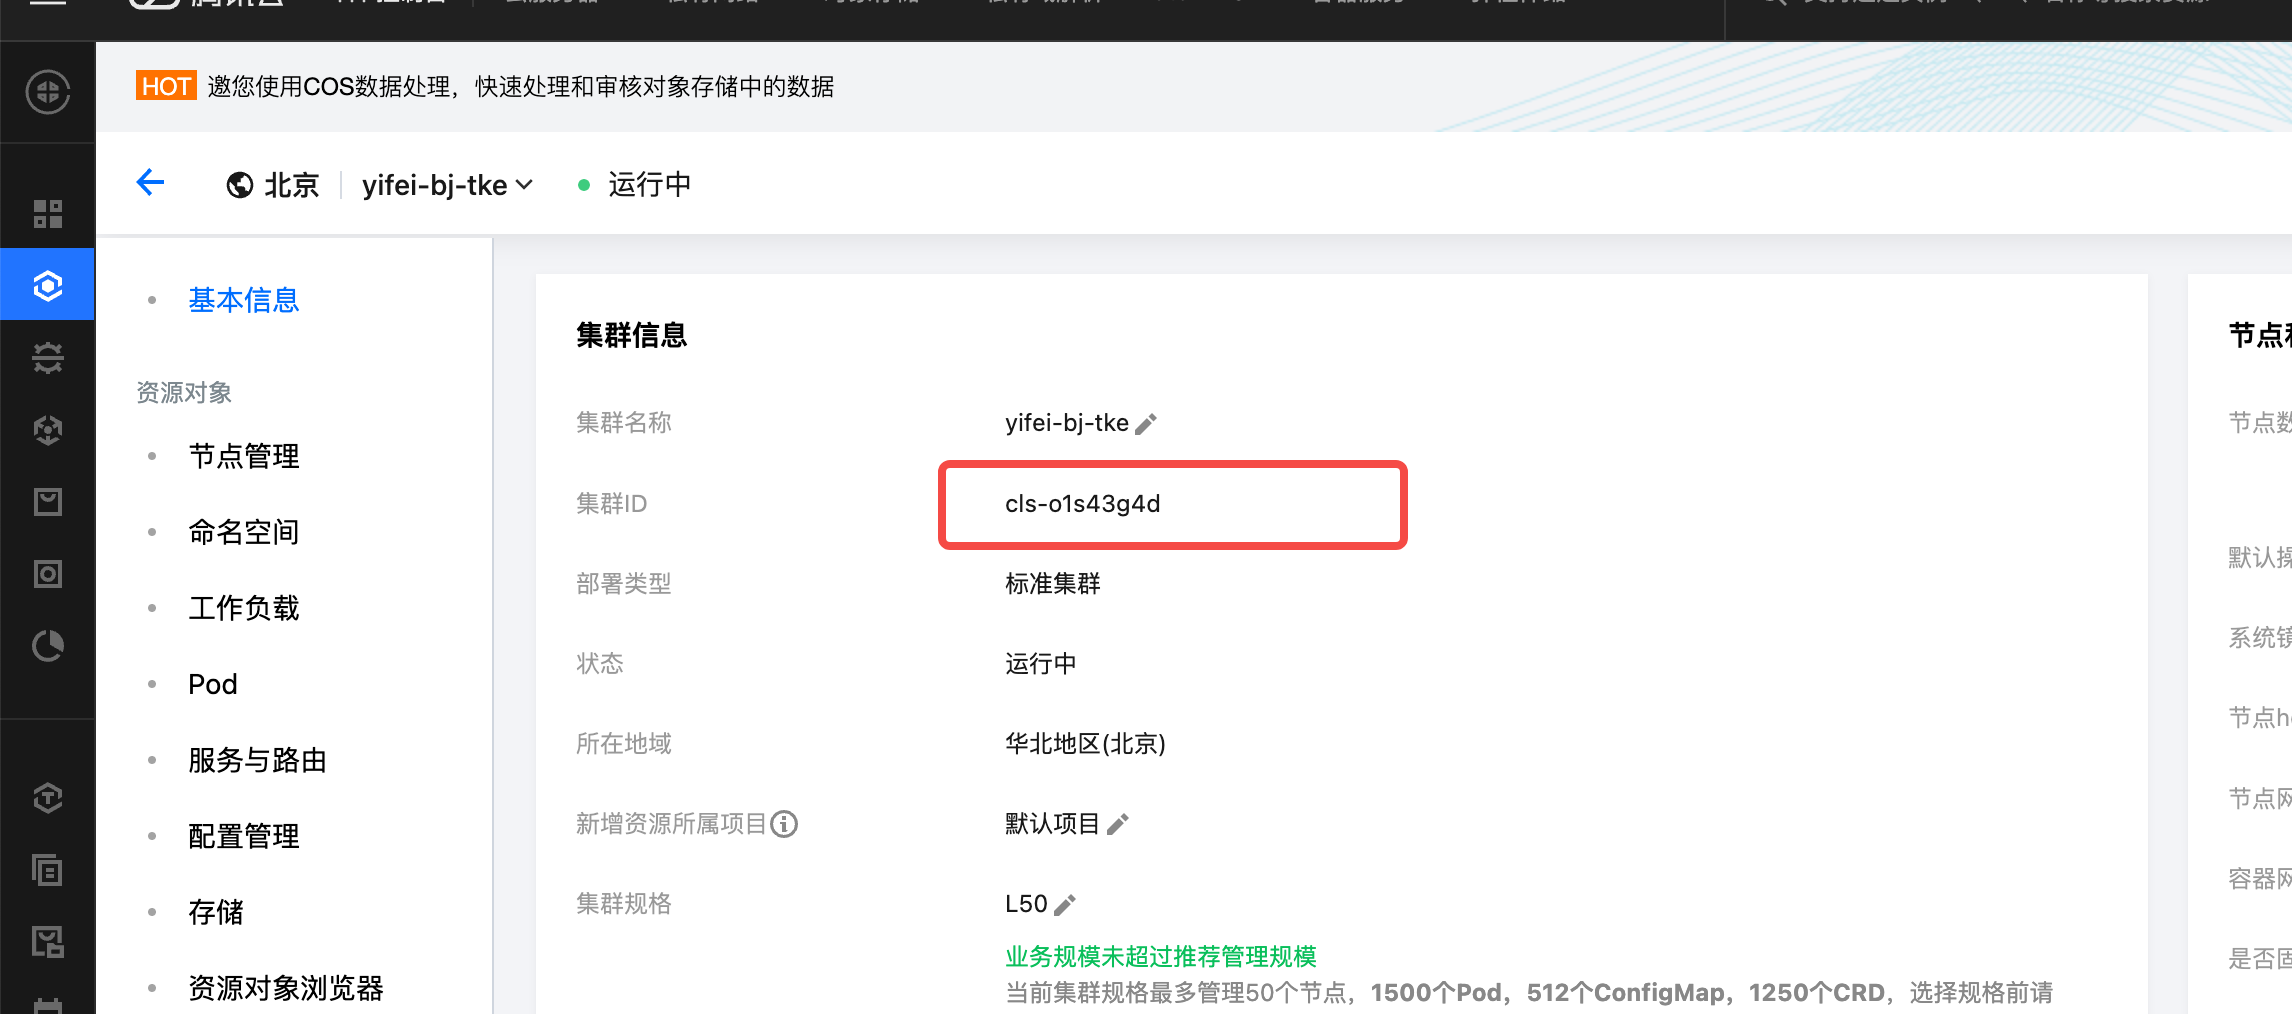
- Copy the Cluster ID of the TKE cluster created in Step 2.
- Locate the APIServer configuration menu and obtain the Kubeconfig configuration file.

-
Log in to the console, enter the cluster ID and Kubeconfig configuration, and click Next.
-
Cloud Account ID: Enter the main account ID of the current cloud account, which can be viewed in the Tencent Cloud console.
-
Deployment type: Choose Kubernetes.
-
Kubernetes cluster: Enter the cluster ID of the TKE cluster.
-
Kubeconfig: Enter the content copied in the previous step.
-
DNS ZoneId: Enter the ZoneId of the Private DNS used for deploying AutoMQ.
-
Bucket name: Enter the data bucket used to store messages for AutoMQ deployment. Multiple COS Buckets are supported.
-
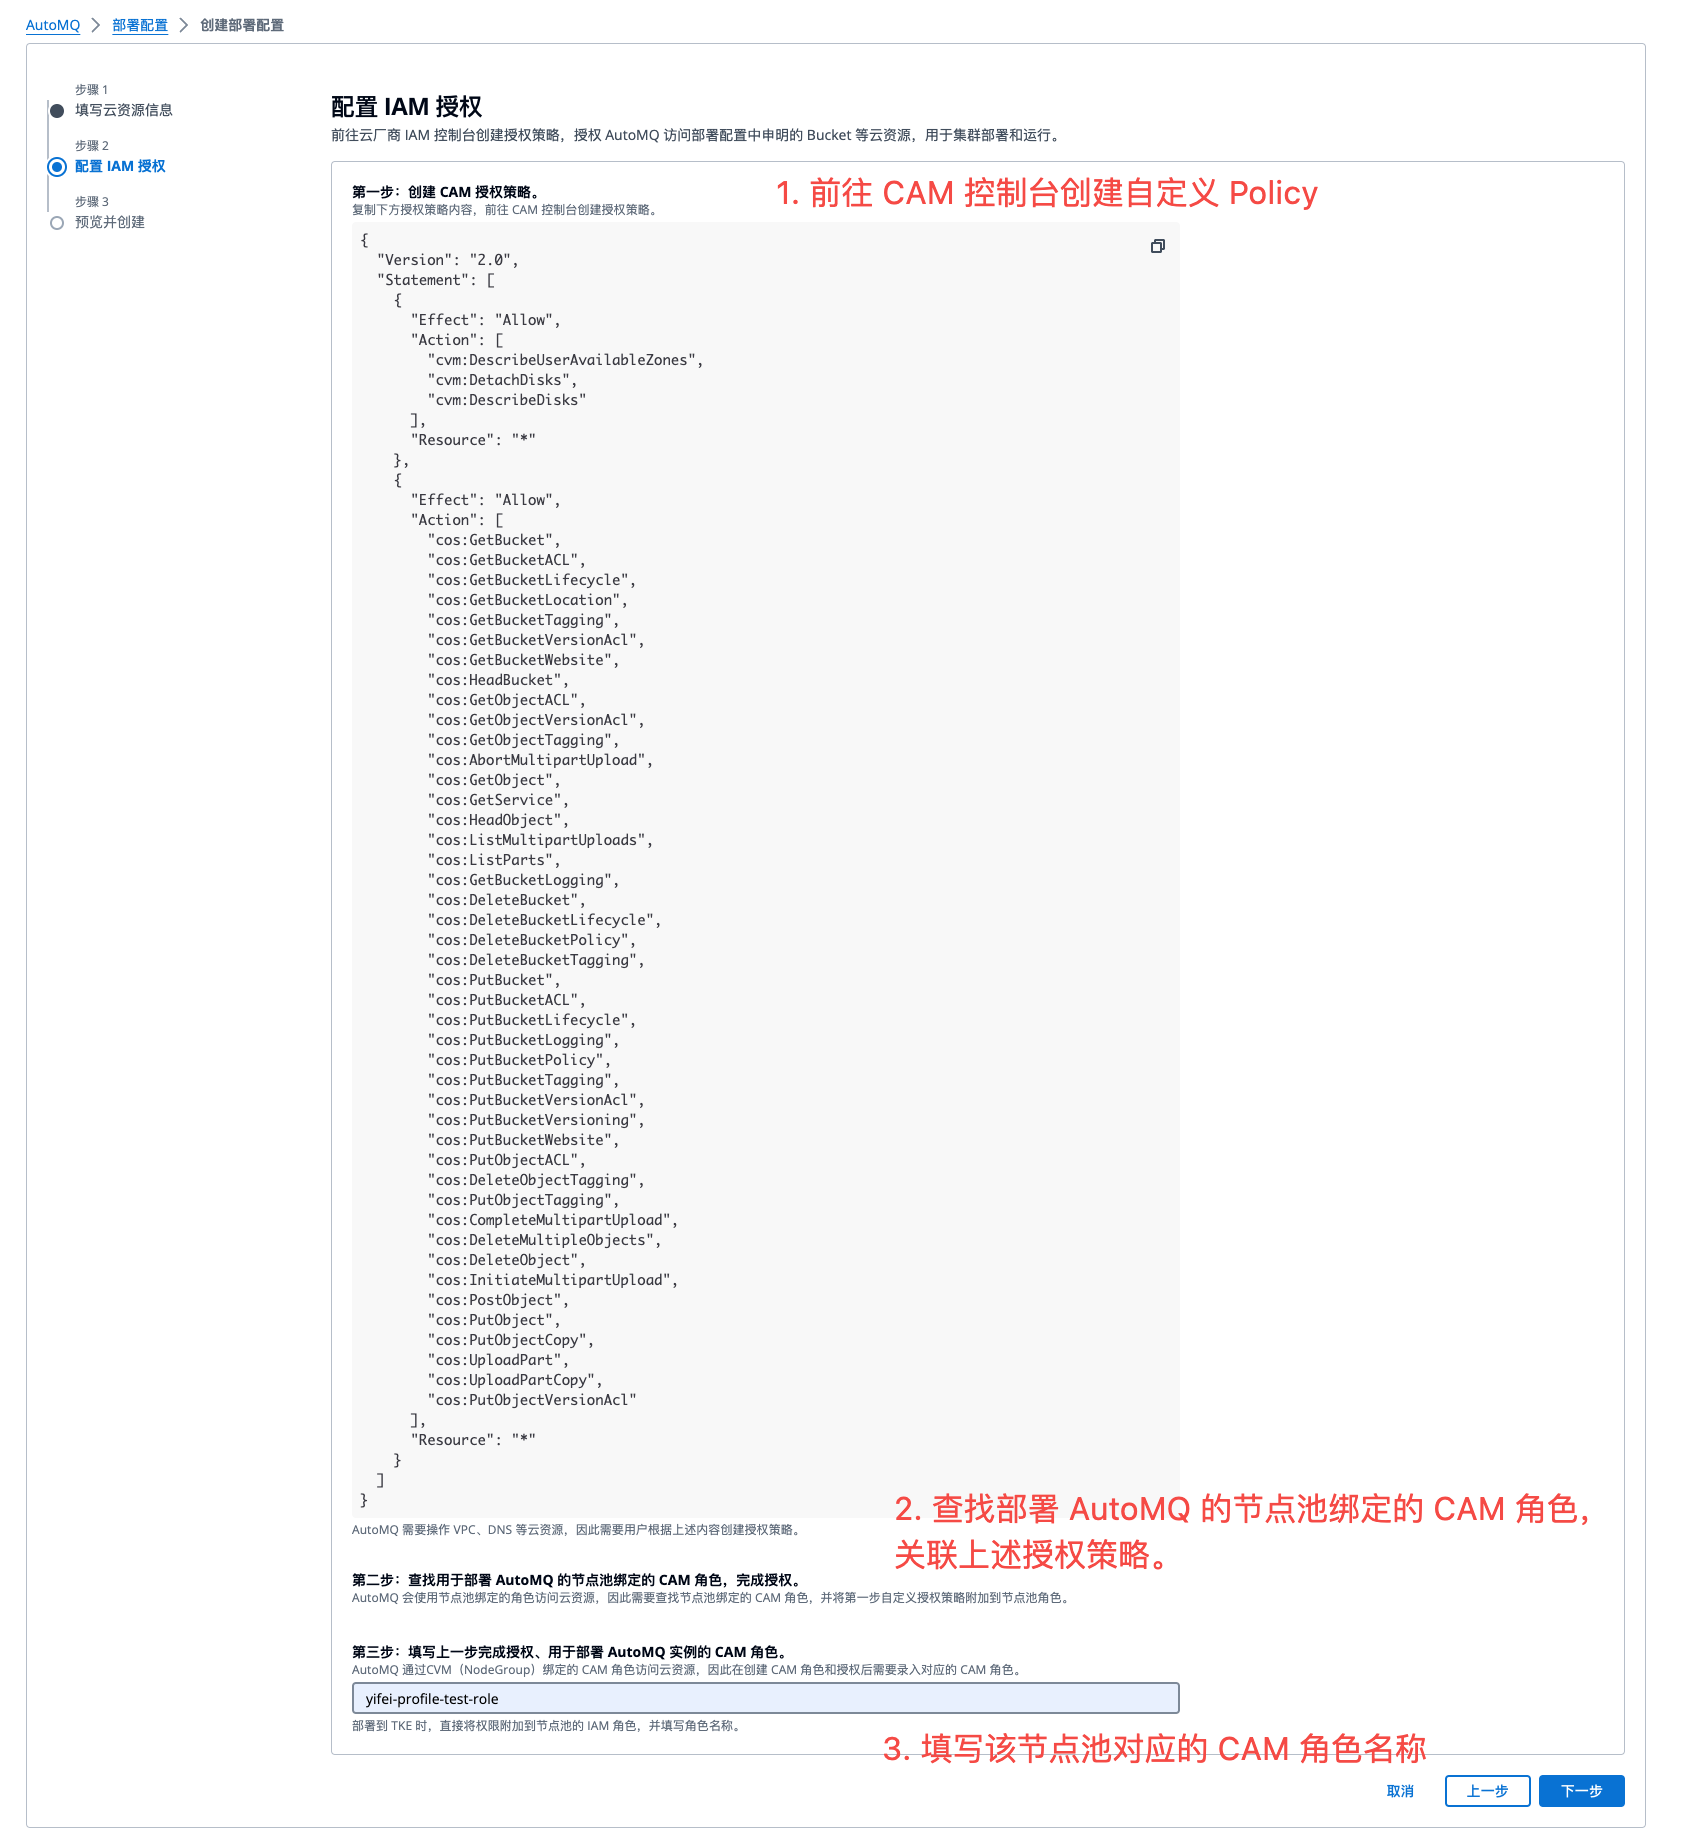
- After providing the cloud resource information, generate the permissions required to authorize the TKE node pool for the data plane. Refer to the console guide to create a custom authorization policy. Then bind the authorization policy to the AutoMQ CAM role created in Step 2, and enter the node pool role name. Click Next to Preview.
- Preview the deployment configuration information and complete the creation. You can then go to the instance management page to create an instance.