
In this article, references to AutoMQ product service provider, AutoMQ service provider, or AutoMQ specifically refer to AutoMQ HK Limited and its affiliates.
Operation Procedure
Step 1: Install Environment Console
Refer to Overview▸, AutoMQ supports deployment on GKE clusters. In the GKE deployment mode, you still need to first install the AutoMQ console, and then use the console interface to manage GKE for deploying the cluster on GKE. On Google Cloud, both Marketplace and Terraform are supported for installing the environment console.- (Recommended) Install the console via Marketplace, refer to Install Env via GCP Marketplace▸.
- Install the console via Terraform, refer to Install Env via Terraform Module▸.
Step 2: Create an IAM Service Account
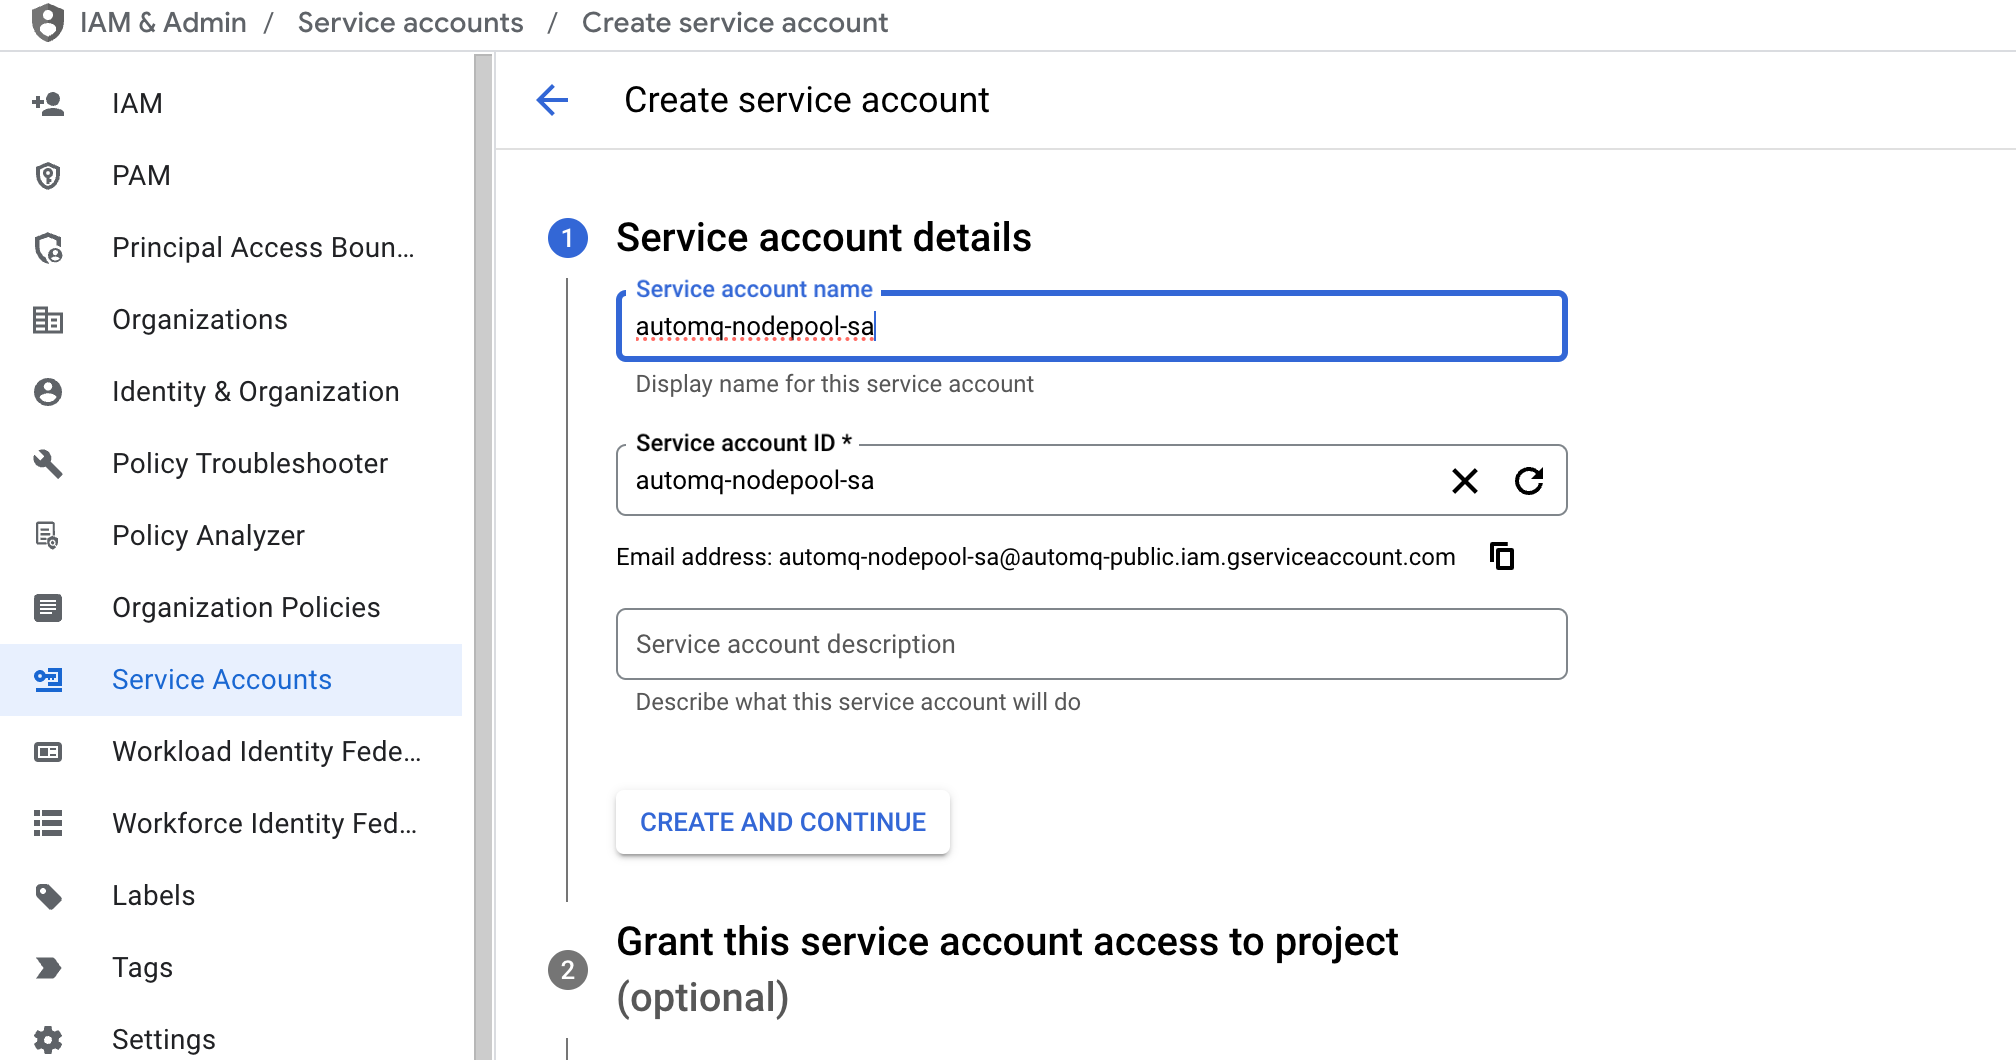
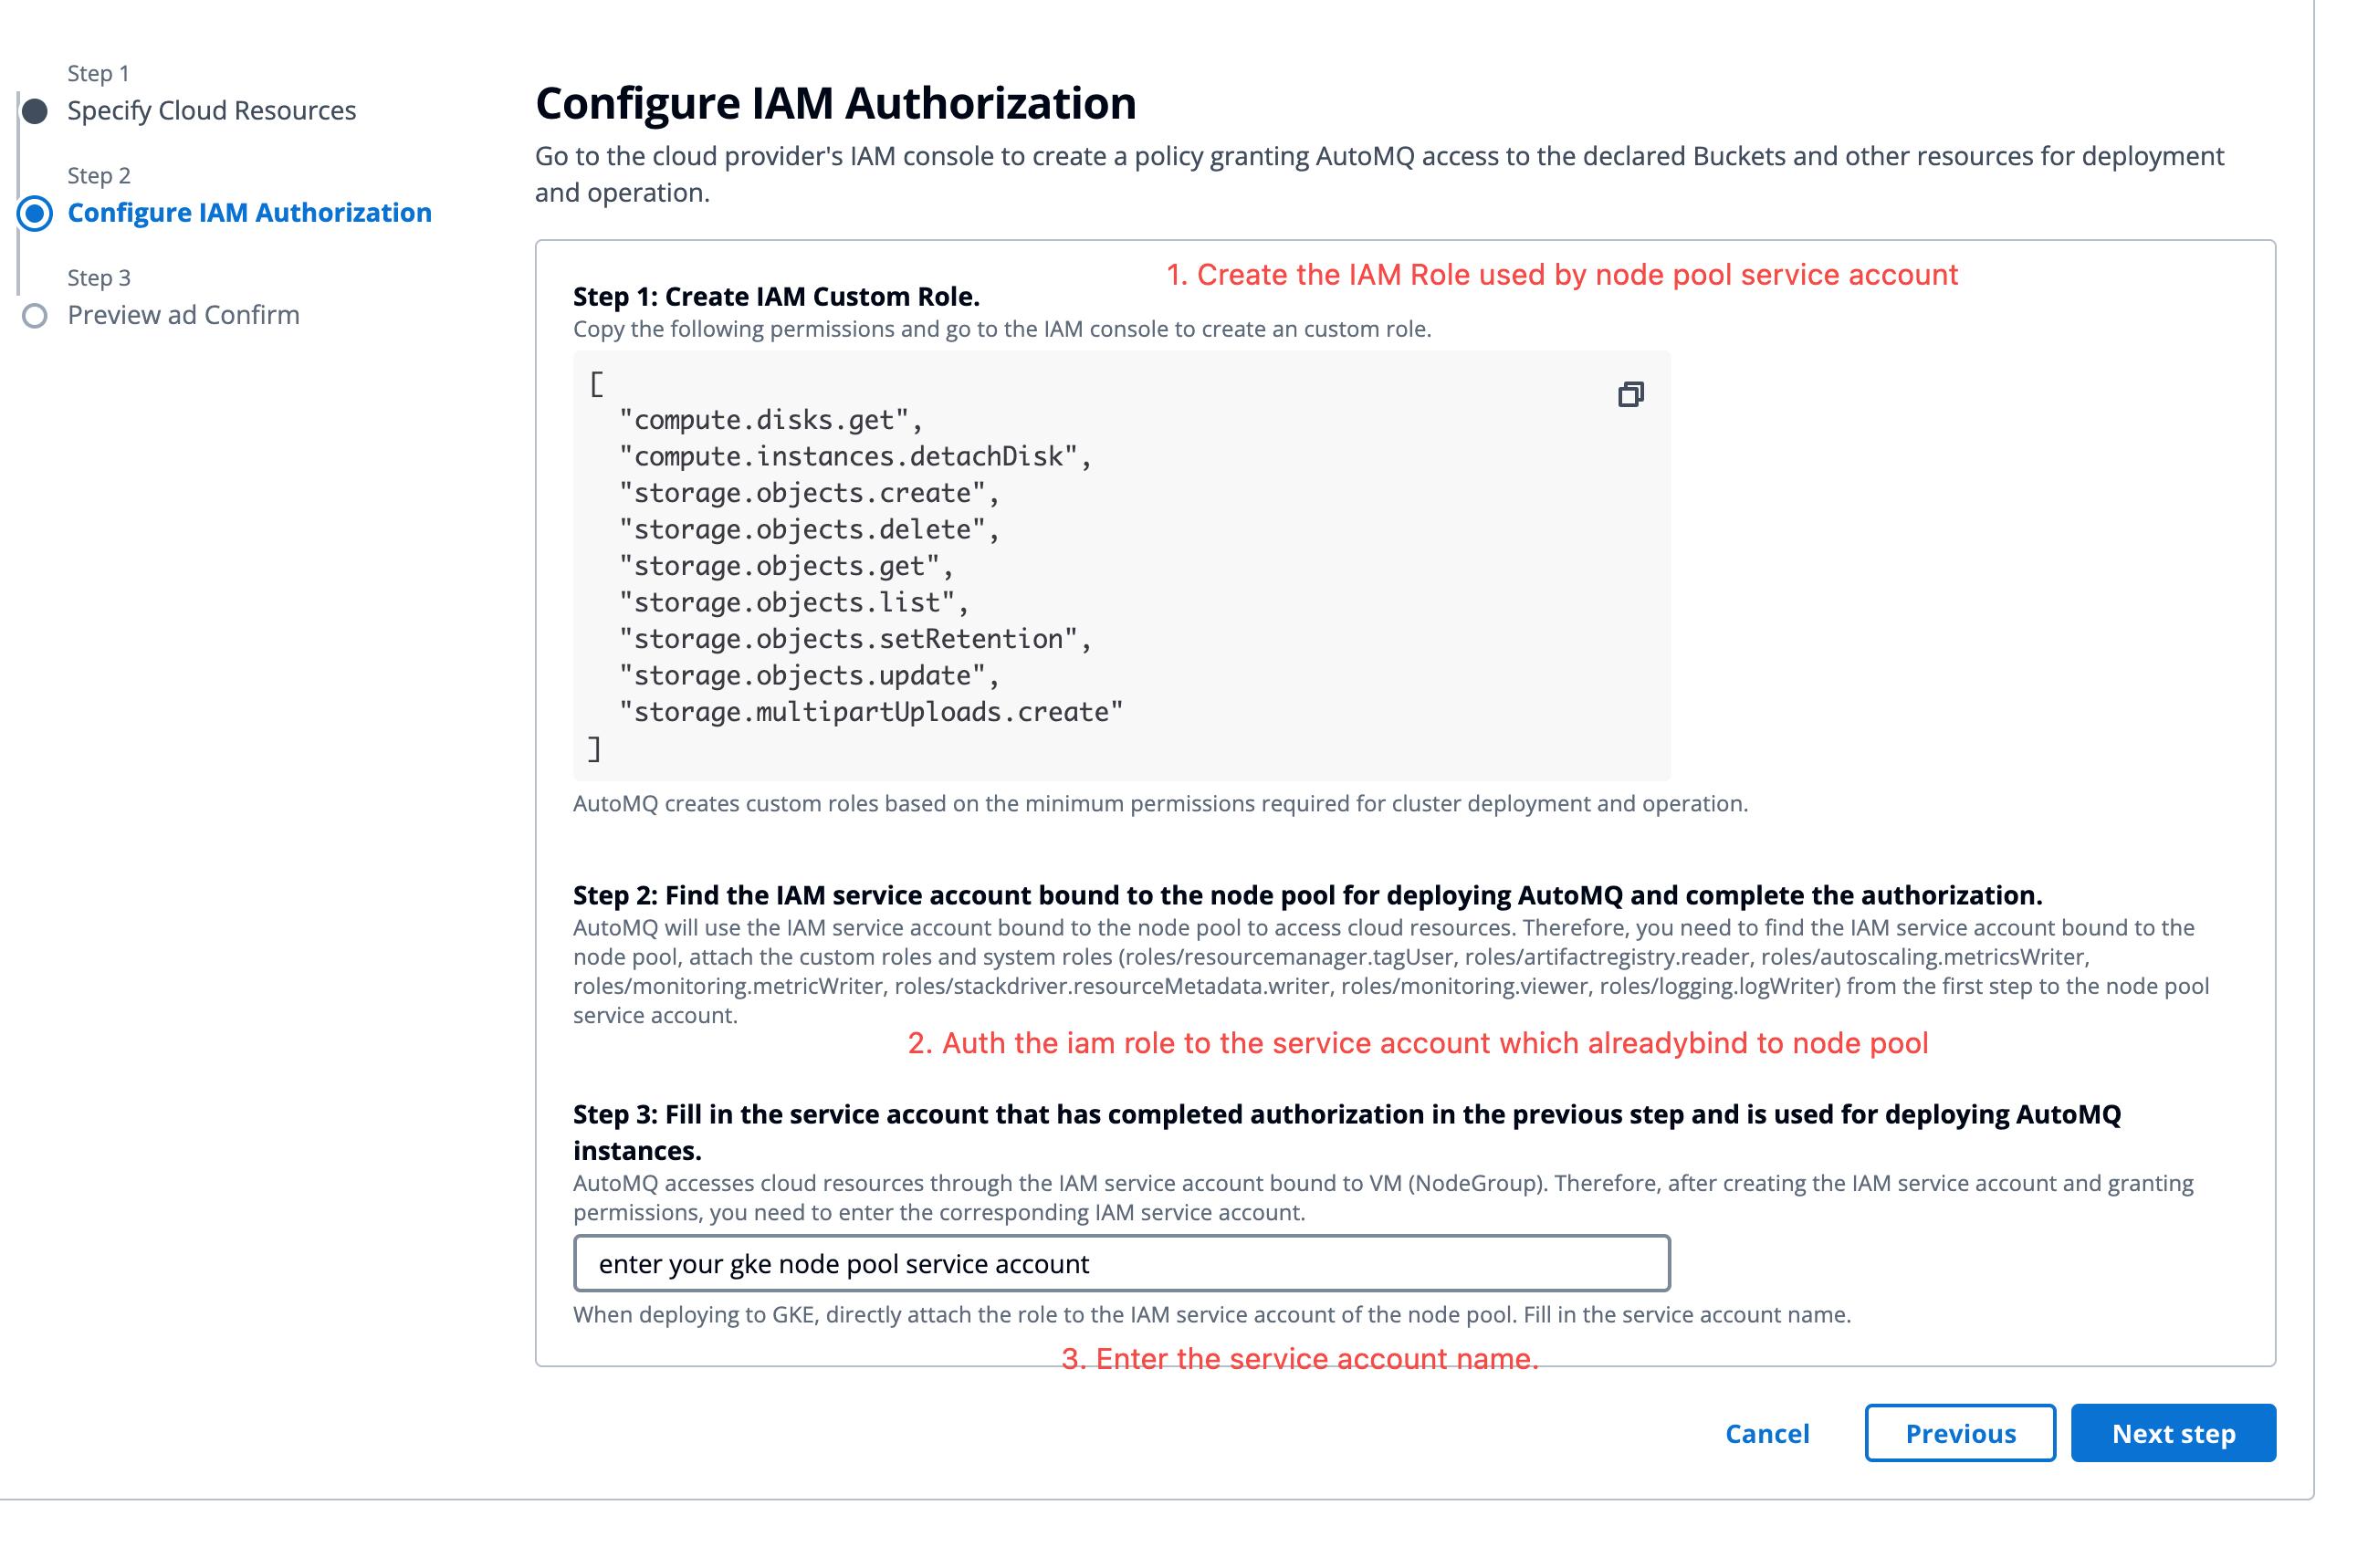
The AutoMQ data plane cluster is deployed using a dedicated node pool, so it is necessary to bind a dedicated IAM service account to the AutoMQ node pool to access GCP cloud services. Follow these steps to create an IAM service account:- Navigate to IAM Console, click Service Accounts, then Create Service Account. Fill in the custom service account name.
-
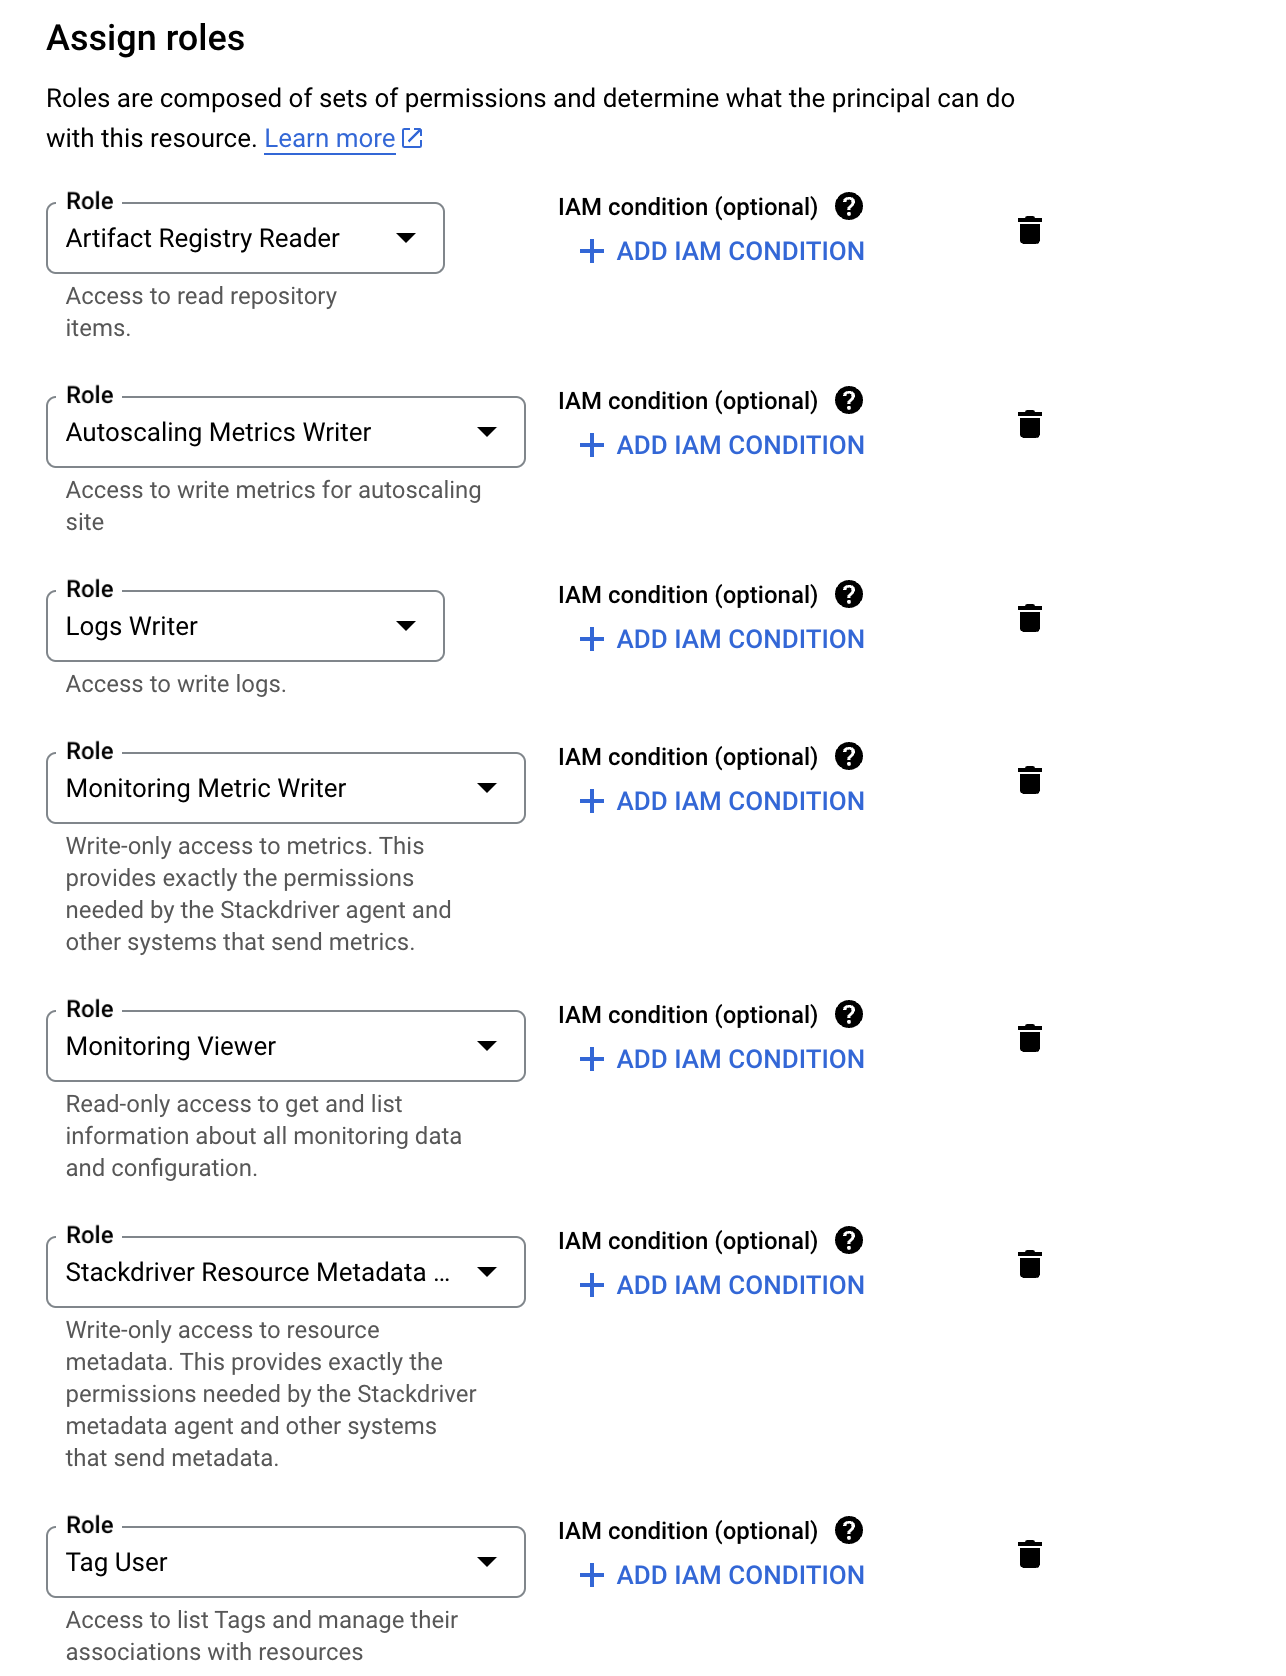
Grant the service account the necessary system roles. The list of system roles is as follows:
- roles/resourcemanager.tagUser
- roles/artifactregistry.reader
- roles/autoscaling.metricsWriter
- roles/monitoring.metricWriter
- roles/stackdriver.resourceMetadata.writer
- roles/monitoring.viewer
- roles/logging.logWriter
- Complete the service account creation, and record the service account’s name and ID, which are needed for the subsequent creation of the node pool.
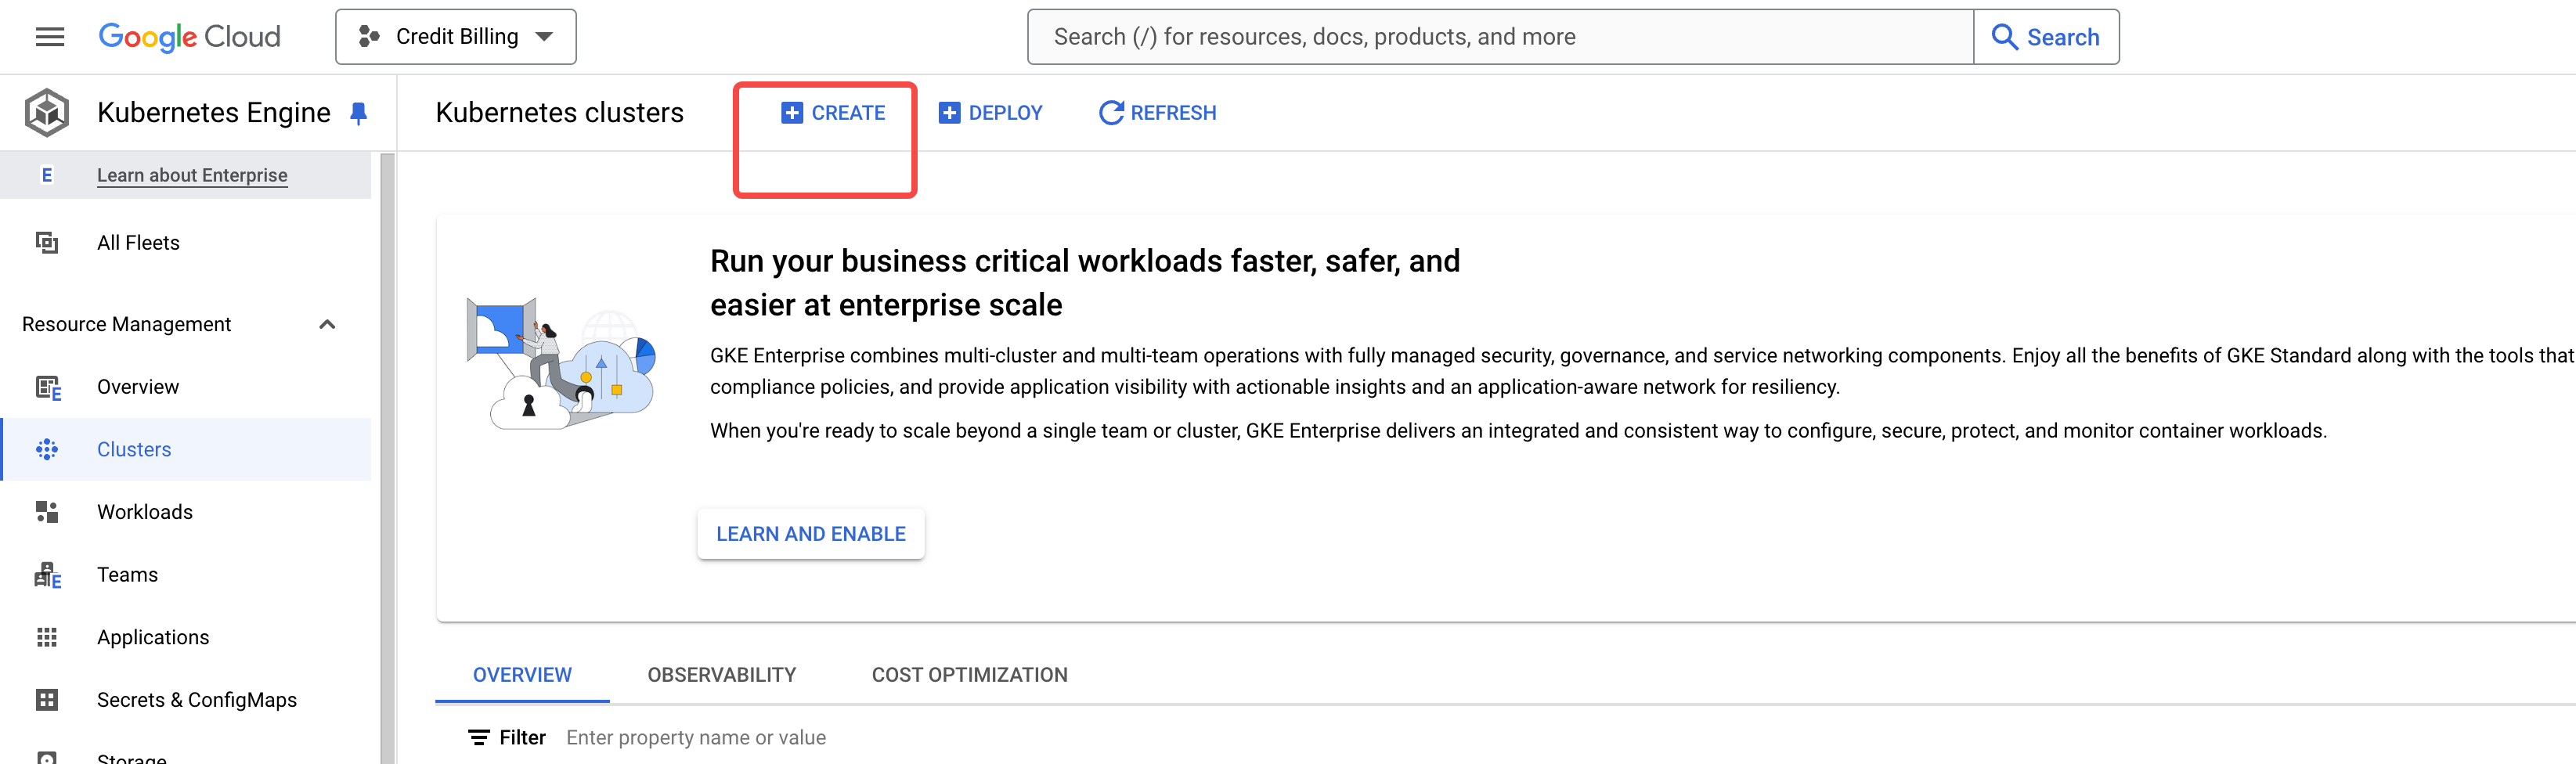
Step 3: Create a GKE Cluster
Refer to Overview▸, users need to create a dedicated GKE cluster in advance for AutoMQ usage. Users can access the Google Cloud GKE product console and follow the steps below.Configure GKE Cluster Type and Region
- Log in to the Google Cloud GKE Console. Click Create Cluster.
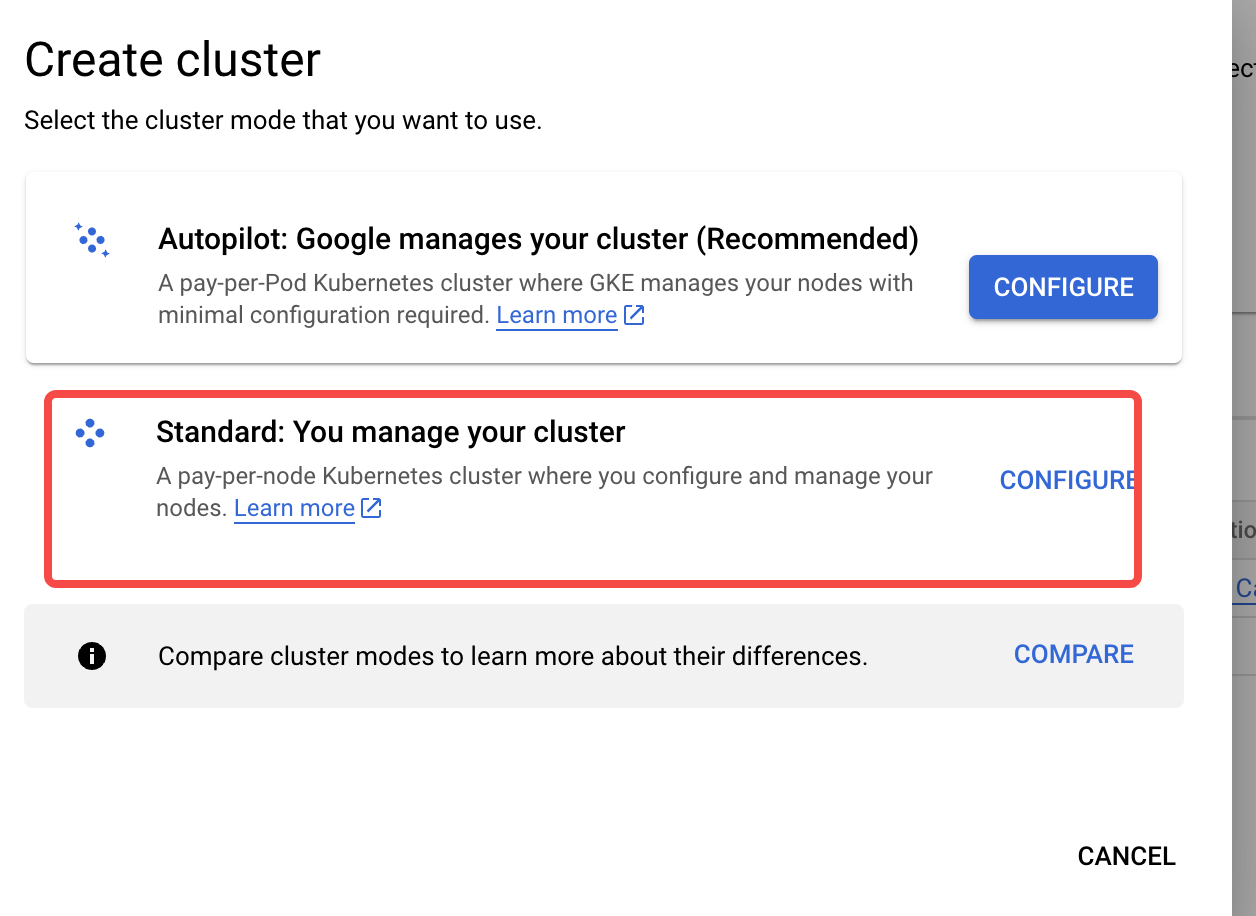
- Choose the cluster type Standard: You manage your cluster.
-
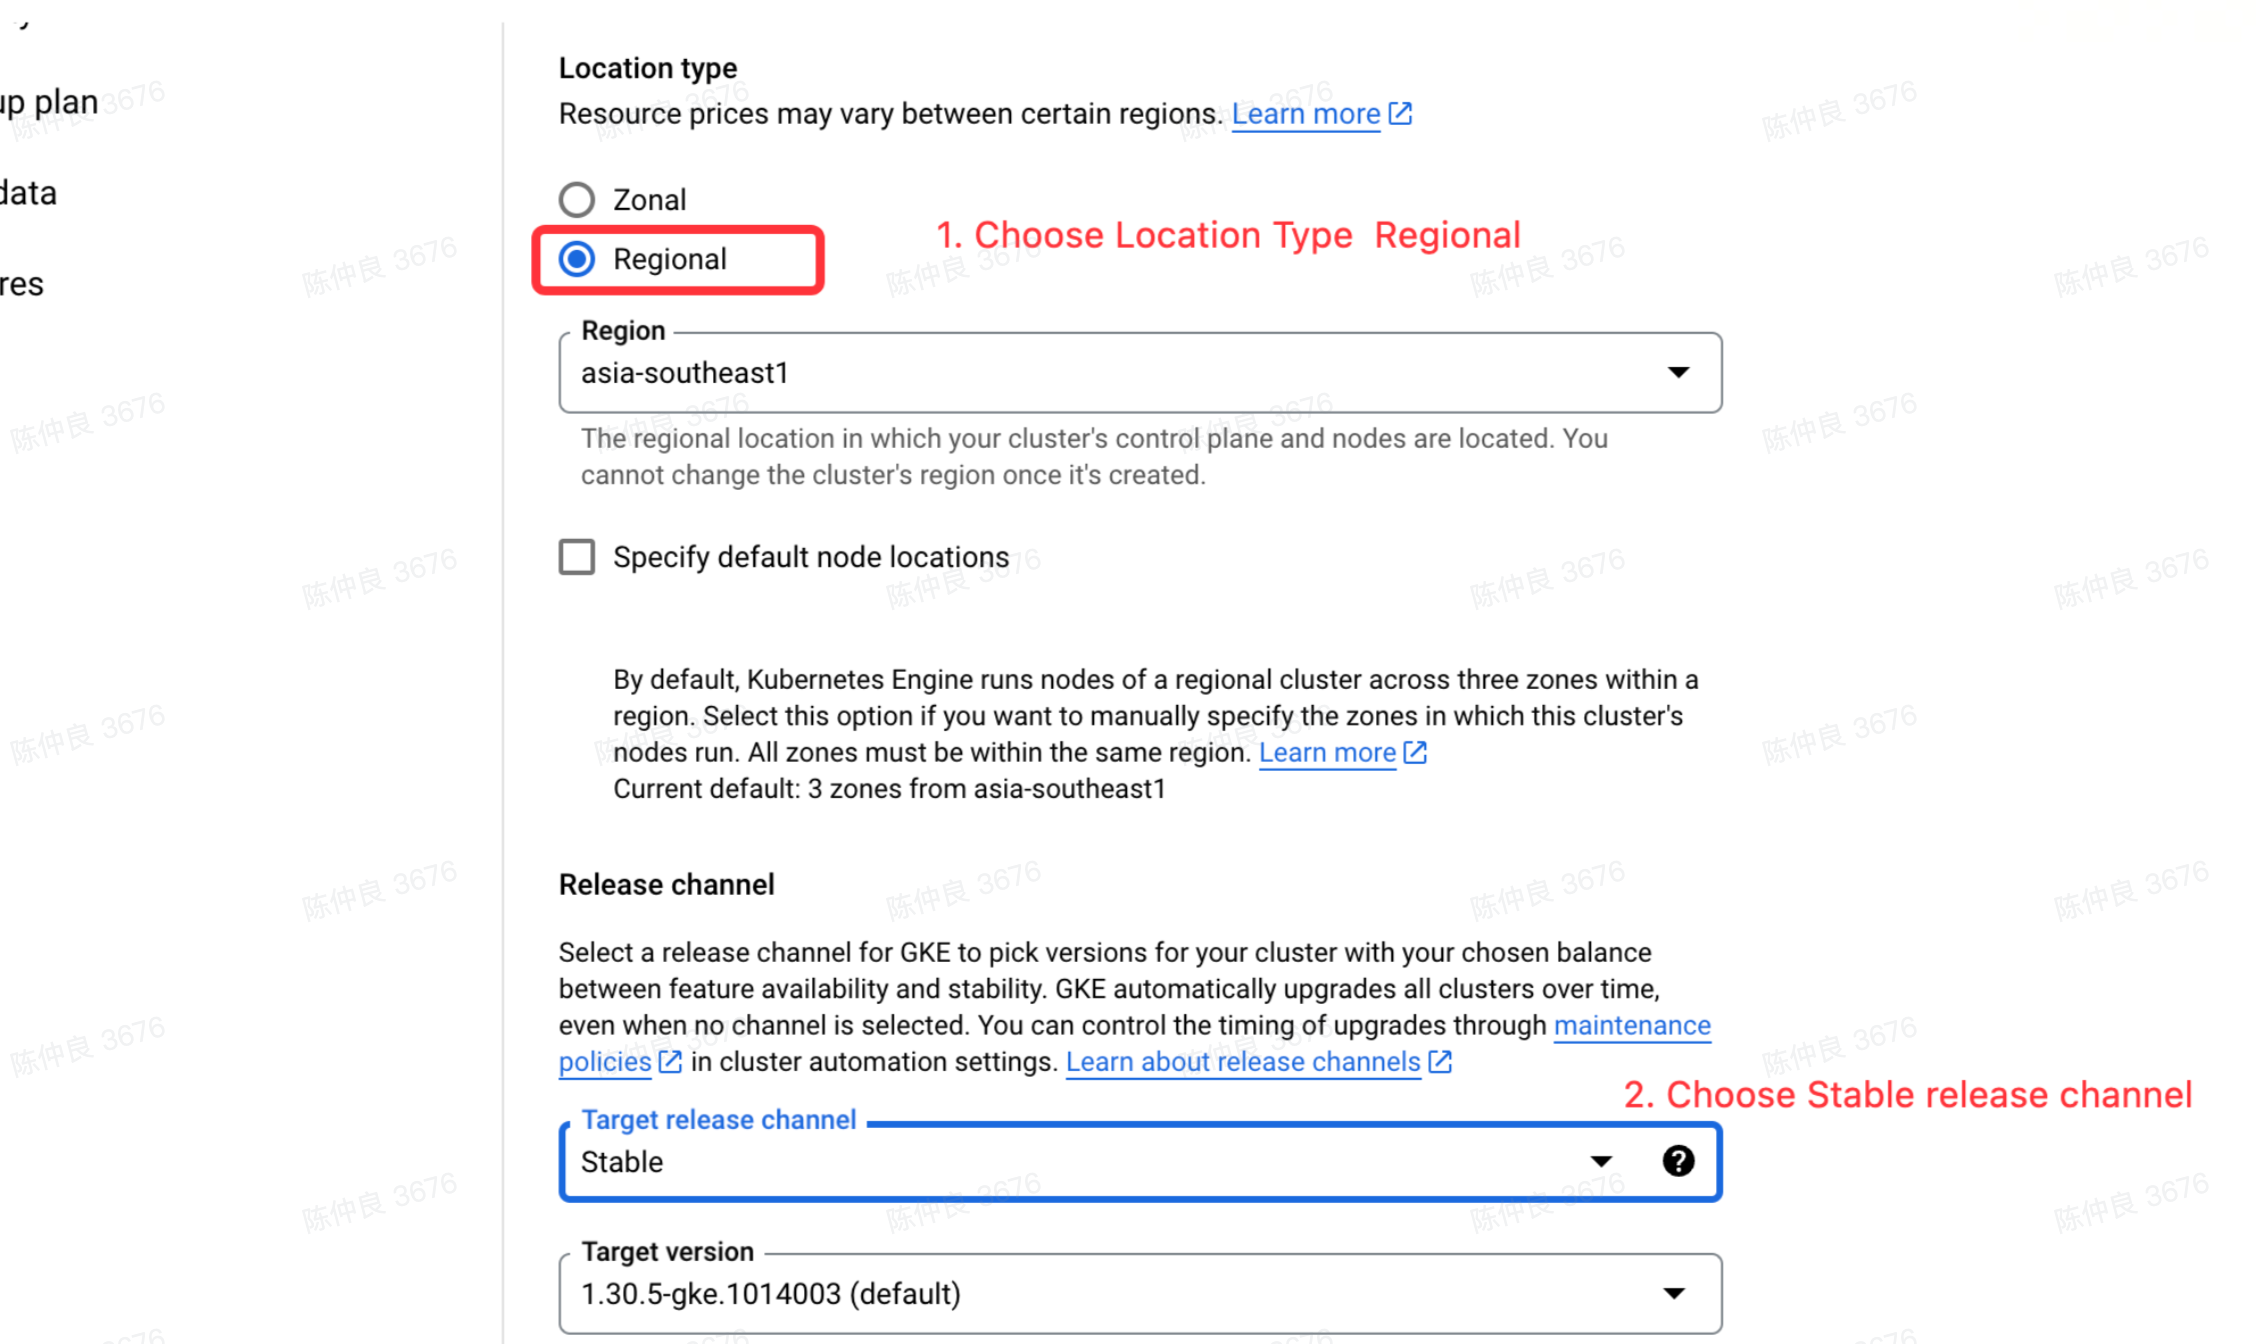
Fill in the cluster name and region information:
- Location Type: Choose Regional so you can create an AutoMQ instance with three availability zones later.
- Target Release Channel: It is recommended to choose the stable version.
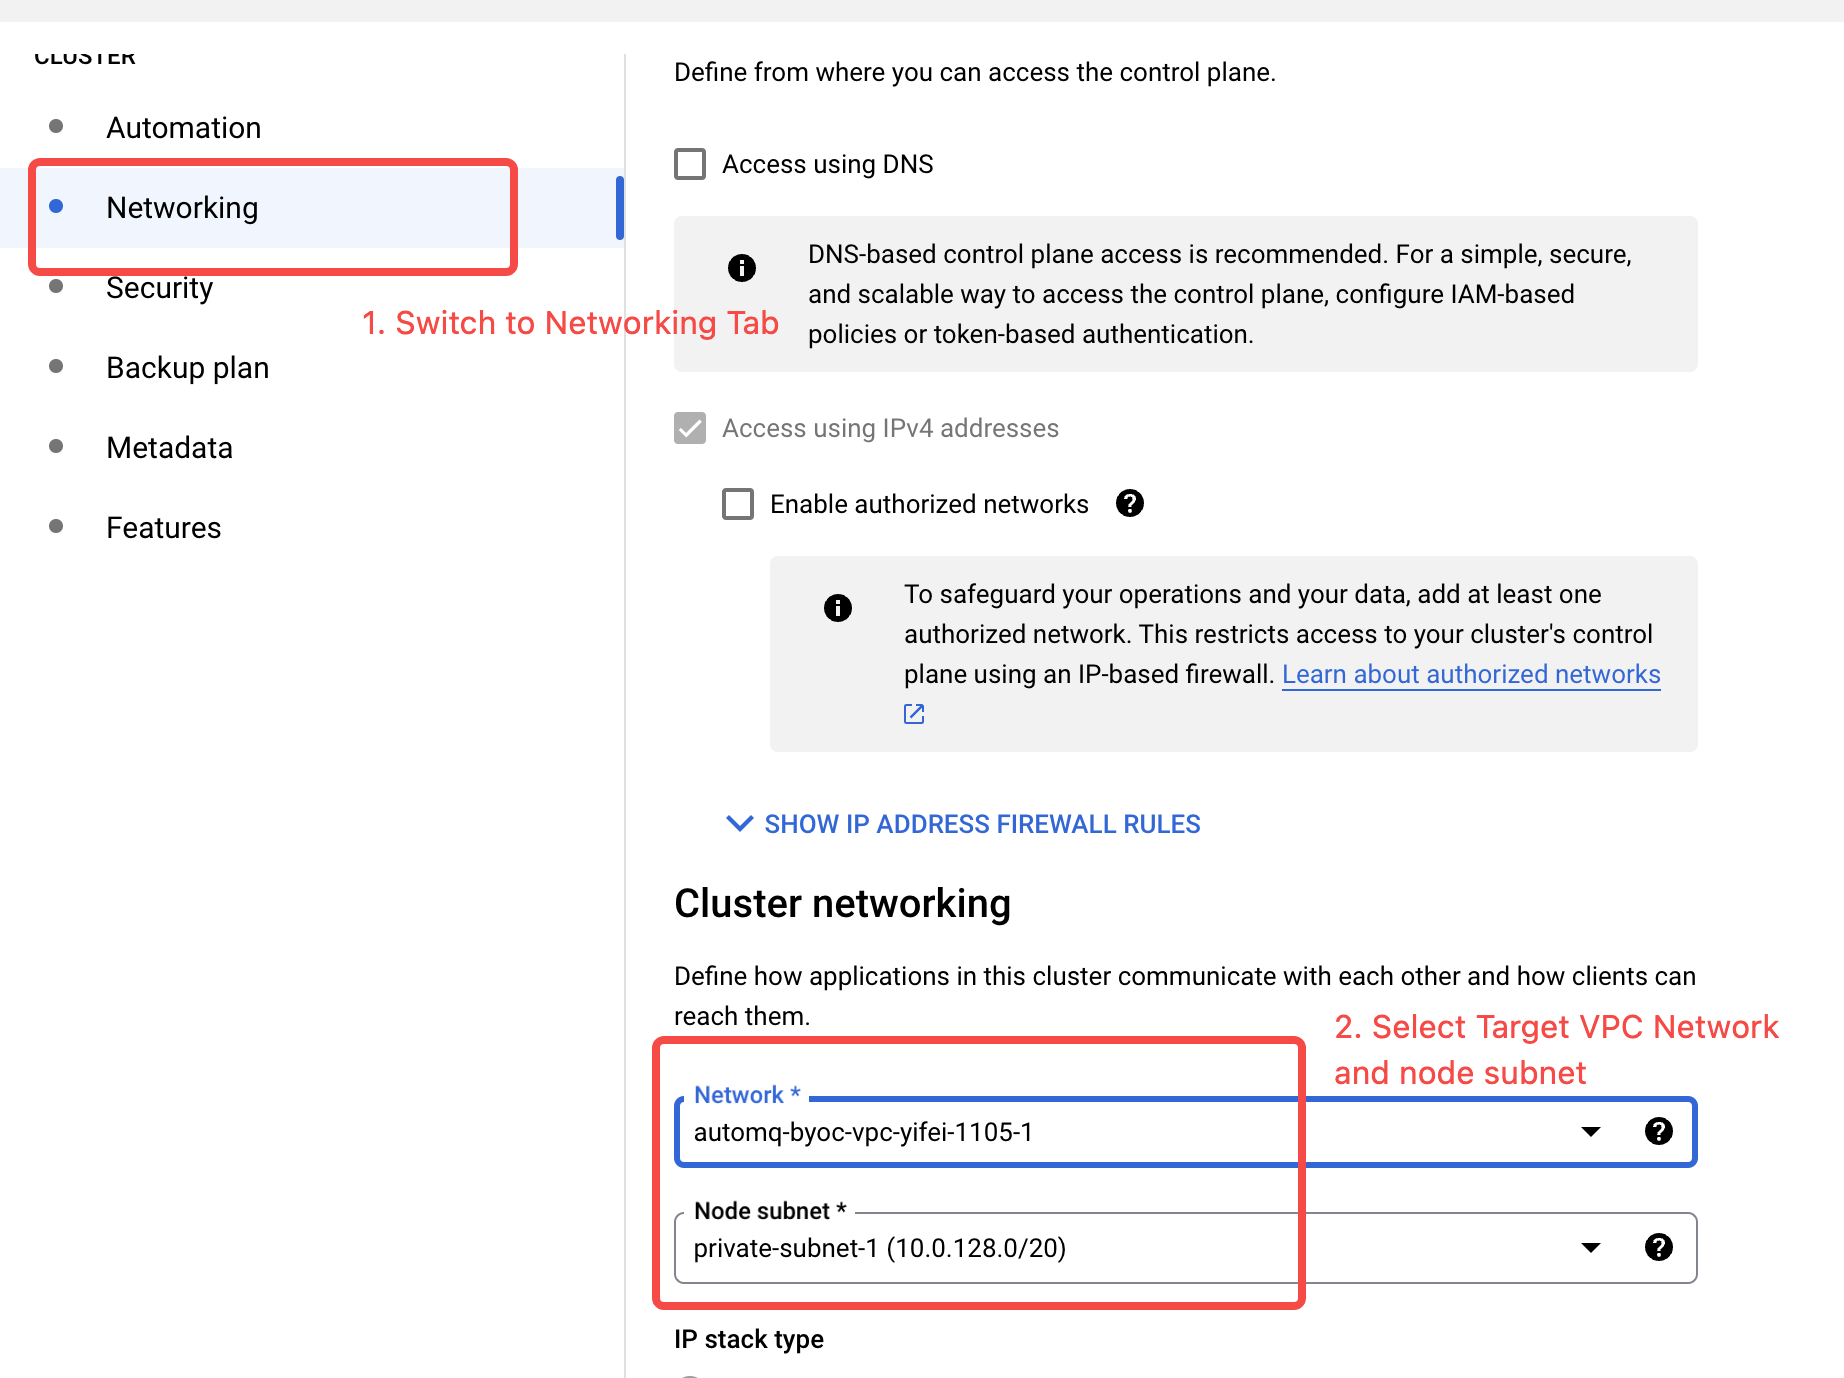
Configure GKE Cluster Network
- Switch to Networking configuration, select Target VPC and Subnets.
Note:The default Firewall policy between multiple subnets in Google Cloud does not allow intercommunication by default. Therefore, it is recommended to install both GKE and the AutoMQ environment console in the same subnet.If the GKE, AutoMQ environment console, and Kafka client applications are not in the same subnet, you need to go to VPC Firewall Policies.If you need to manually add firewall policies, it is recommended to allow all IP ranges of the subnet where the AutoMQ environment console resides. The port list includes: 9090, 9092-9093, 9102-9103, 22.
-
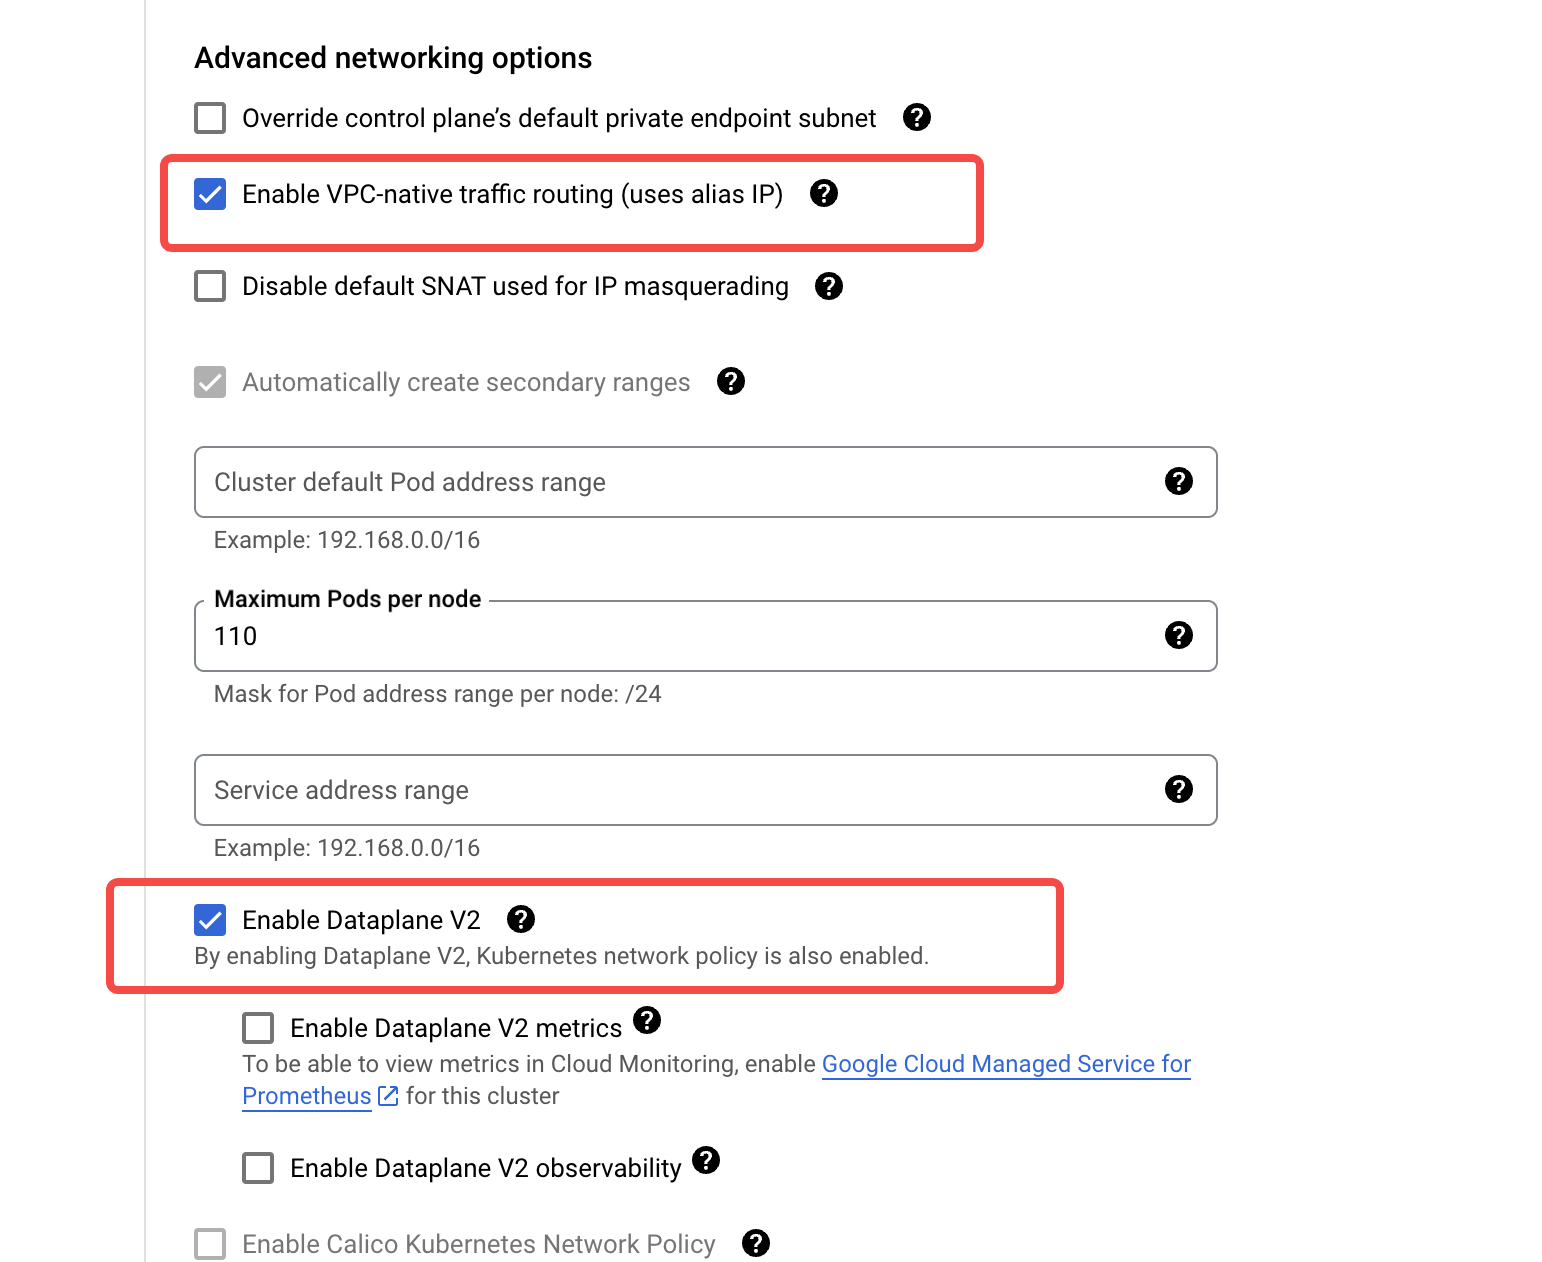
Modify the network configuration. Ensure the following options are set:
- Enable VPC-native traffic routing.
- Enable Dataplane V2.
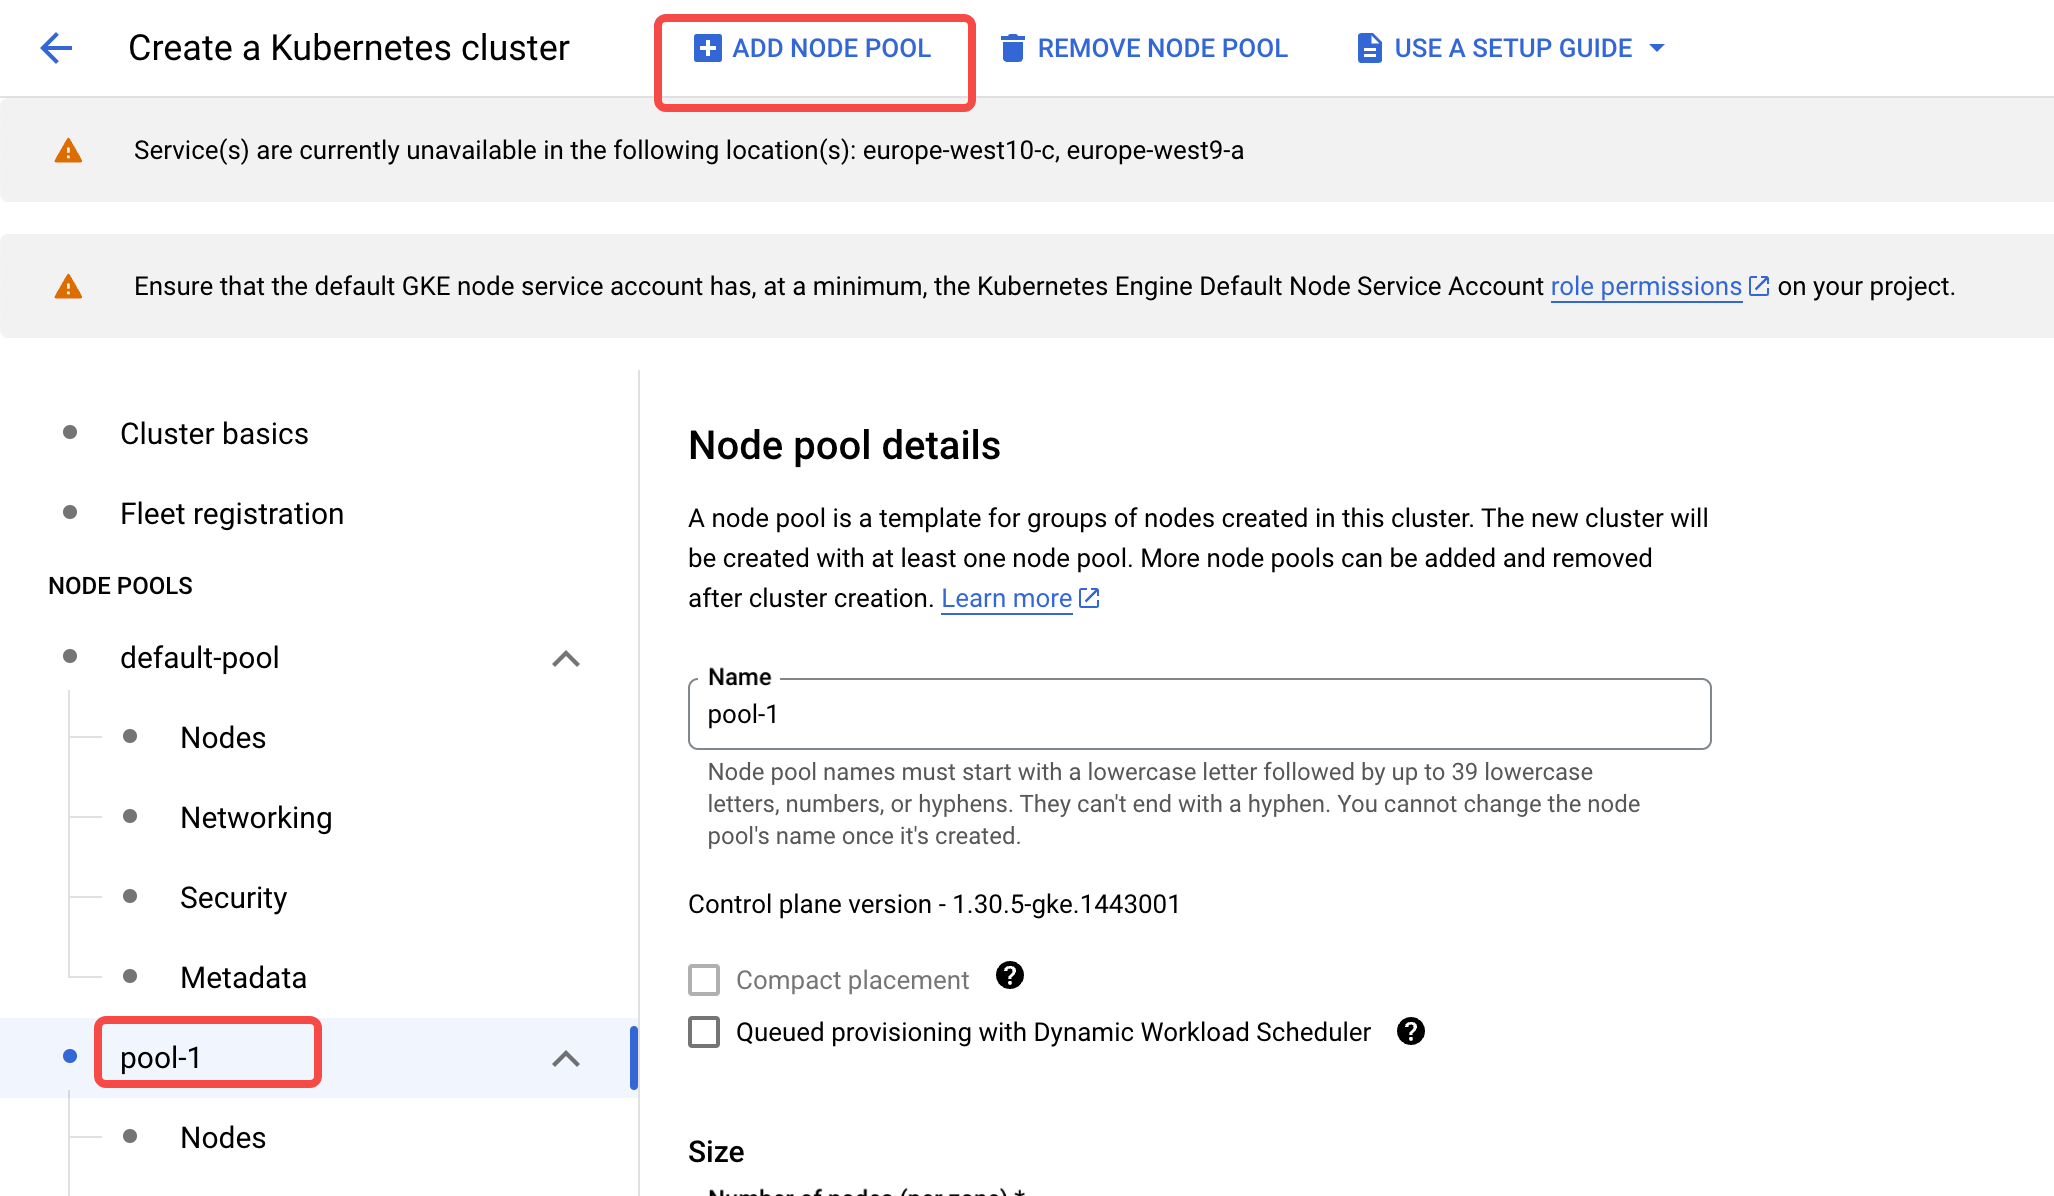
Set up the GKE Cluster Public Node Pool
Switch to the NODE POOLS configuration option and configure the default node pool to deploy GKE system components. Adjust the number of nodes to 1 per availability zone, ensuring the total number of nodes is at least 3. For the node pool deployed for GKE system components, aside from the configurations shown in the figure, other options can use the default settings.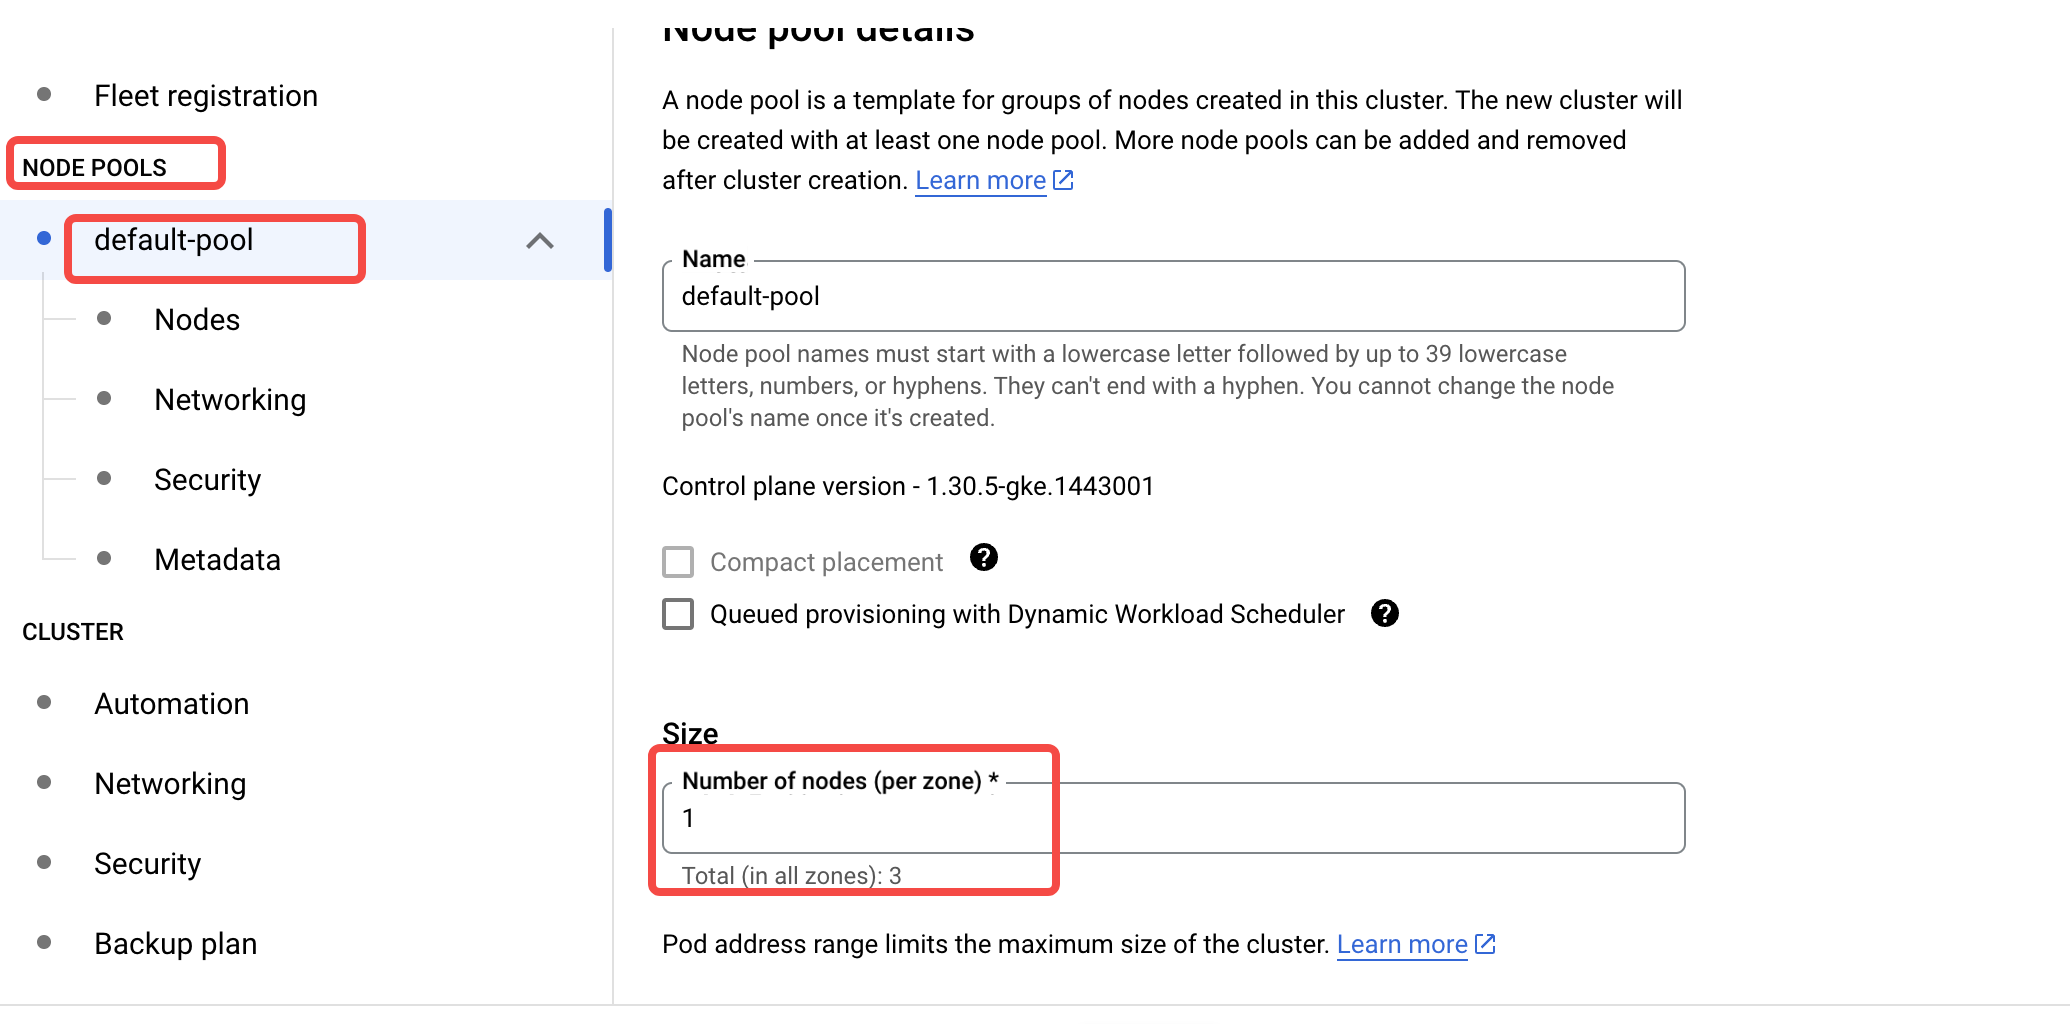
Add an AutoMQ Dedicated Node Pool
Important:If the Workload Identity feature is enabled on a GKE cluster, it will default to using the GKE metadata server, which will impact AutoMQ’s Pod access to the node’s service account. In this case, you need to disable the GKE metadata server after the node pool is created.
- Click the Add Node Pool button above to configure the AutoMQ dedicated node pool.
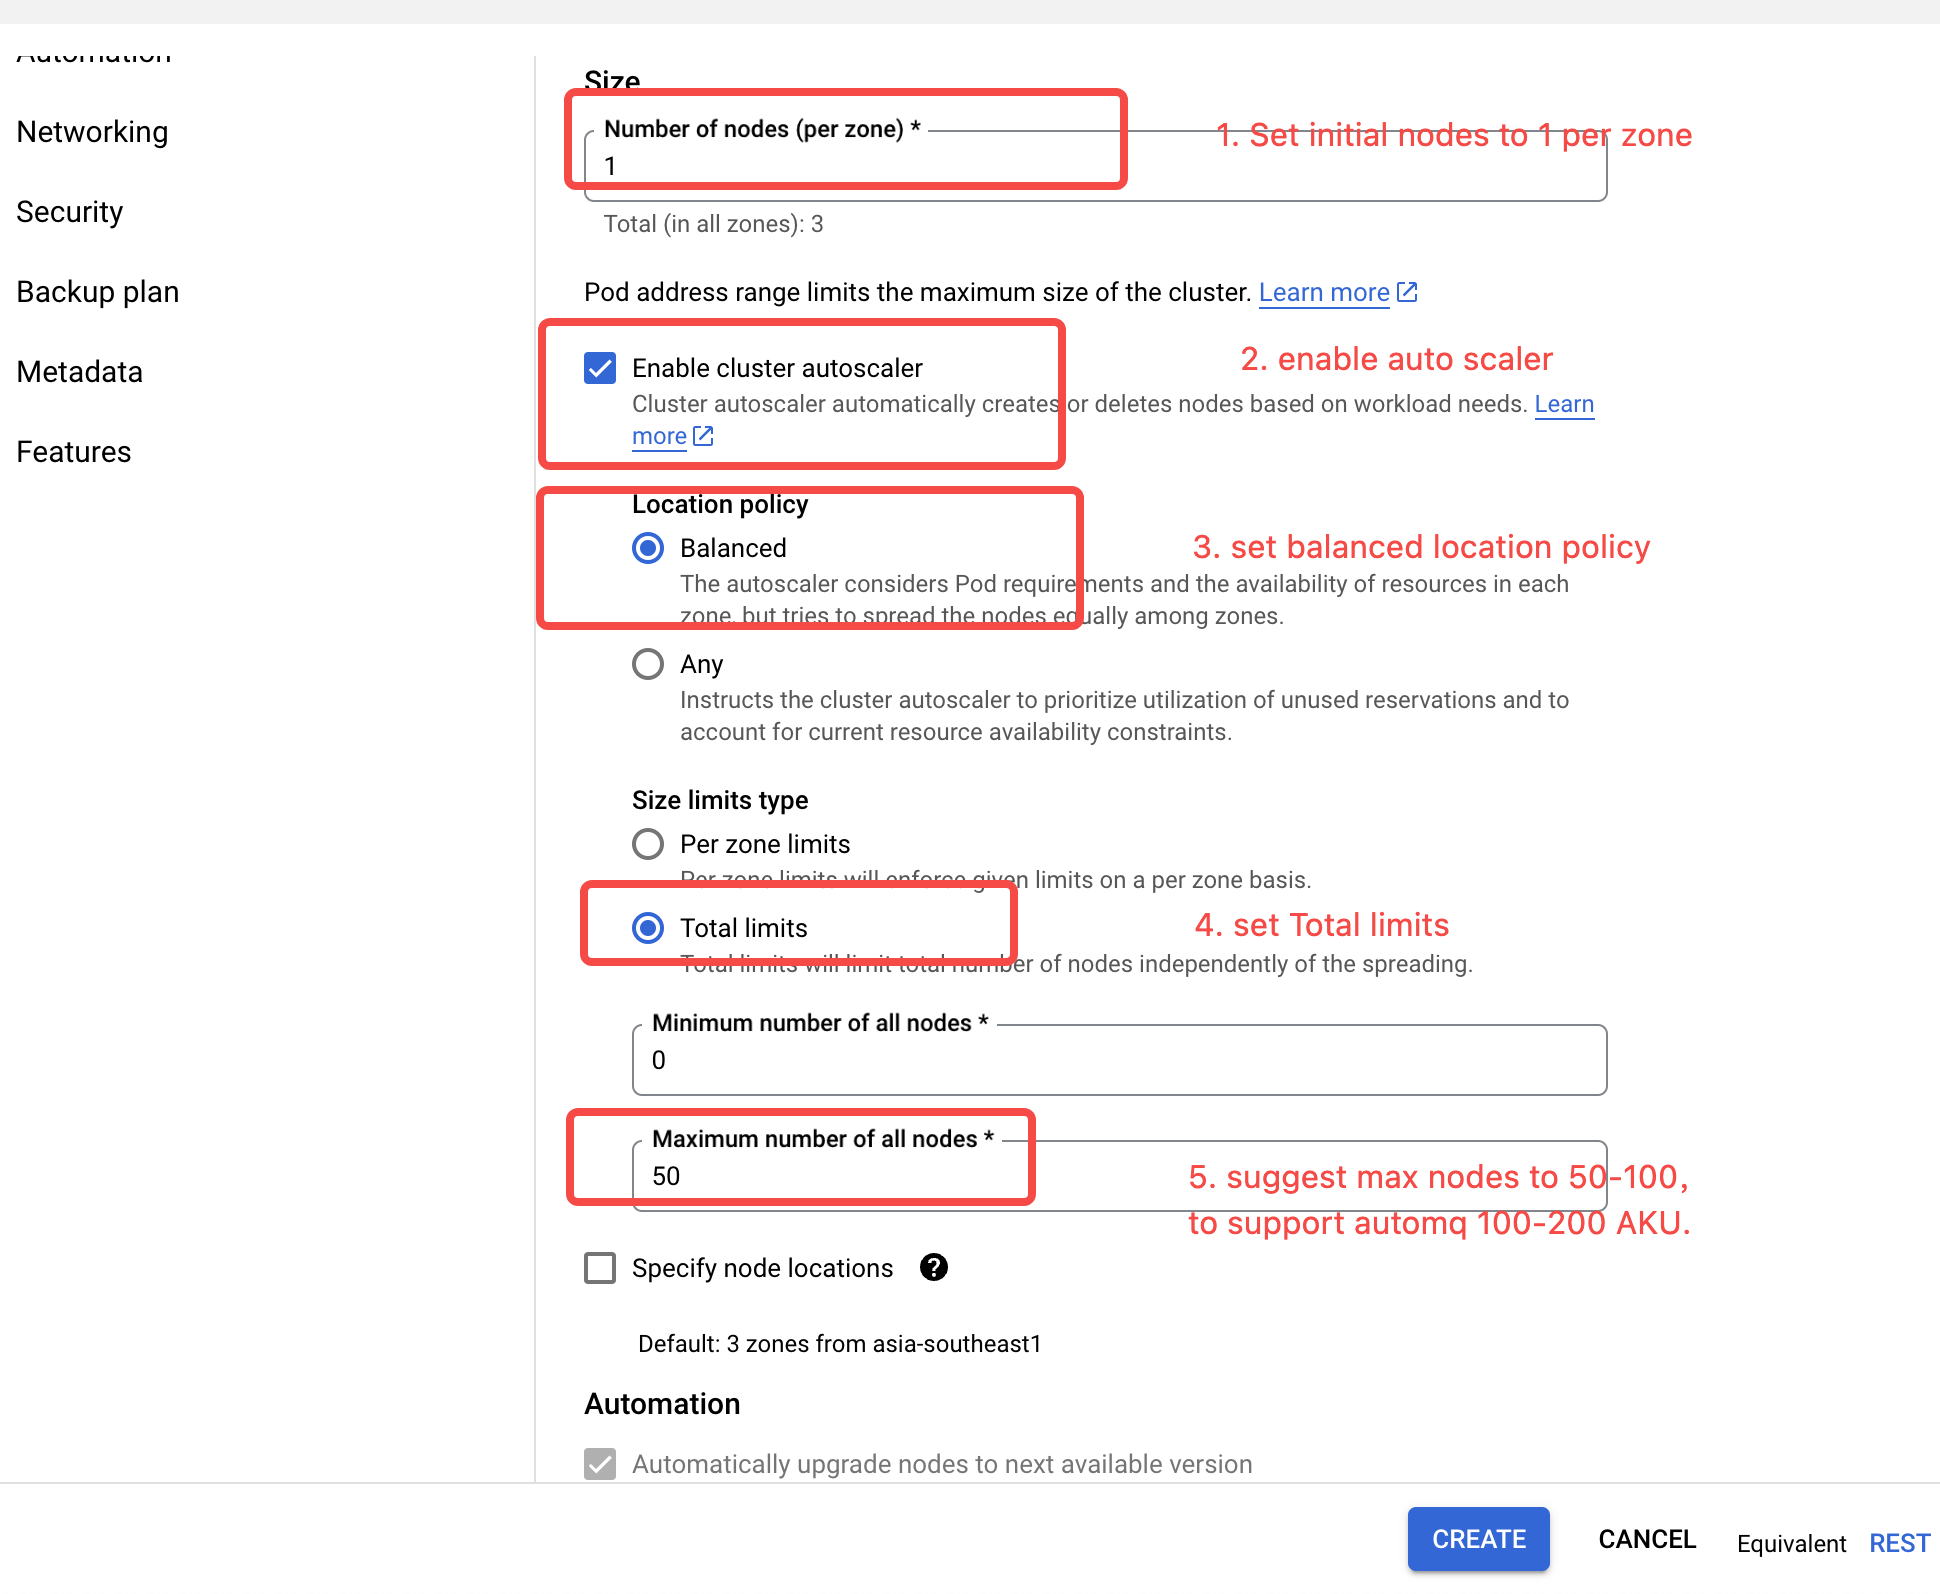
- Enable Cluster AutoScaler. Configure it to the Balanced type with the size limit set to Total limits. Set an appropriate upper limit (an upper limit of 50-100 is suggested).
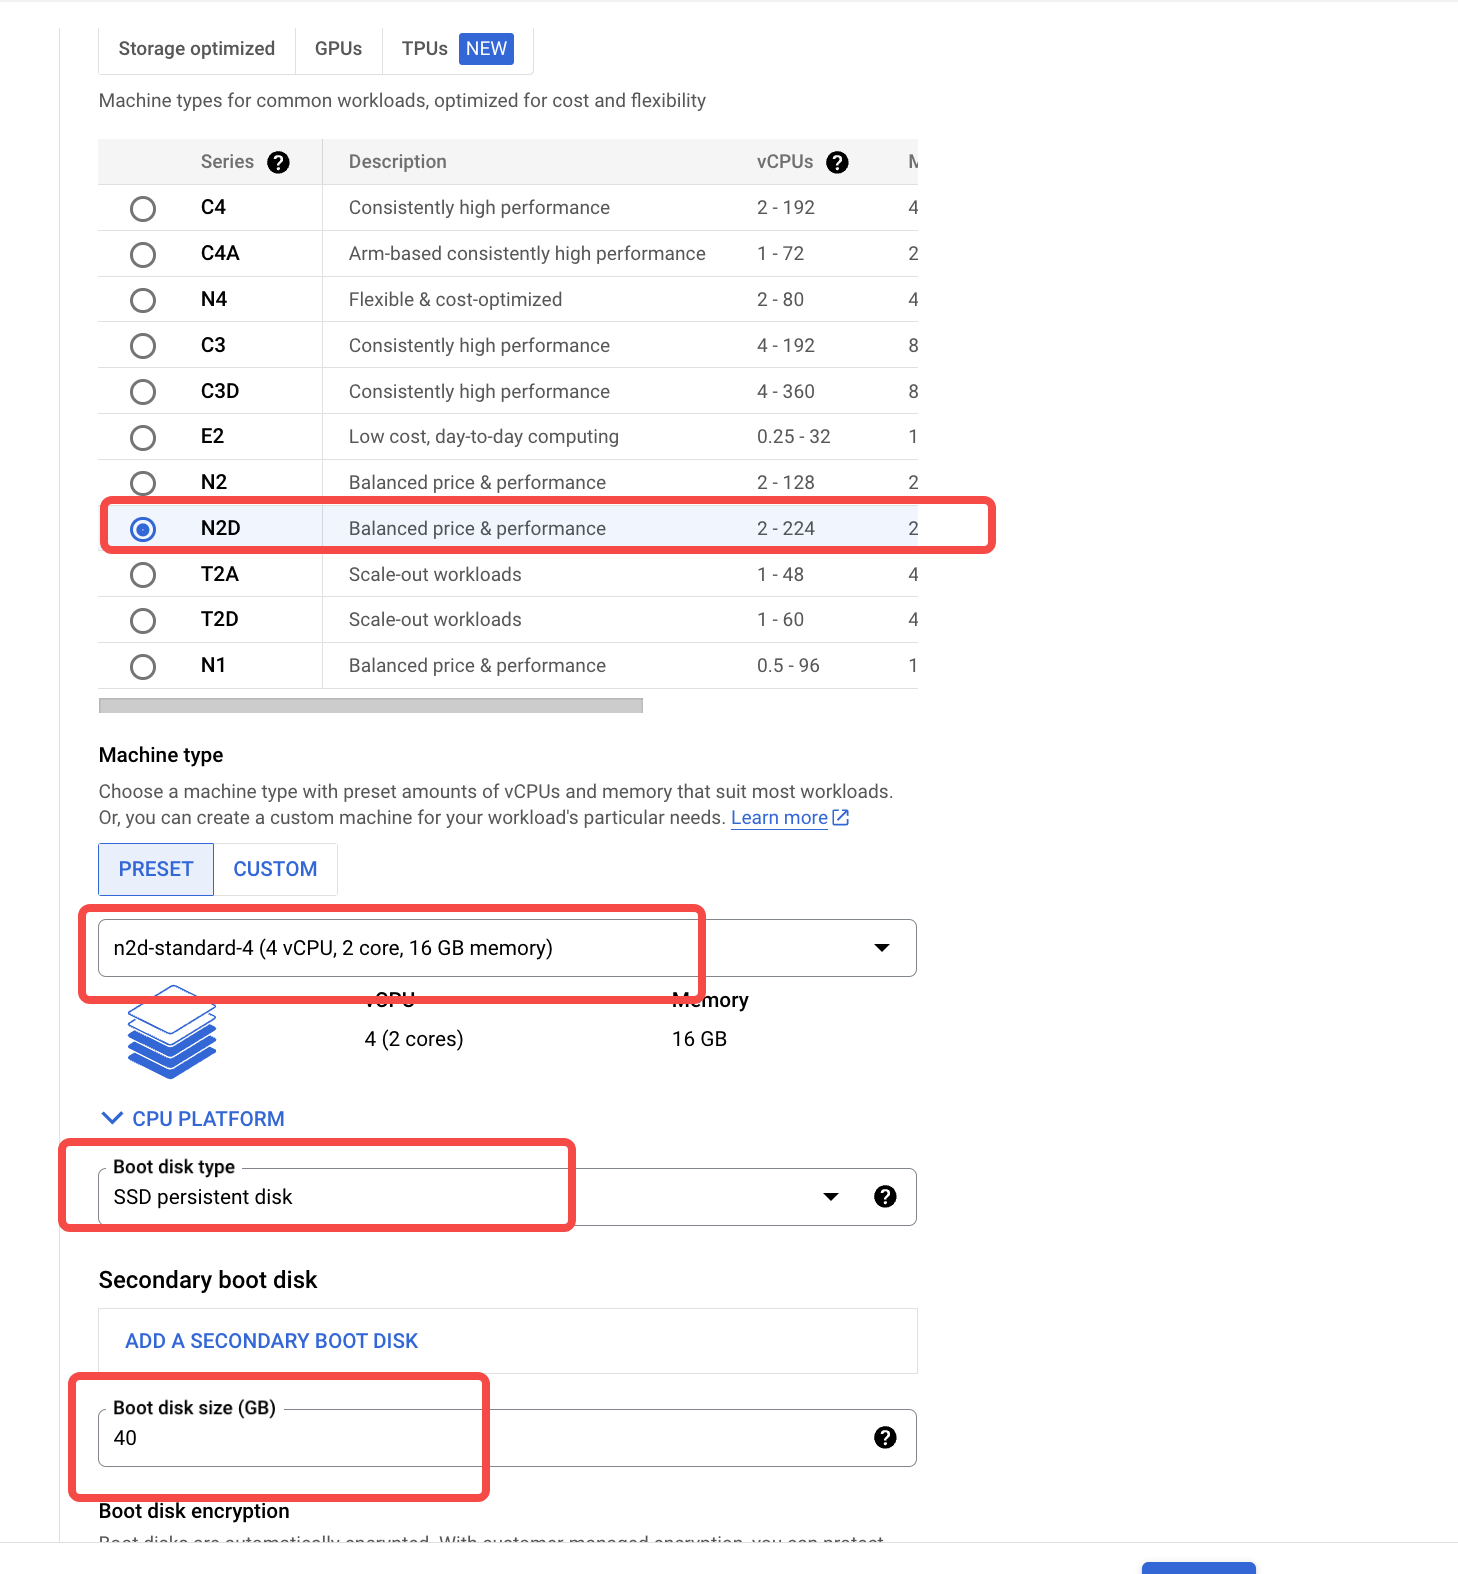
- On the Nodes tab, configure the machine type list that meets AutoMQ’s requirements by referring to Overview▸.
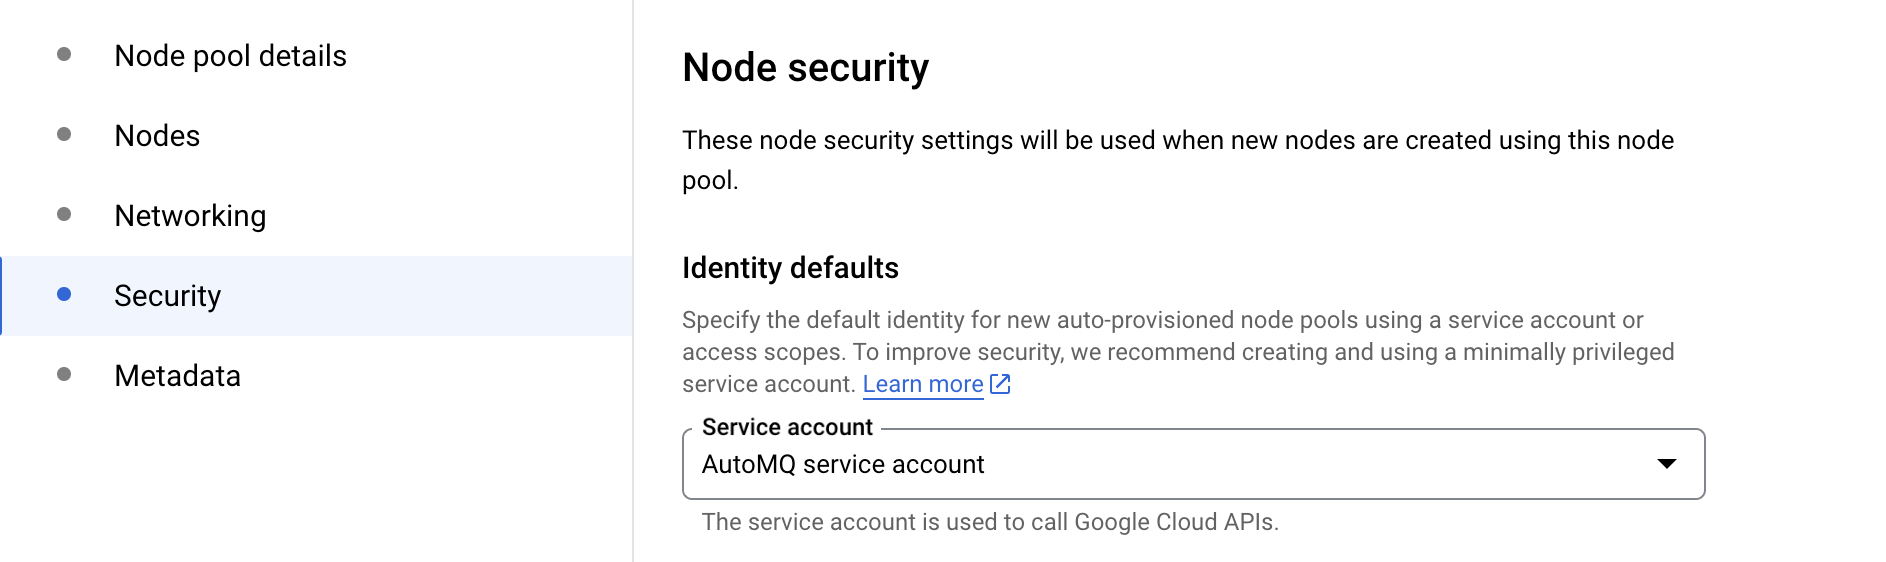
- In the Security tab, bind the service account dedicated for the AutoMQ node pool created in step 2.
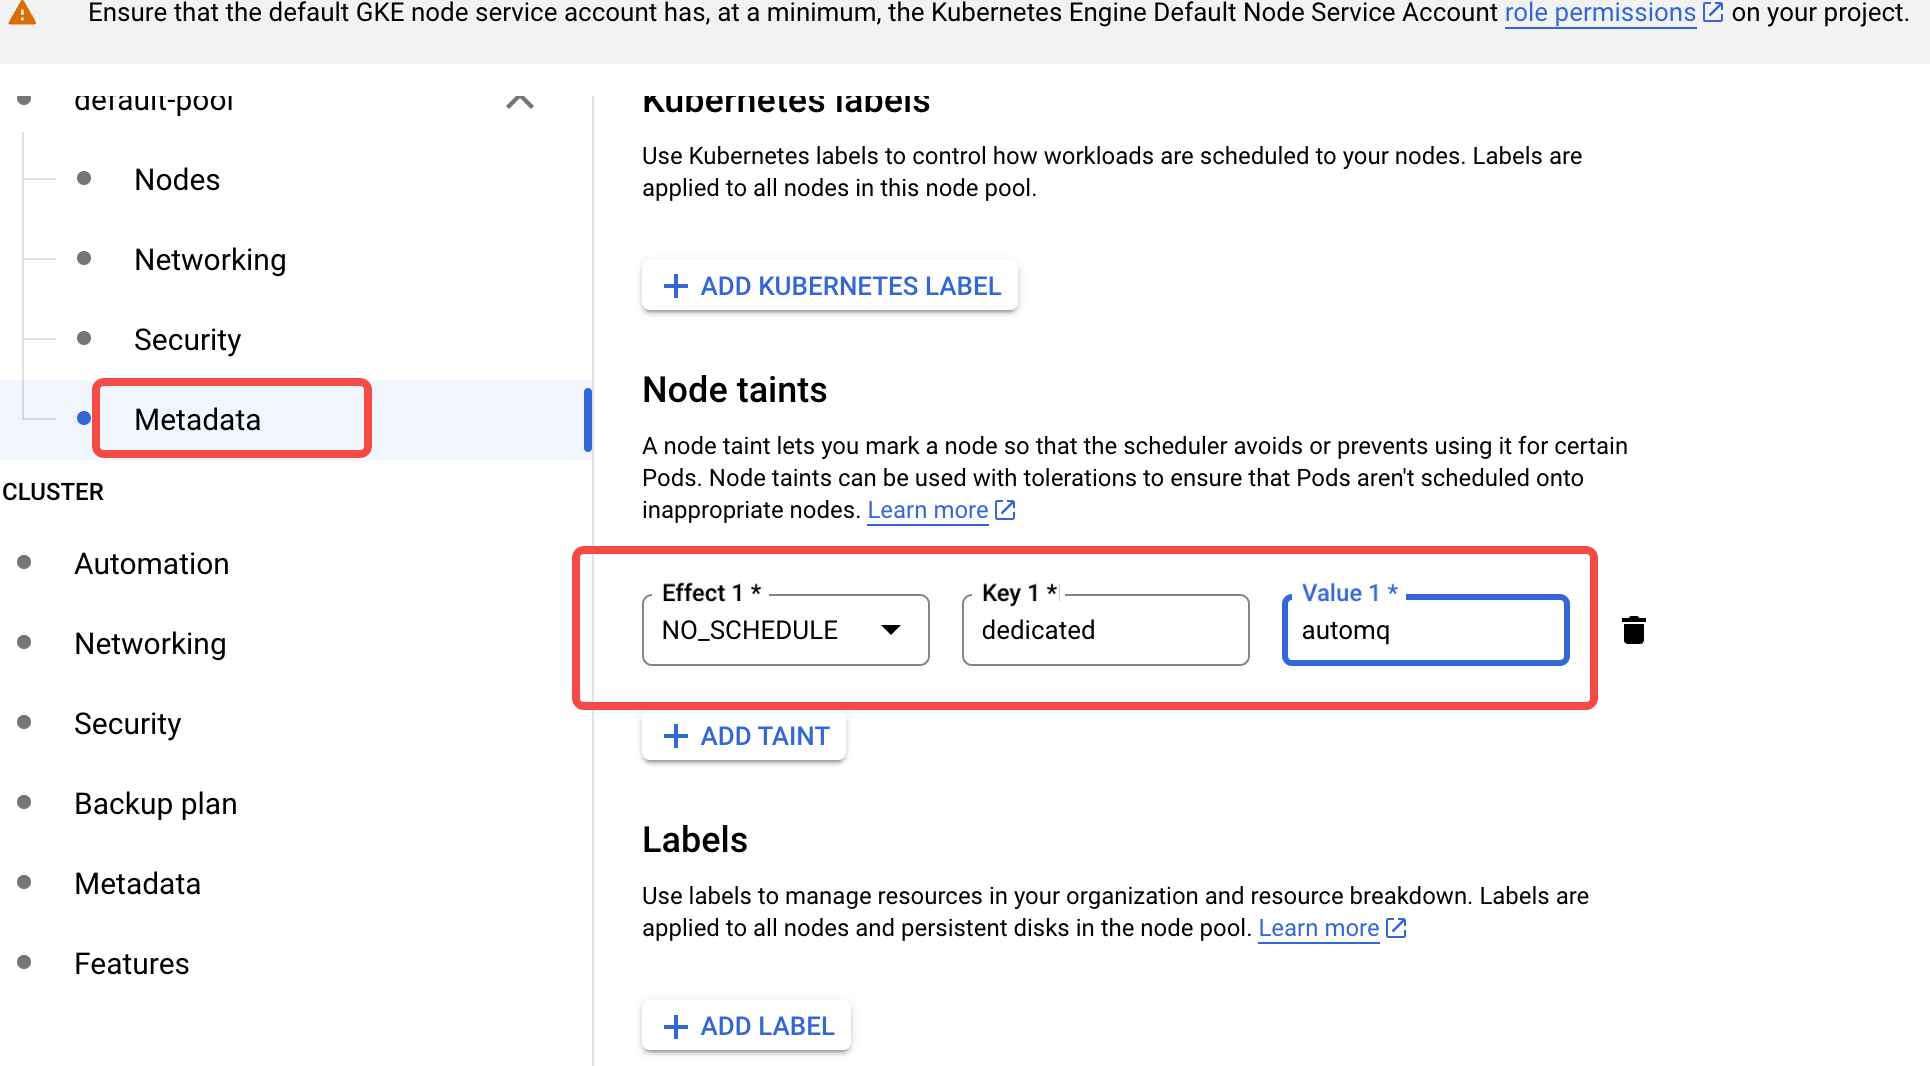
- In the Metadata tab, set the taint for AutoMQ exclusive use. The key of the taint is dedicated, the value is automq, and the effect is NO_SCHEDULE.
Click to Create the GKE Cluster
- After verifying all configurations are correct, click the Create button below to create the GKE cluster.
- Once the GKE cluster is created, copy the cluster Name for use in step 3 configuration.
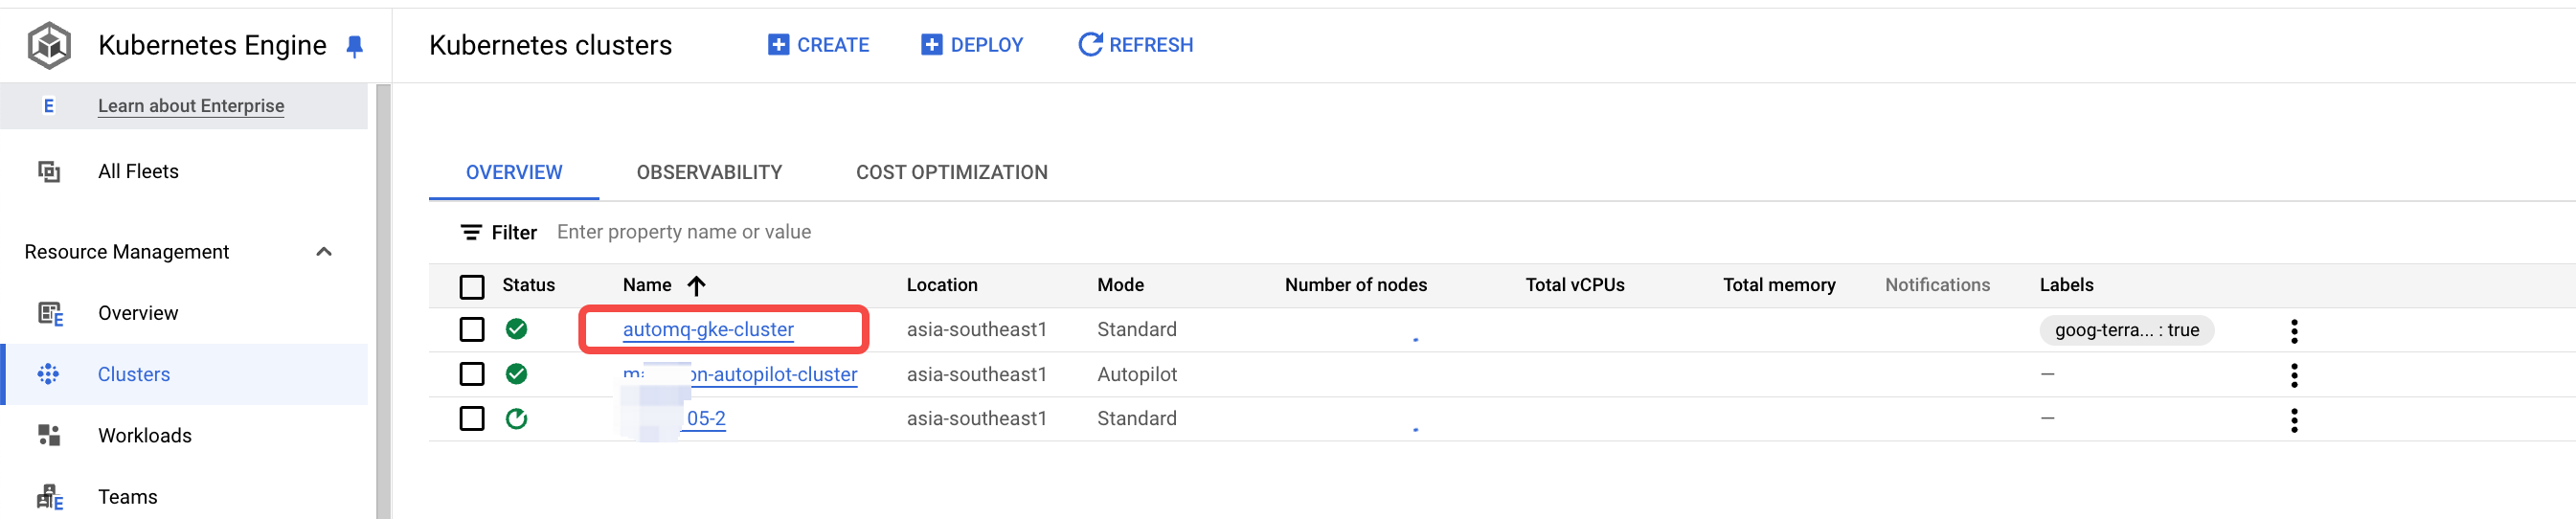
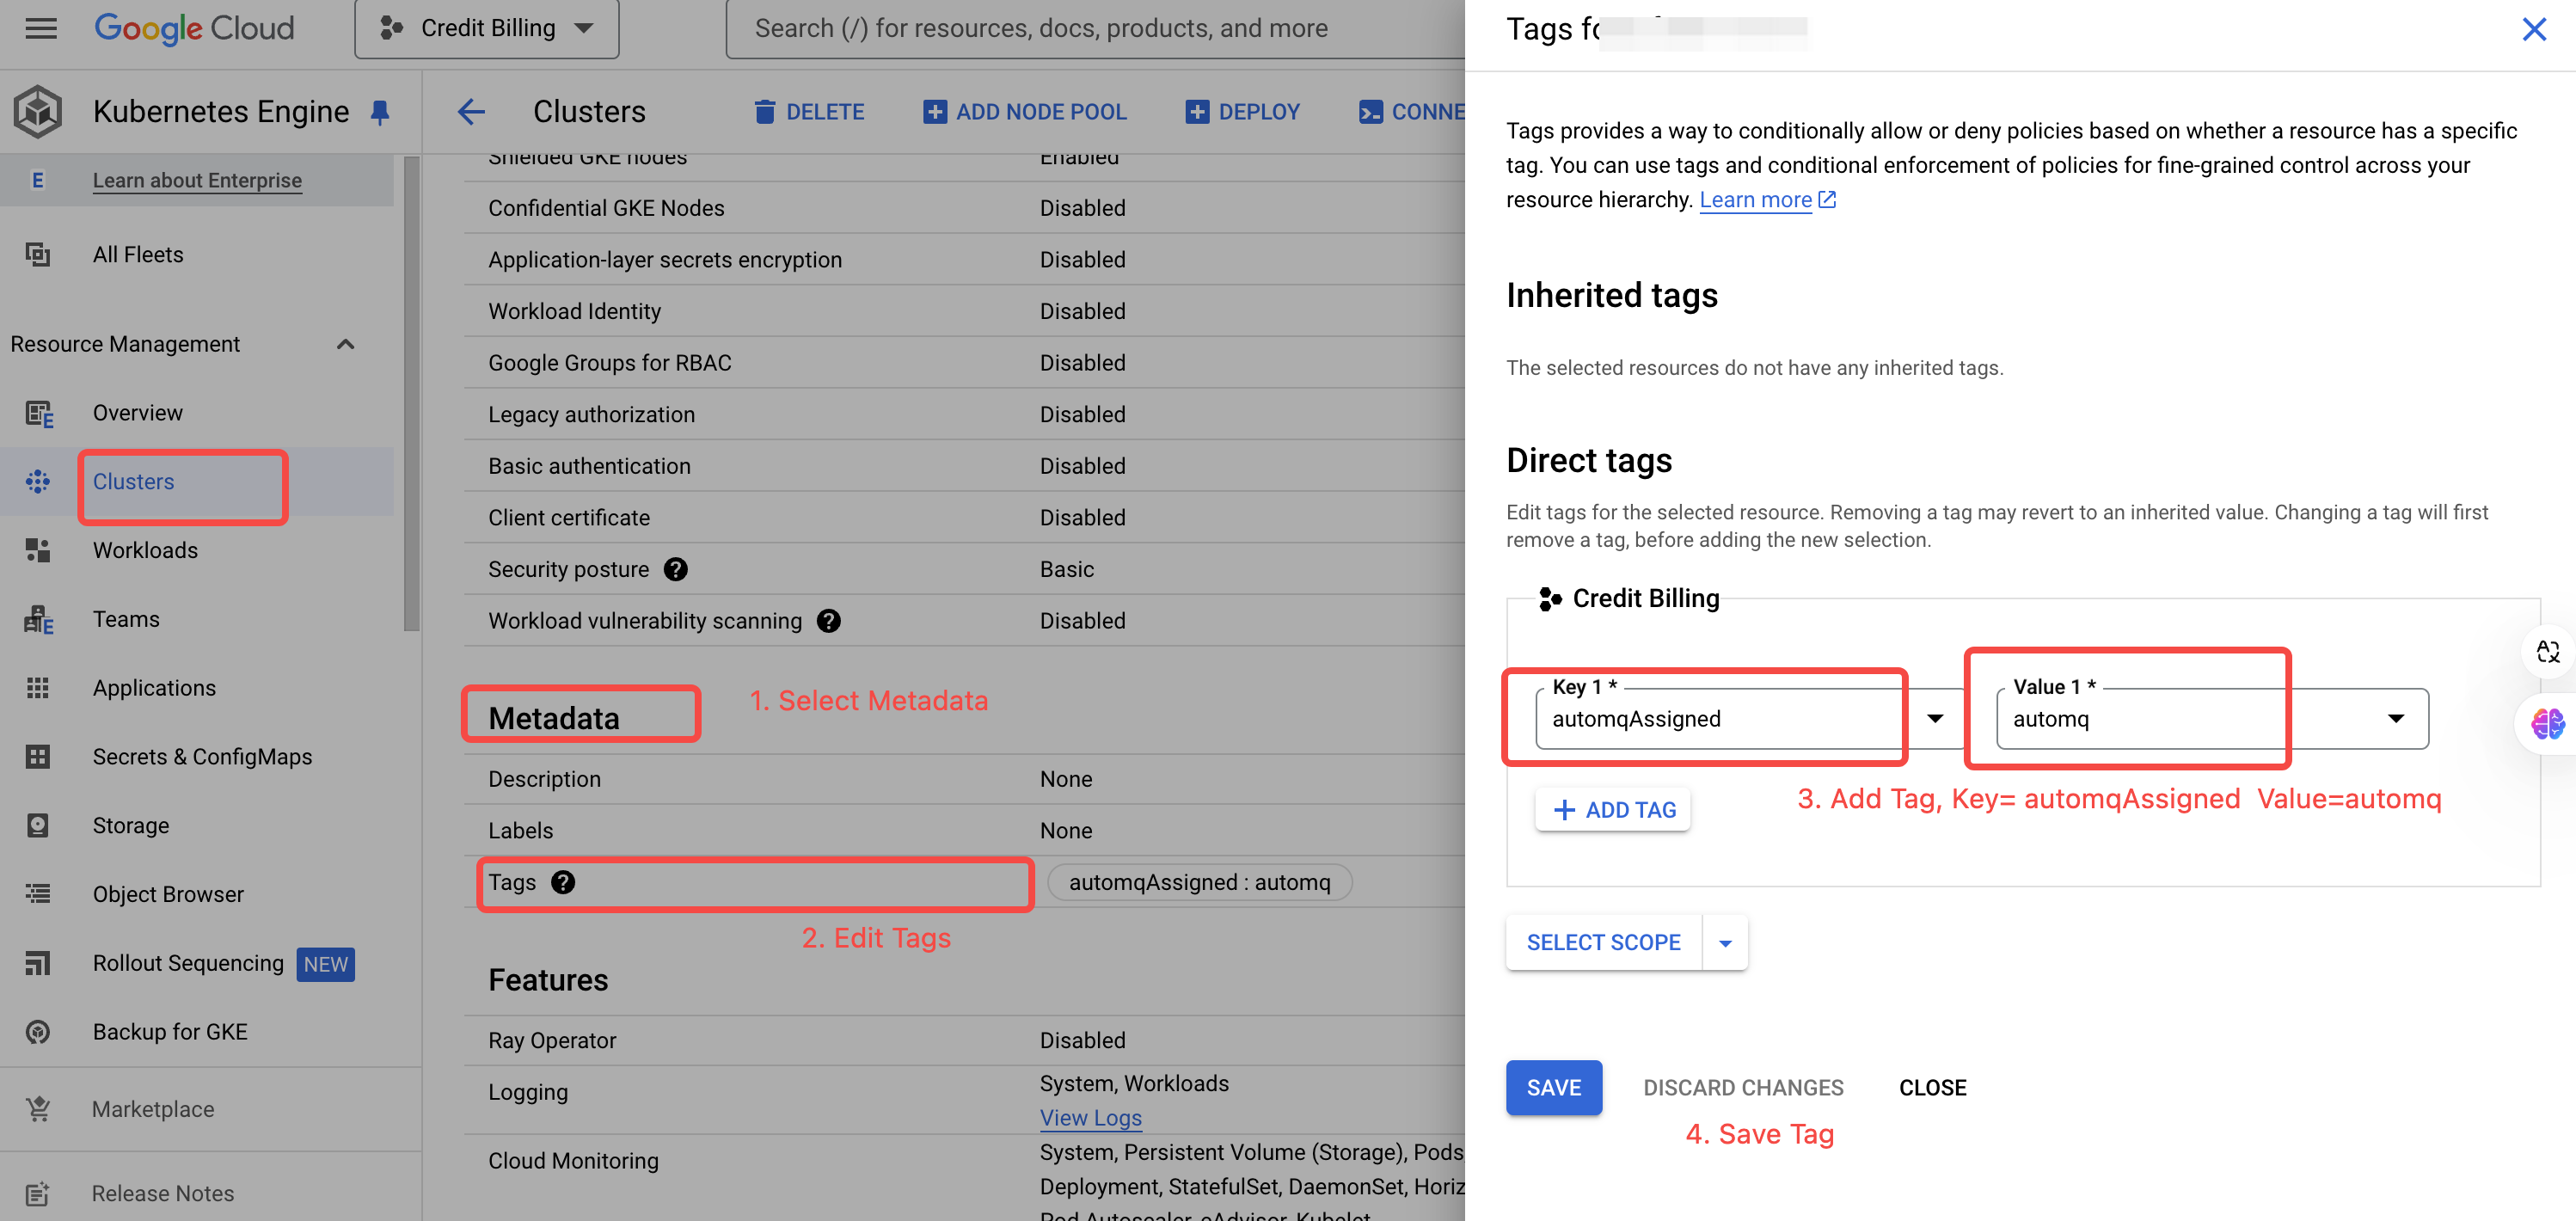
- Locate the GKE cluster in the cluster list and add a tag to it. This tag will be used to manage permissions in the subsequent AutoMQ console.
Disabling GKE Metadata Server (Required when a GKE Cluster Enables Workload Identity)
If a GKE cluster has the Workload Identity feature enabled, it will, by default, use the GKE metadata server. This setup can affect AutoMQ’s Pods’ access to the node service account. Therefore, it is necessary to disable the GKE metadata service for the AutoMQ node pool after the node pool is created, and instead use the default GCE service.- View the AutoMQ designated node pool and click Edit.
- Check the security options and disable the GKE metadata server.

- Click Save to submit, and GKE will update the configurations for all nodes.
Deploy AutoMQ Placeholder Deployment
Create a Placeholder Deployment for the node group used by AutoMQ to accelerate failover speed in node failure scenarios. You can deploy the Placeholder Deployment using thekubectl command or the Kubernetes console.
First, click the link to download the priority declaration file named automq-low-priority.yaml, then execute the following command to create the priority declaration.
automq-gke-placeholder.yaml file. Depending on the actual deployment node pool, modify the parameters within:
-
metadata.name: It is recommended to change it to a meaningful placeholder name likeplaceholder-for-nodegroup-A. -
replicas: The reserved number of Placeholder pods, with the default set to 1. If deploying across multiple availability zones, it is advisable to reserve one machine per zone, meaning you should set the number to match the number of available zones. -
affinity.nodeAffinity: This is used to select nodes for Placeholder deployment. You need to modifymatchExpressionsfor bothkeyandvaluesto accurately match the AutoMQ node pool. Two options for filtering nodes are provided in the example YAML file.-
cloud.google.com/gke-nodepool: Use thecloud.google.com/gke-nodepoollabel on GKE to filter specific node pools. -
node.kubernetes.io/instance-type: Use thenode.kubernetes.io/instance-typelabel on GKE to filter specific node types.
-
-
resources:- The limits for CPU/memory should align with the specifications of the Node Group, such as 2C16G.
- Requests for CPU/memory should be slightly less than the Node Group’s specifications, e.g., occupying 3/4 of the resources, ensuring that the Placeholder Pod can be scheduled to an additional Node with exclusive access, which prevents unexpected occupation by other Pods in the cluster that might cause a failure in scheduling during an actual Failover due to insufficient resources.
Running, and observe whether it has been scheduled to the desired node.
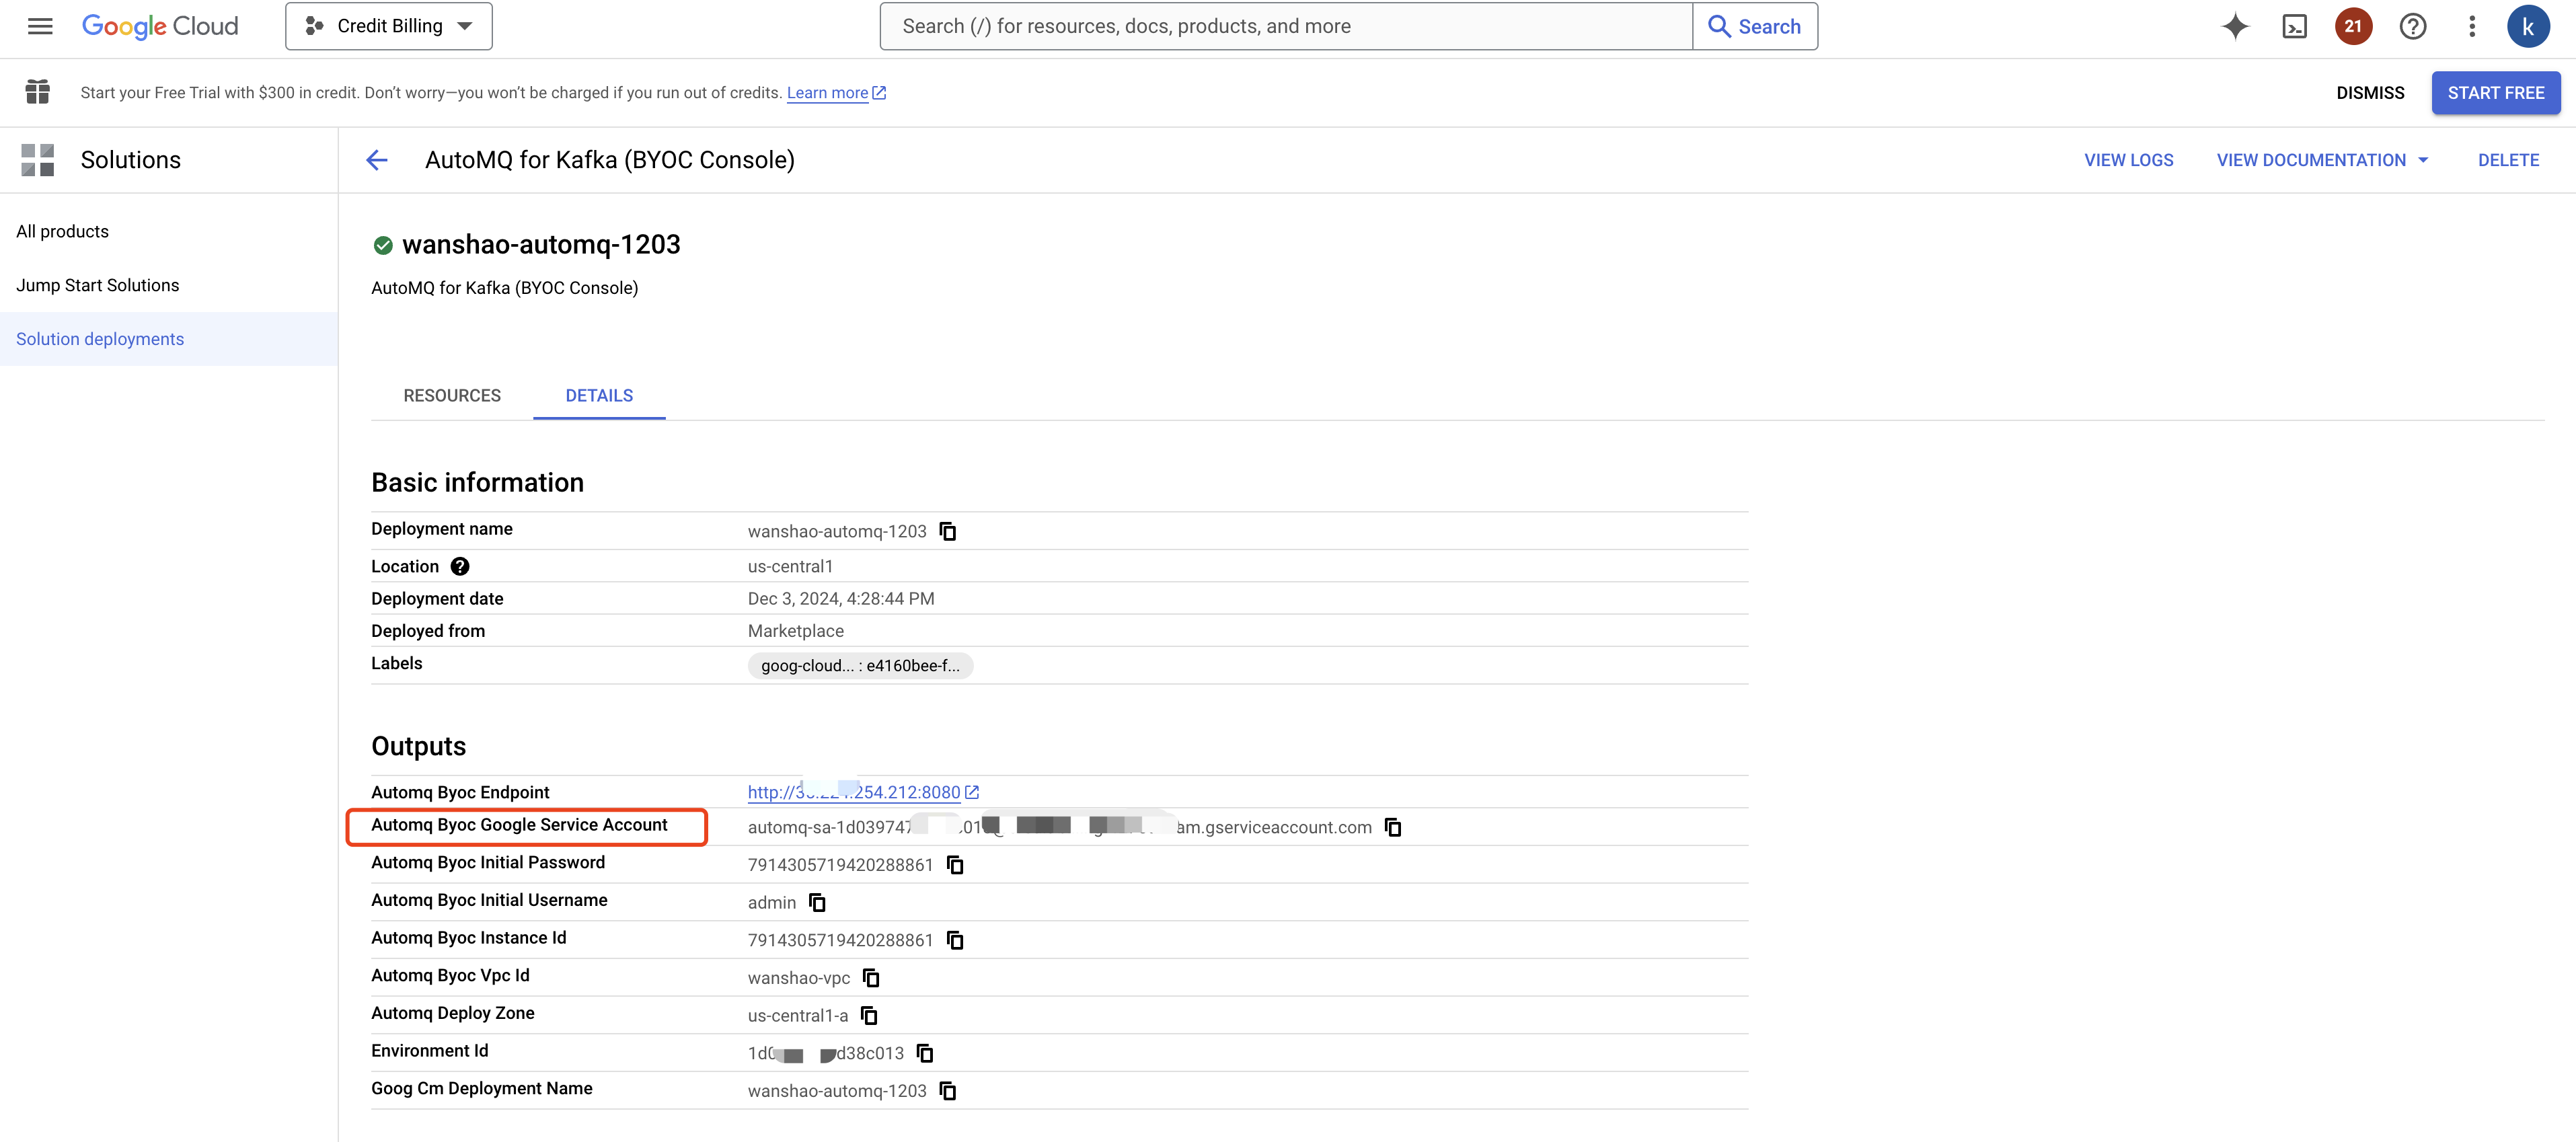
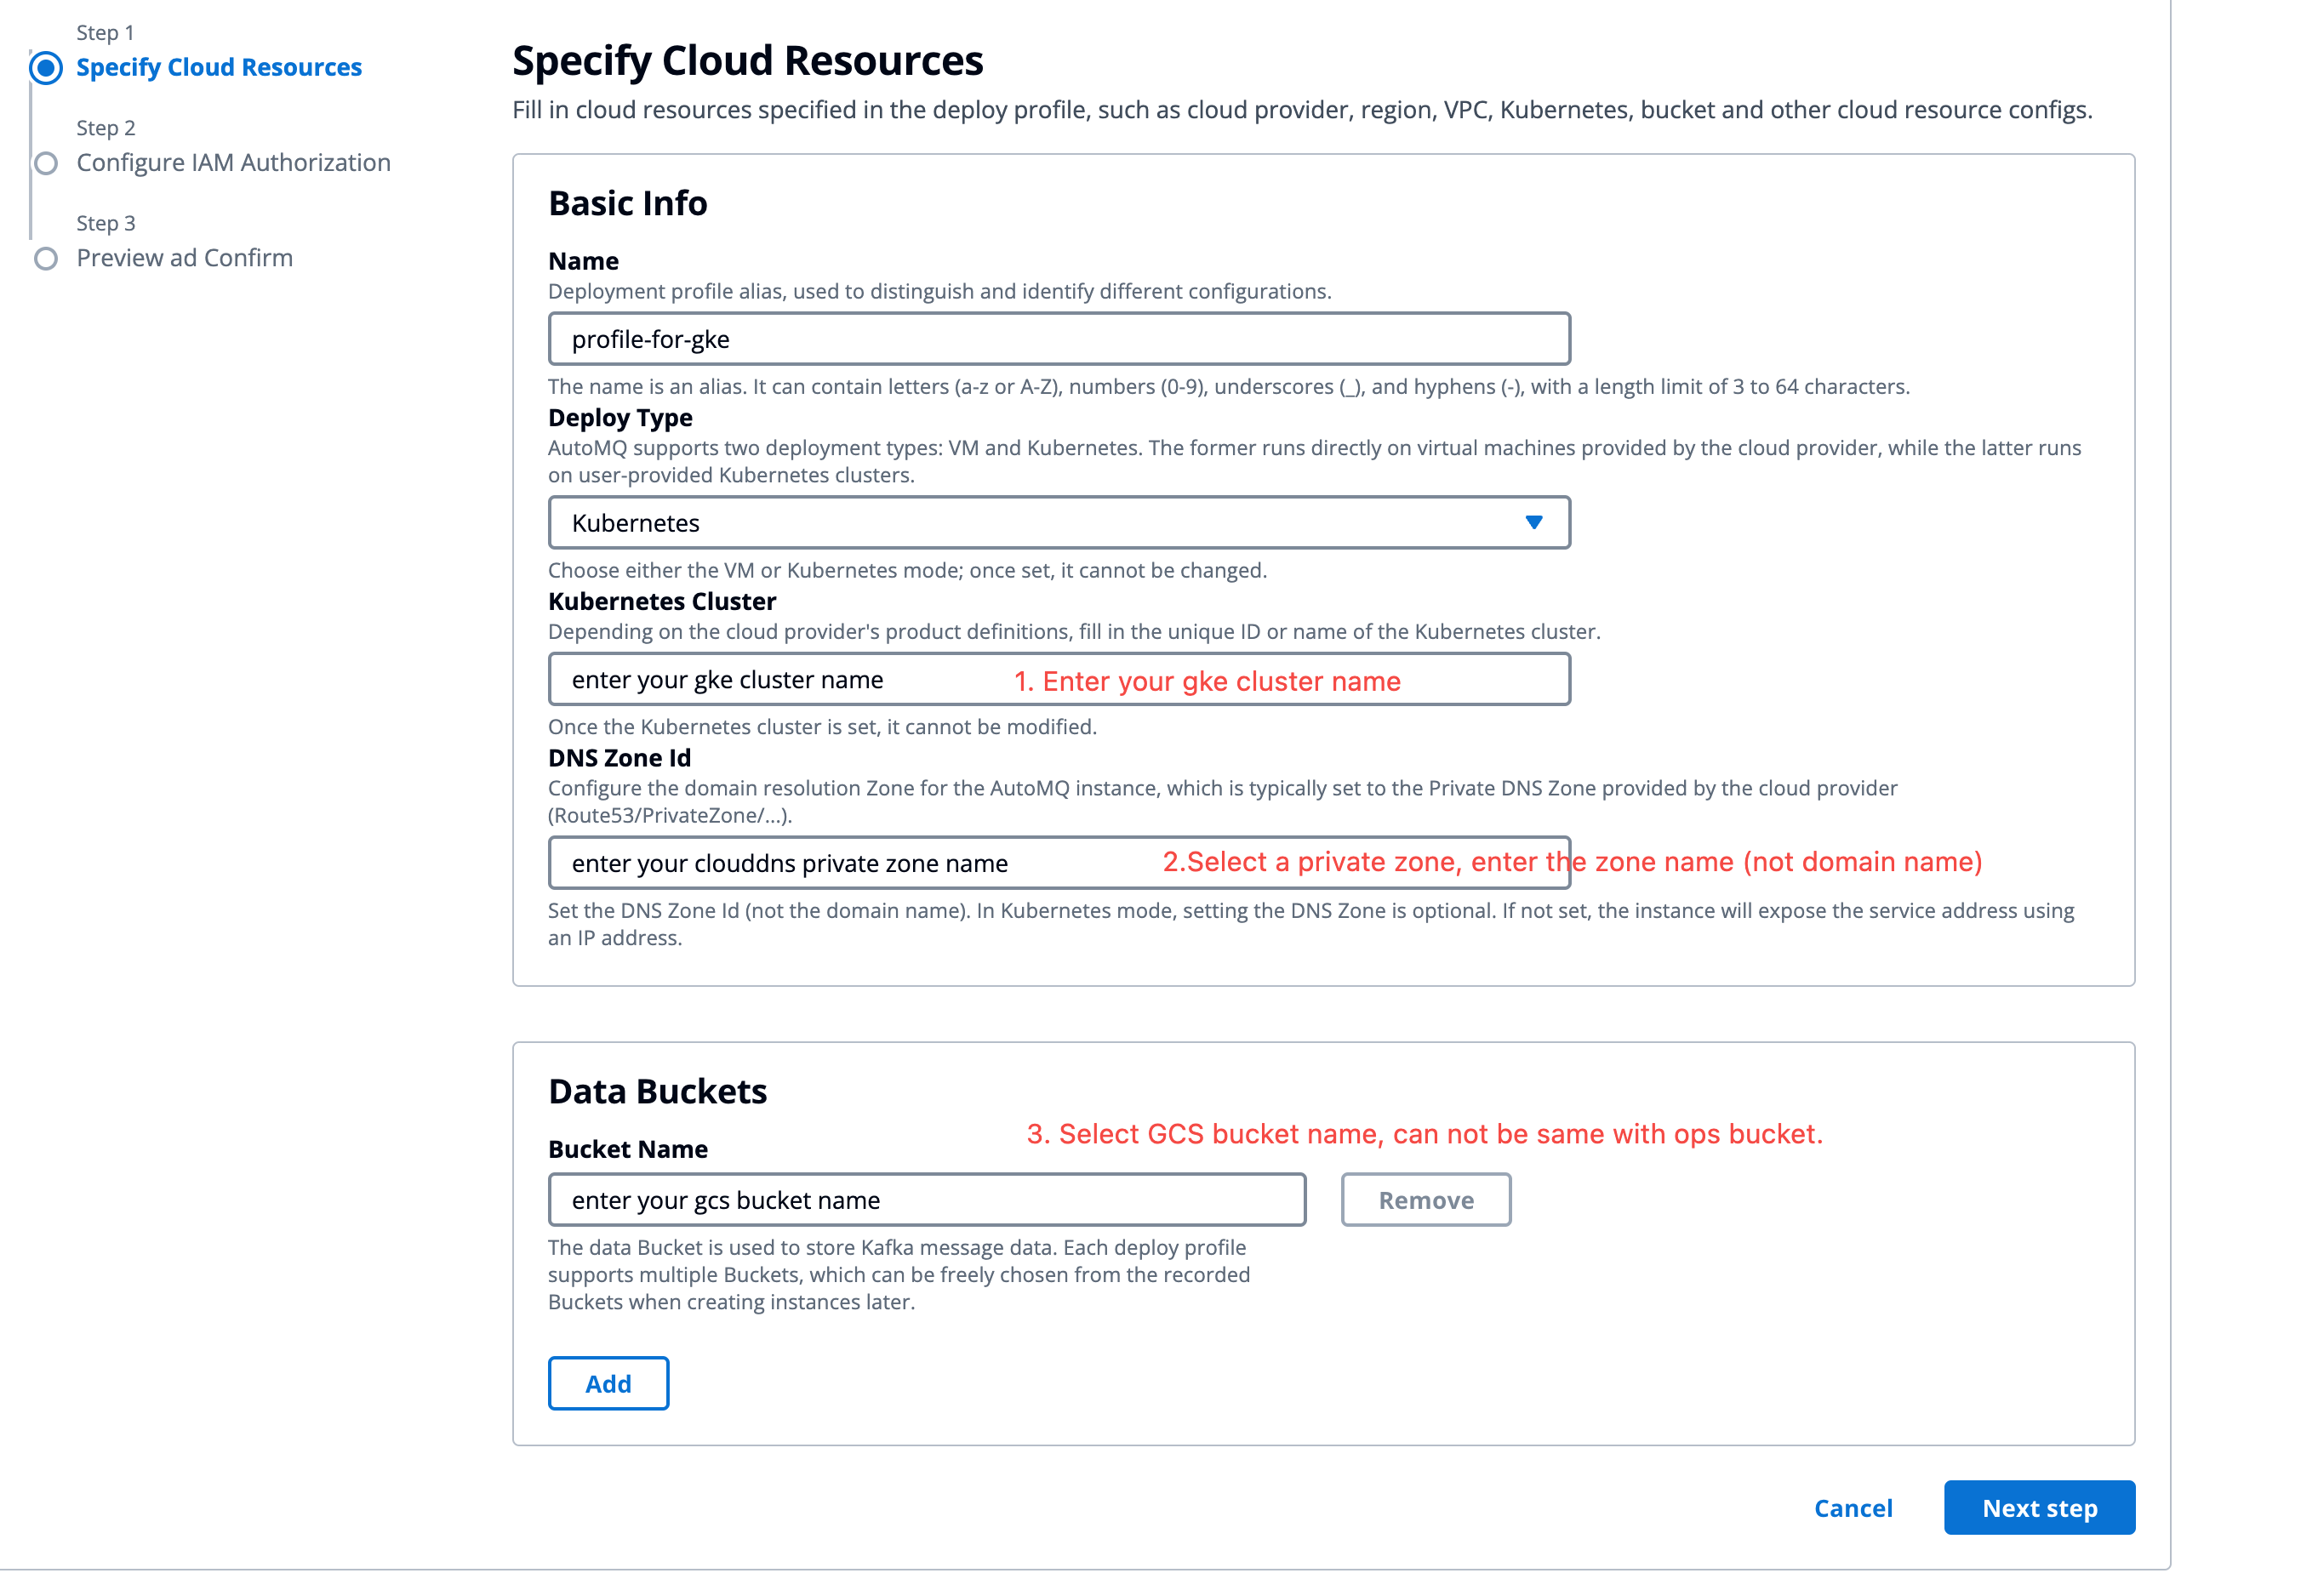
Step 4: Access the Environment Console and Create Deployment Configuration
When you first enter the AutoMQ BYOC console, you need to create a deployment configuration to set up Kubernetes cluster information, GCS Bucket information, and other settings before you can create instances.Note:If the AutoMQ environment console (Kafka client application) and GKE cluster are deployed on different VPC subnets, the user needs to add traffic rules on the VPC firewall page. Otherwise, network issues may impact the creation and use of instances.It is recommended to allow all IP sources from the subnet where the environment console is located in the added firewall policy. The port list is: 9090, 9092-9093, 9102-9103, 22.
- Copy the cluster name of the GKE cluster created in step 3.
-
Log in to the console, enter the cluster name and other configurations, and click Next.
- Deployment Type: Select Kubernetes.
- Kubernetes Cluster: Enter the name of the GKE cluster.
- DNS ZoneId: Enter the ZoneId of the Private DNS used for deploying AutoMQ.
- Bucket Name: Enter the name of the data Bucket used for storing messages in AutoMQ. Multiple GCS Buckets are supported.
- After filling in the cloud resource information, generate the necessary permissions for the data plane GKE node pool. Refer to the console guidance to create a custom authorization policy. Then bind the authorization policy to the AutoMQ IAM delegate created in Step 2, and enter the name of the node pool delegate, click Next to preview.
- Preview the deployment configuration information, complete the creation. You can then go to the instance management page to create an instance.