
The terms AutoMQ product service provider, AutoMQ service provider, and AutoMQ in this document specifically refer to AutoMQ HK Limited and its subsidiaries.
Operation Process
Step 1: Install Environment Console
Refer to Overview▸, AutoMQ is compatible with deployment on AKS clusters. In the AKS deployment mode, it is first necessary to install the AutoMQ Console, and then use the console interface to operate AKS and deploy the cluster to AKS. On Azure, it’s recommended to install the console using ARM templates. Refer to Install Env on Azure▸.Step 2: Create Managed Identity
When deploying AutoMQ to AKS, the AutoMQ data plane cluster requires a dedicated node pool. This node pool must be bound to an independent Managed Identity to access cloud resources. Therefore, before creating the AKS node pool, you need to create a Managed Identity in advance and grant the necessary permissions for AutoMQ. The steps are as follows:- Visit the Managed Identity Console. Click “Create.” Choose the following parameters:
- Resource Group: It is recommended to keep it consistent with the AutoMQ Console resource group.
- Region: It is recommended that the target region for deploying AutoMQ remains consistent.

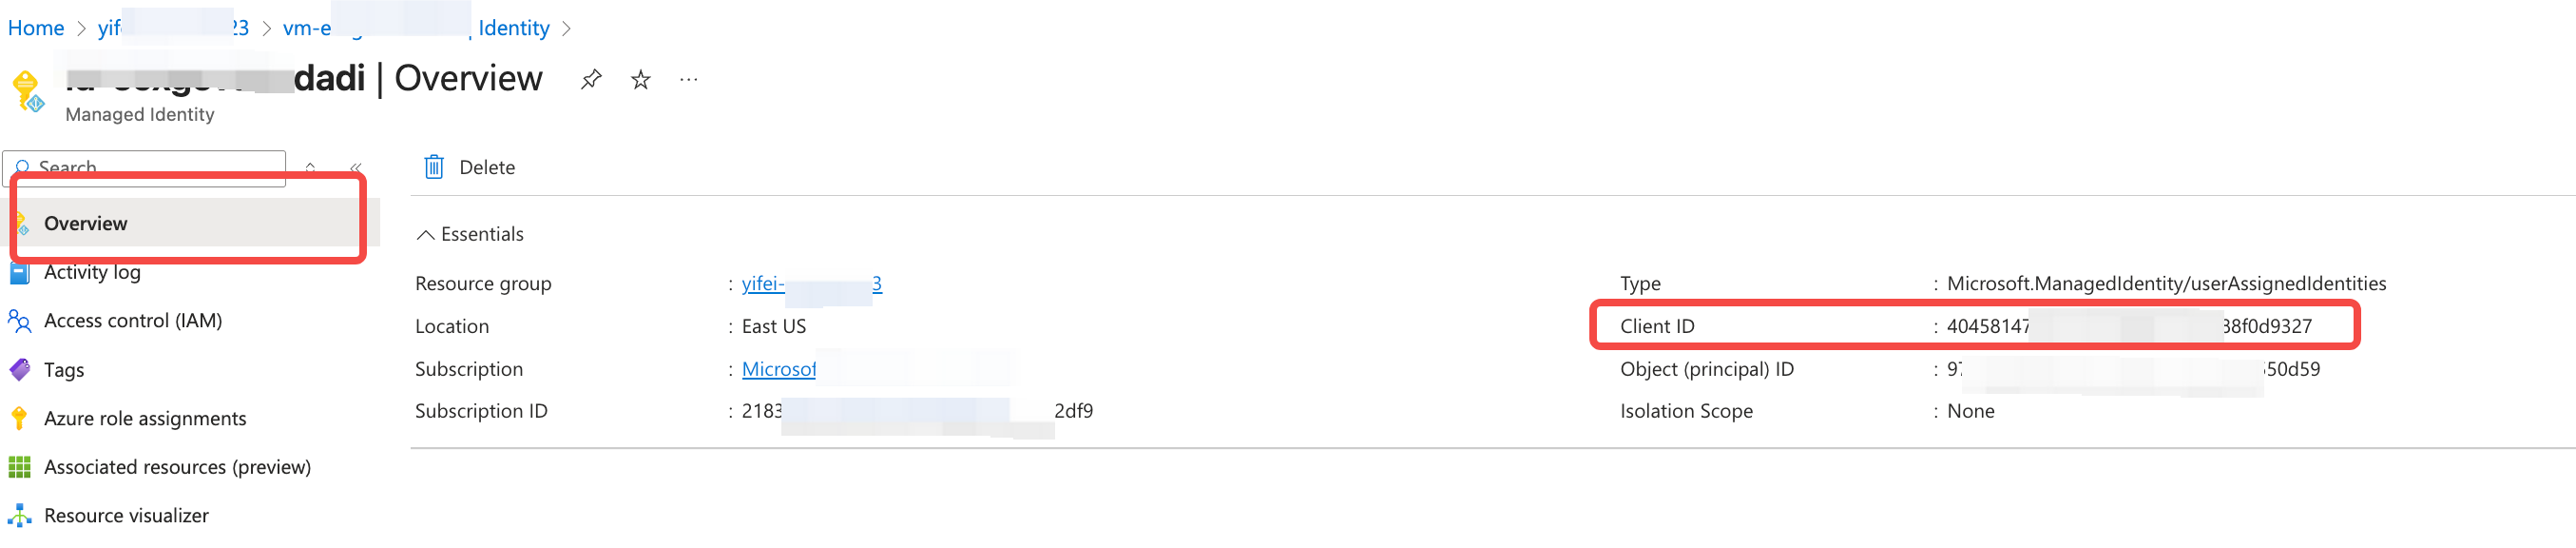
- Click Next, Create Managed Identity. Once created, click on the Managed Identity, navigate to Overview, and record the Client ID, which will be needed when creating the deployment configuration in step 4.
Step 3: Create an AKS Cluster
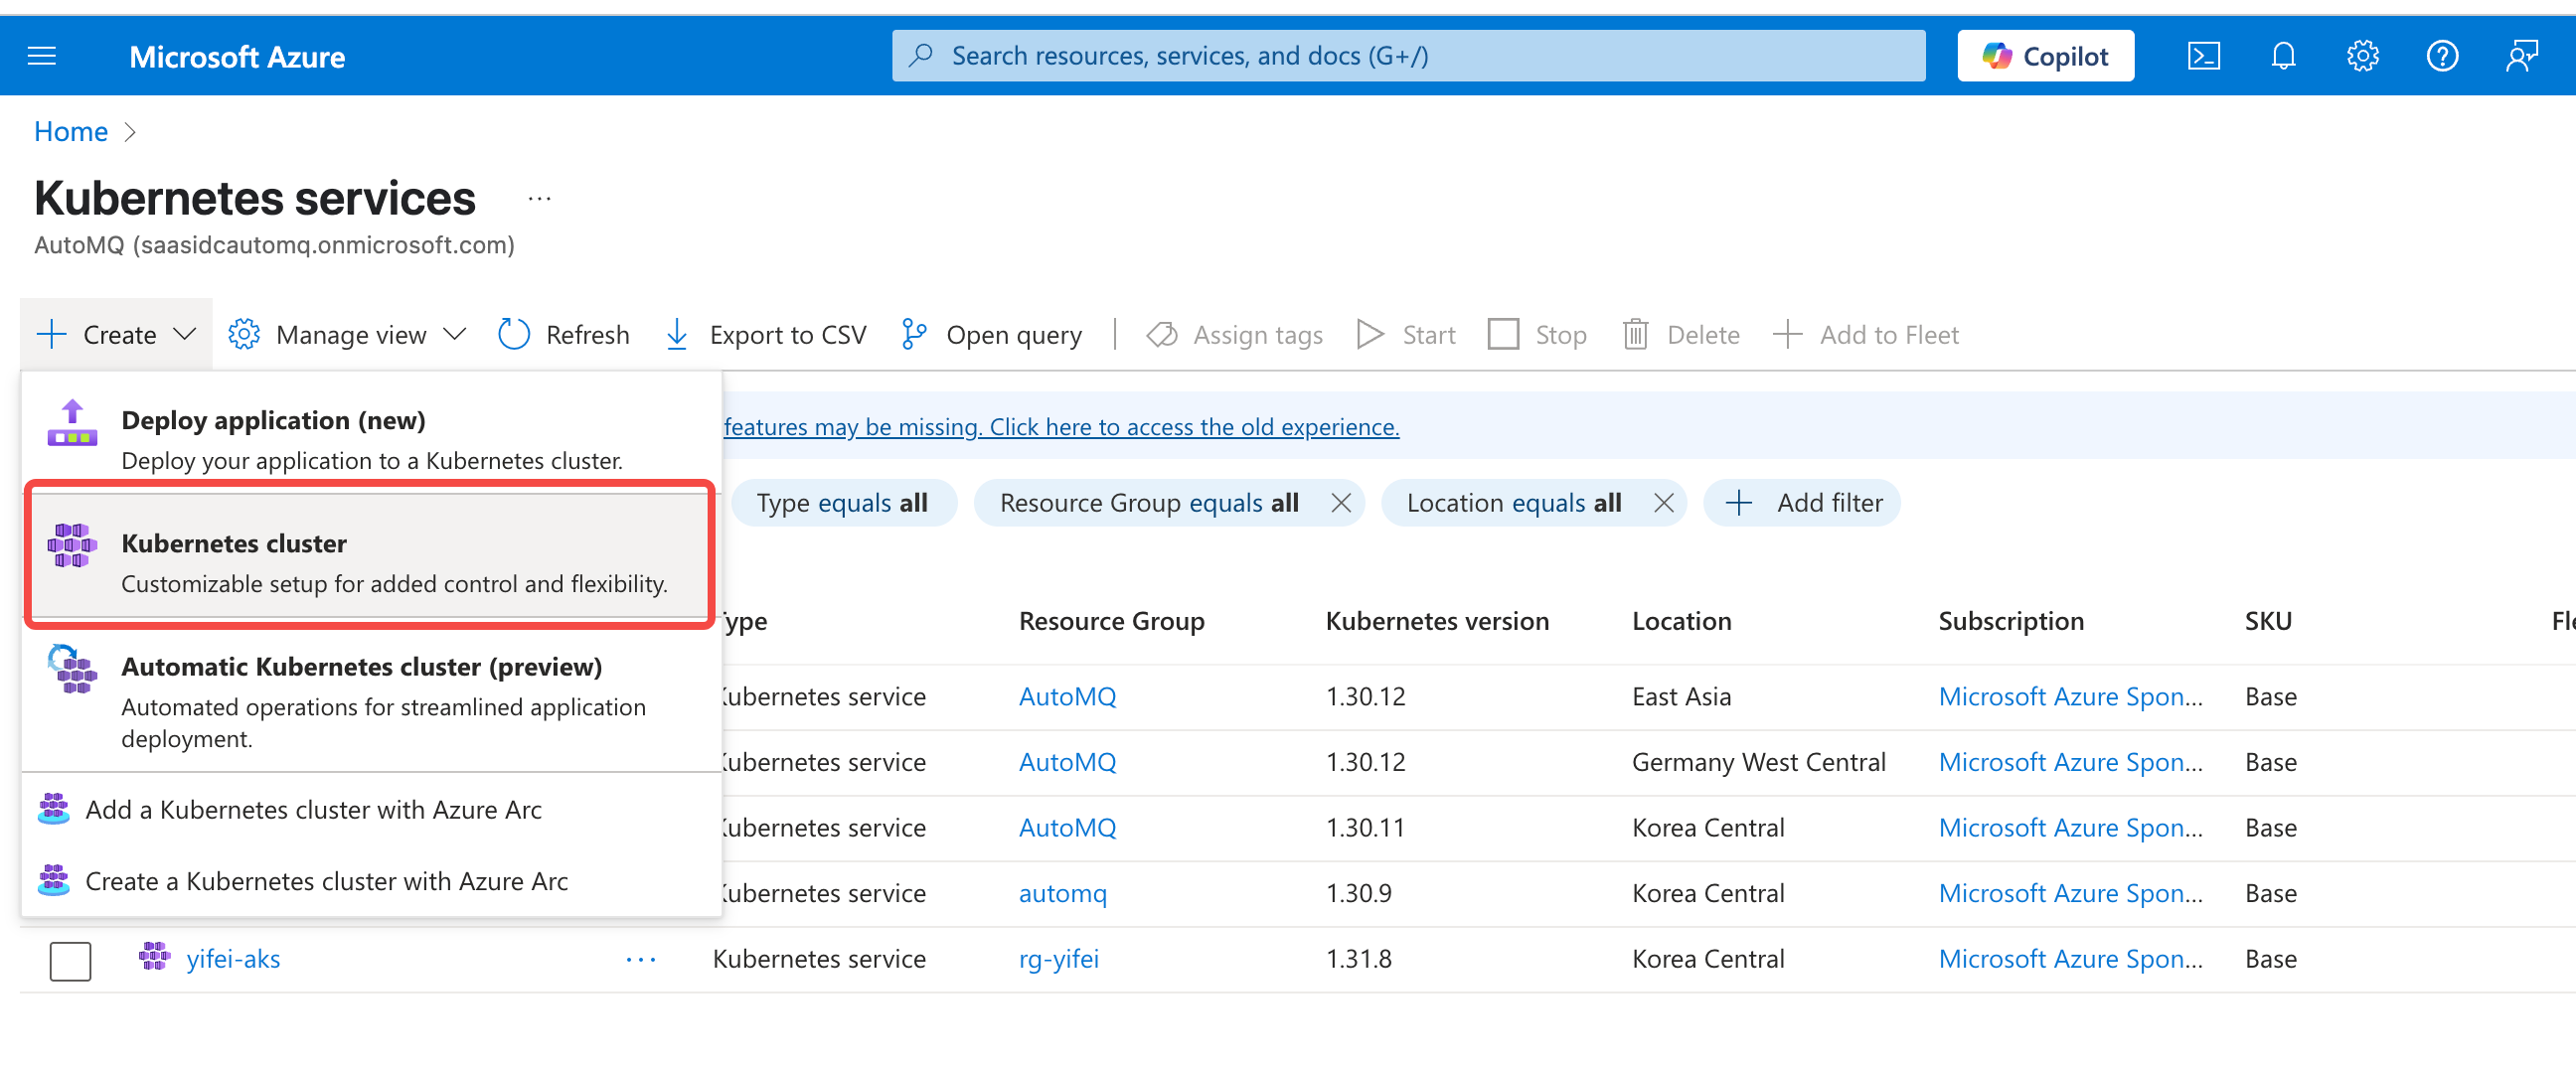
Refer to Overview▸. Users should pre-create a standalone AKS cluster designated for AutoMQ use. Users can visit the Azure AKS product console to follow the steps below.- Log in to the Azure AKS Console. Click Create Cluster.
-
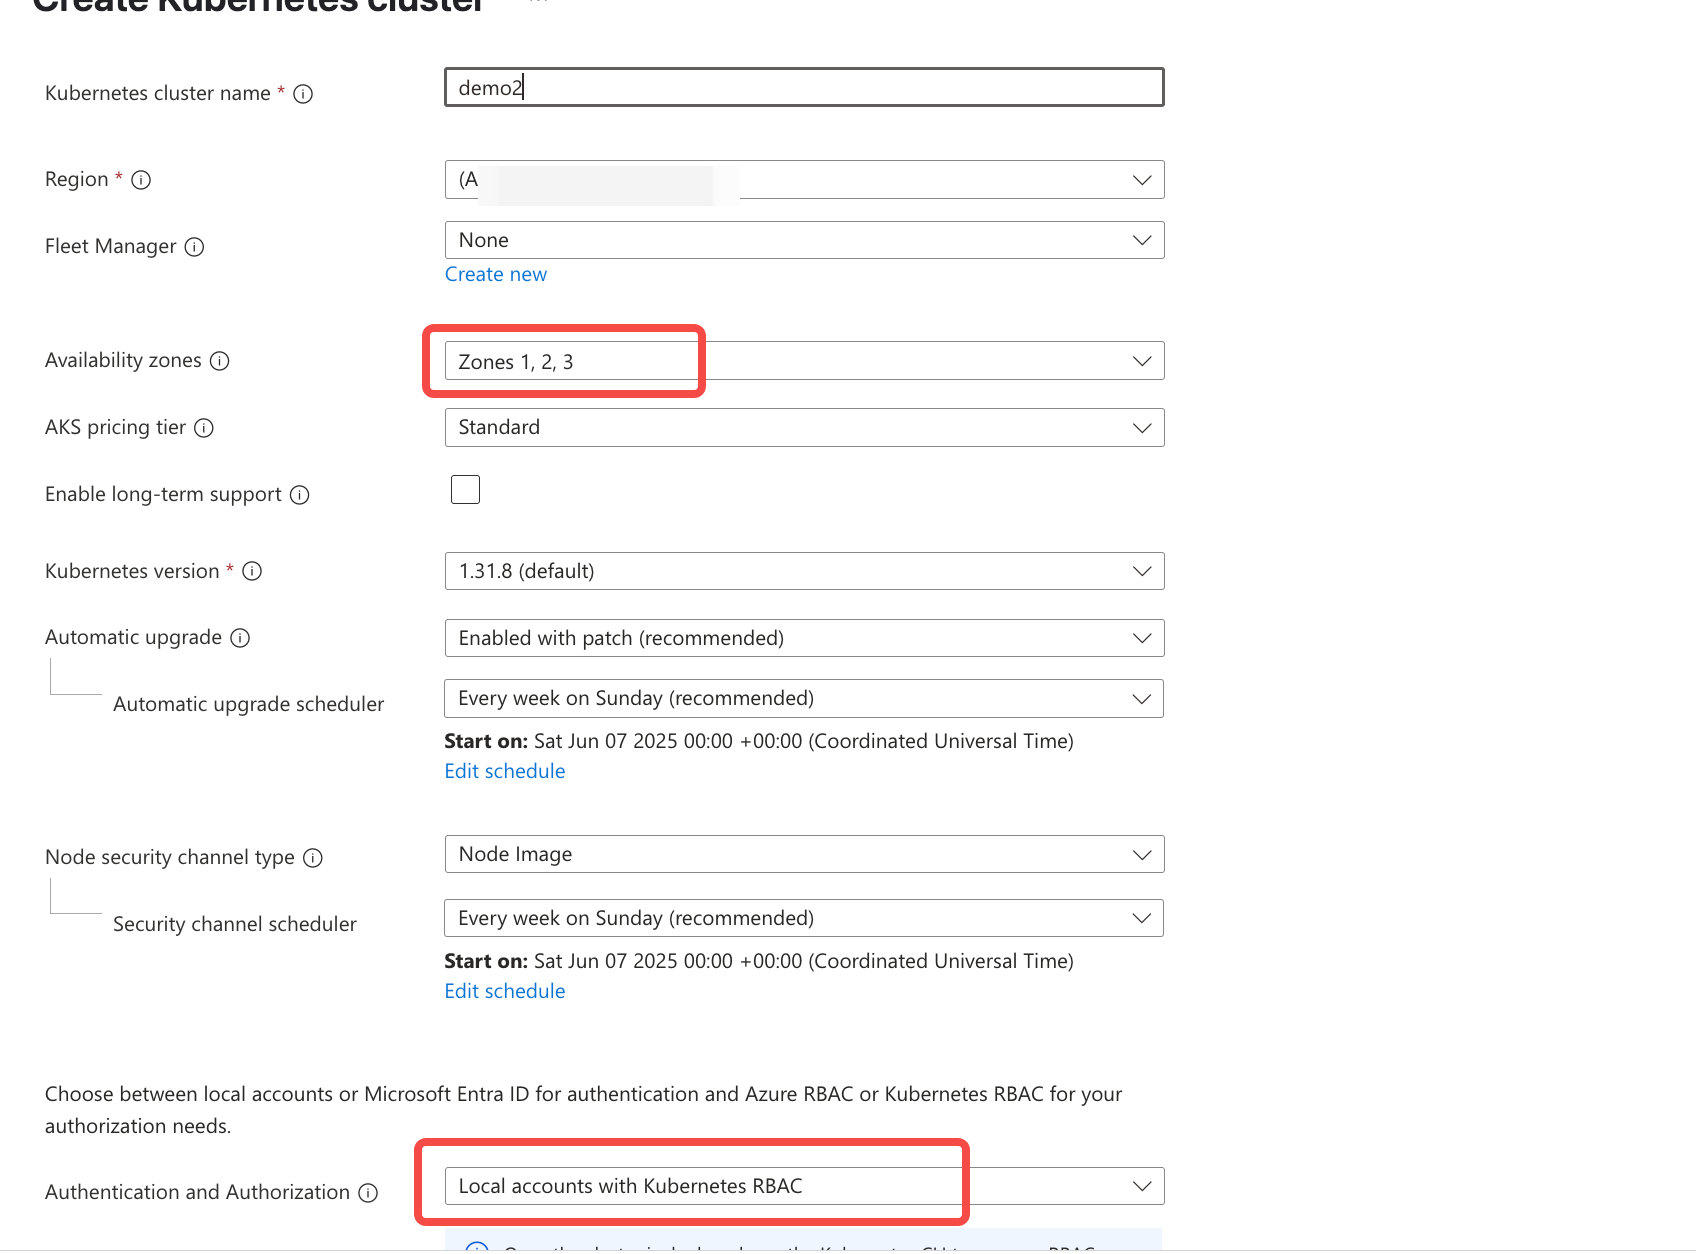
Configure Basic Cluster Information, focusing on the specified configuration items, while leaving other options at their default settings.
- Region: Choose the correct region.
- Resource Group: Select the appropriate resource group, preferably the same as the console, Storage Account, DNS, etc.
- Availability Zone: Choose 3 availability zones.
-
AKS Pricing Tier: Choose
Standard. -
Authentication and Authorization: Select
Local account with Kubernetes RBAC.
-
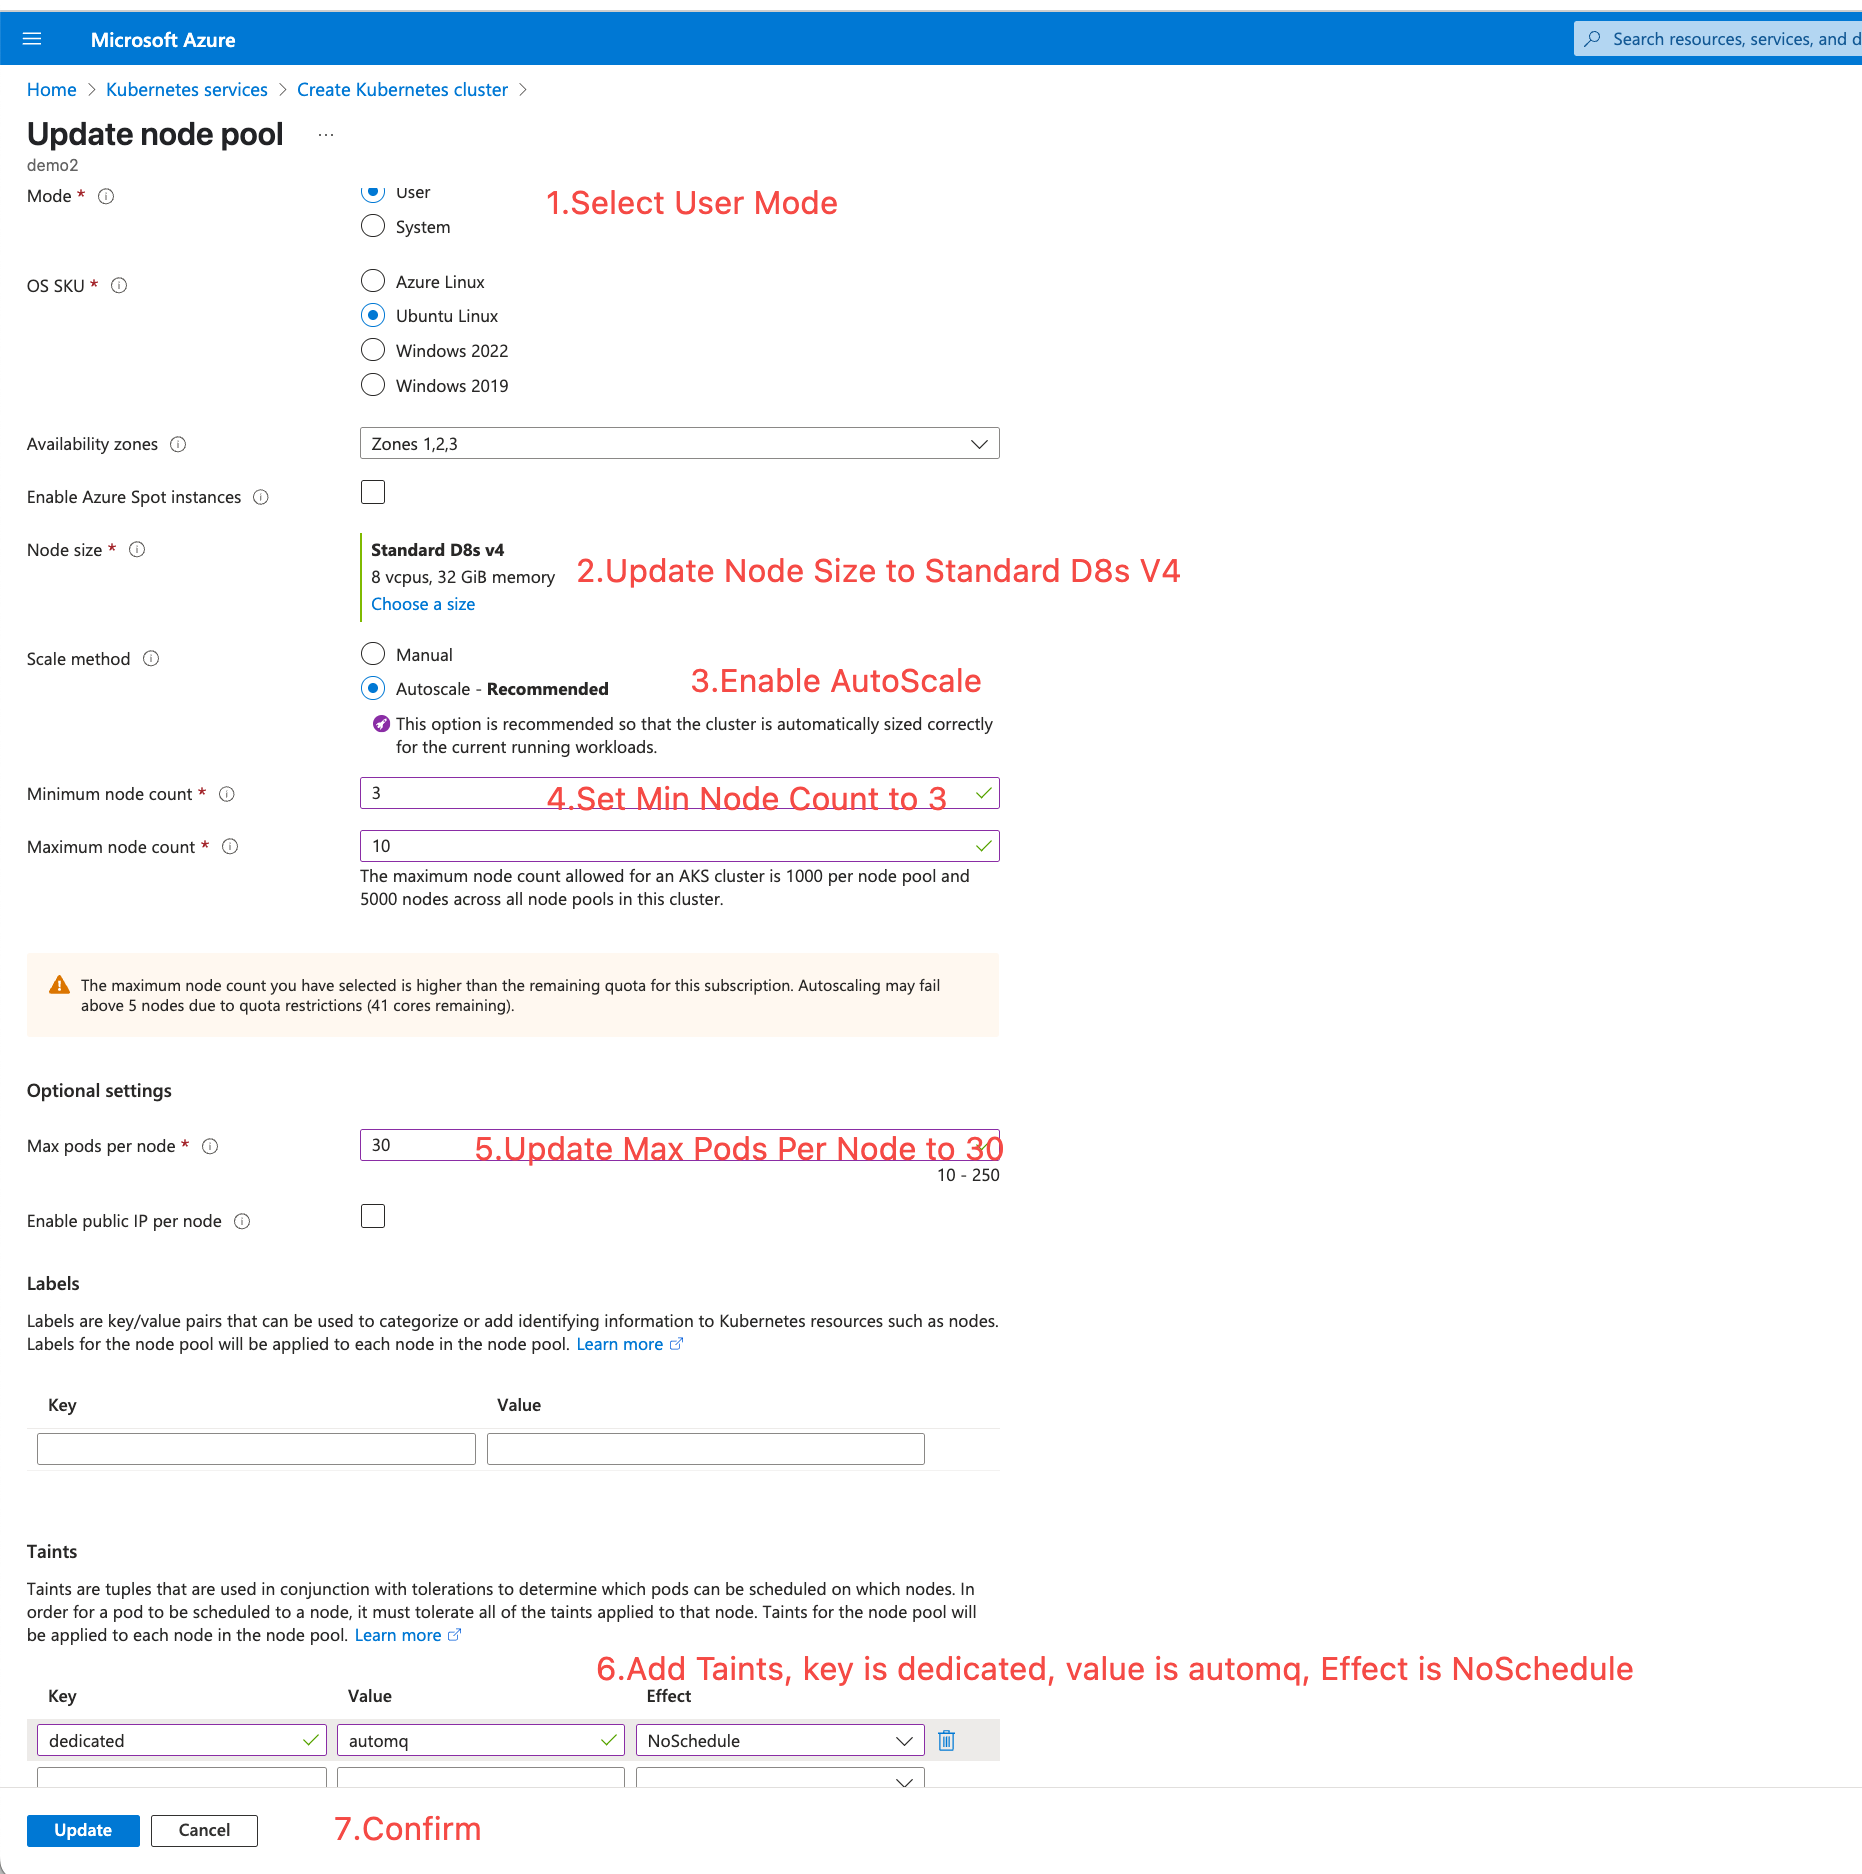
Configure Node Pool: Set up a dedicated node pool for AutoMQ (you can modify the default generated node pool or create a new separate node pool). Refer to the reference values below for configuration items to modify, and it is recommended to keep other configurations unchanged.
-
Mode: Select
Usermode. - Availability zones: It is recommended to choose at least 3 availability zones.
-
Node size: Refer to Overview▸ and select the
Standard D4as v5instance type. -
Scale method: Choose the
Autoscalemode to automatically scale nodes based on deployment needs. - Minimum node count: It is recommended to select at least 3 nodes.
- Max pods per node: It is advised to set this to 30.
-
Taints: Add a taint configuration with the key as
dedicated, value asautomq, and effect asNoSchedule.
-
Mode: Select
-
Configure the Network. Choose the target Virtual Network and Subnet.
-
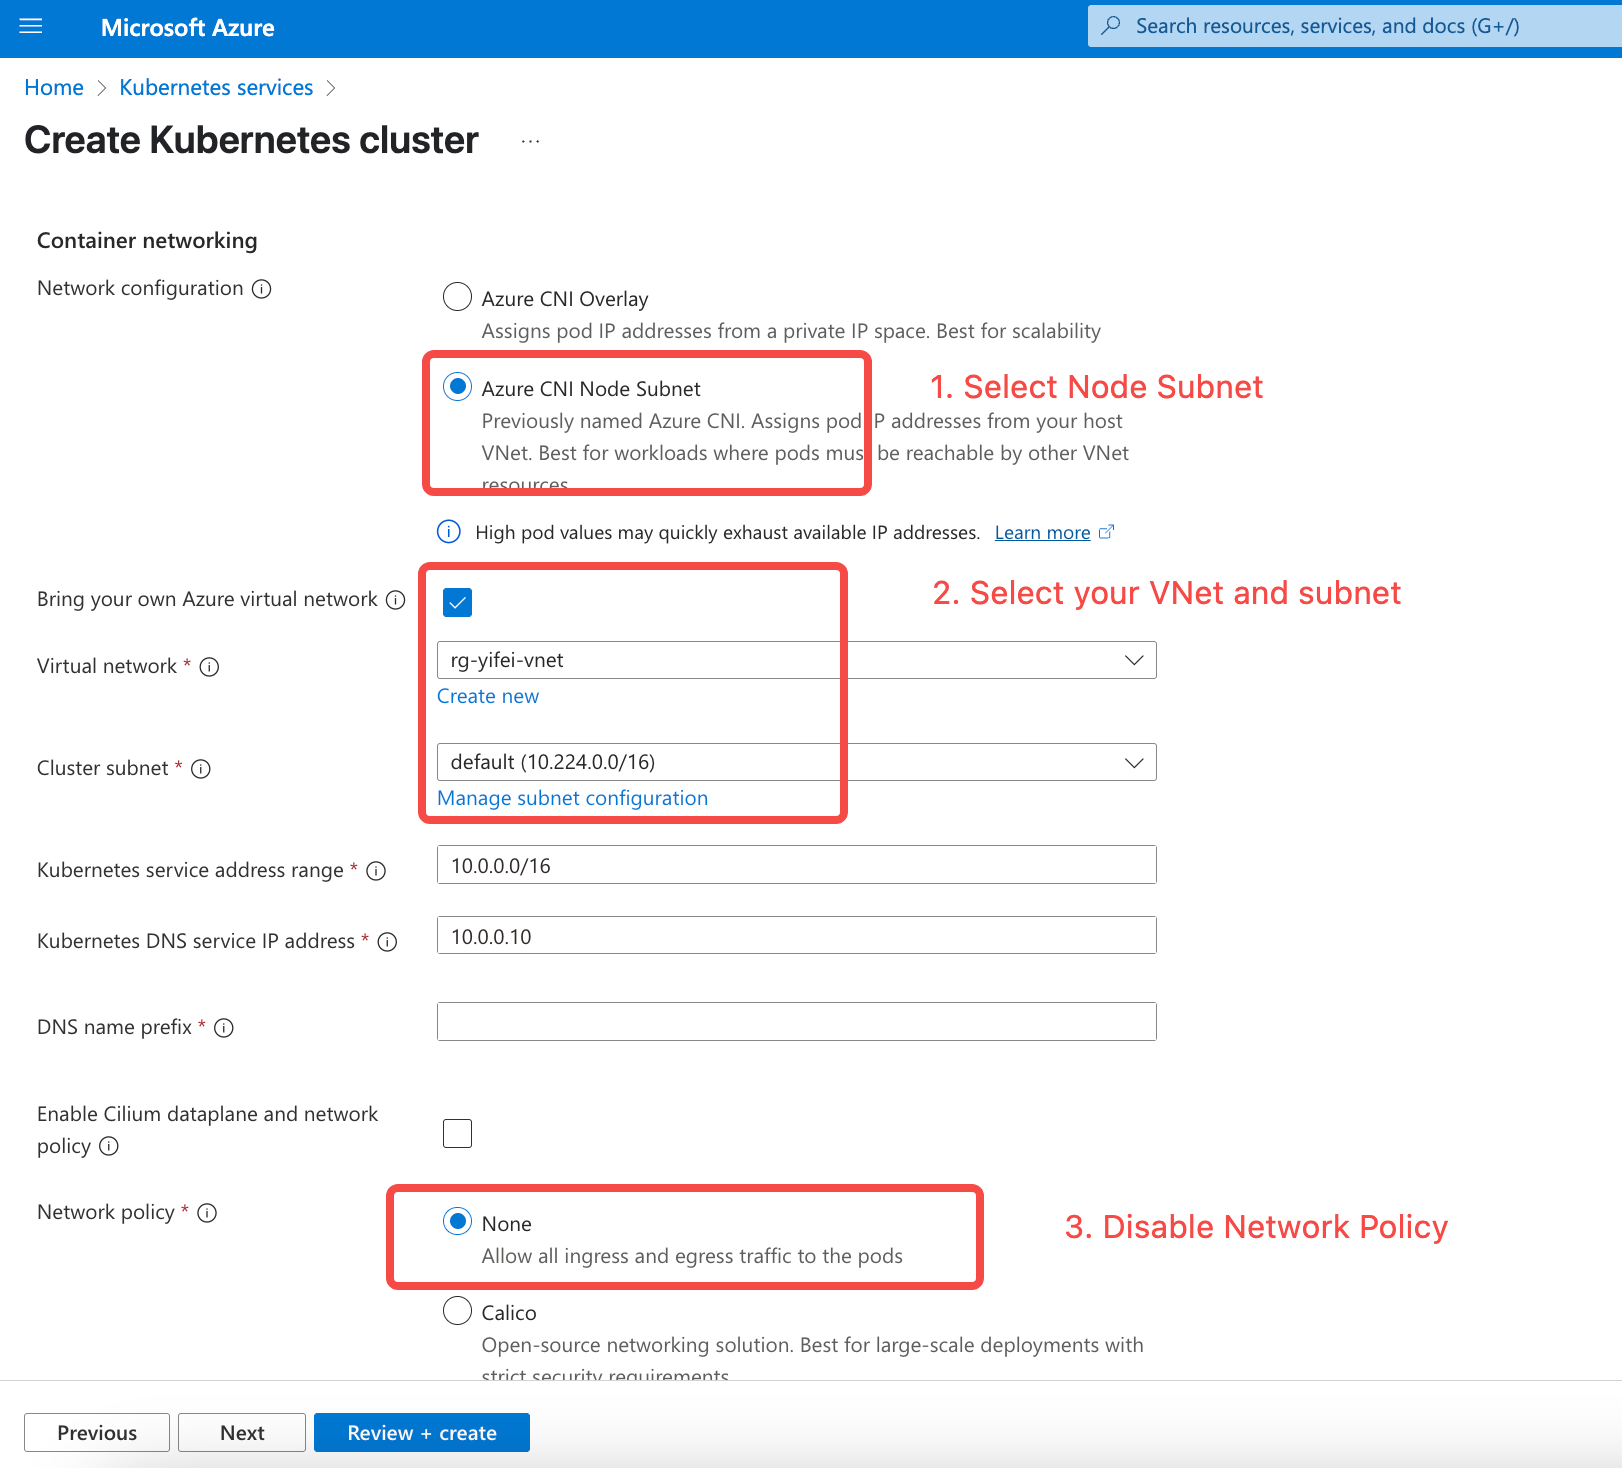
Network Configuration: Ensure that you select the
Azure CNI Node Subnetmode so that Pods can directly use VNet IPs. - Bring your own Azure Virtual Network: Make sure this option is checked and enabled.
- Virtual Network: Select the private network where AutoMQ should be deployed.
- Cluster subnet: Pick the subnet where AutoMQ should be deployed.
-
Network Configuration: Ensure that you select the
- Maintain the default configurations and create an AKS cluster.
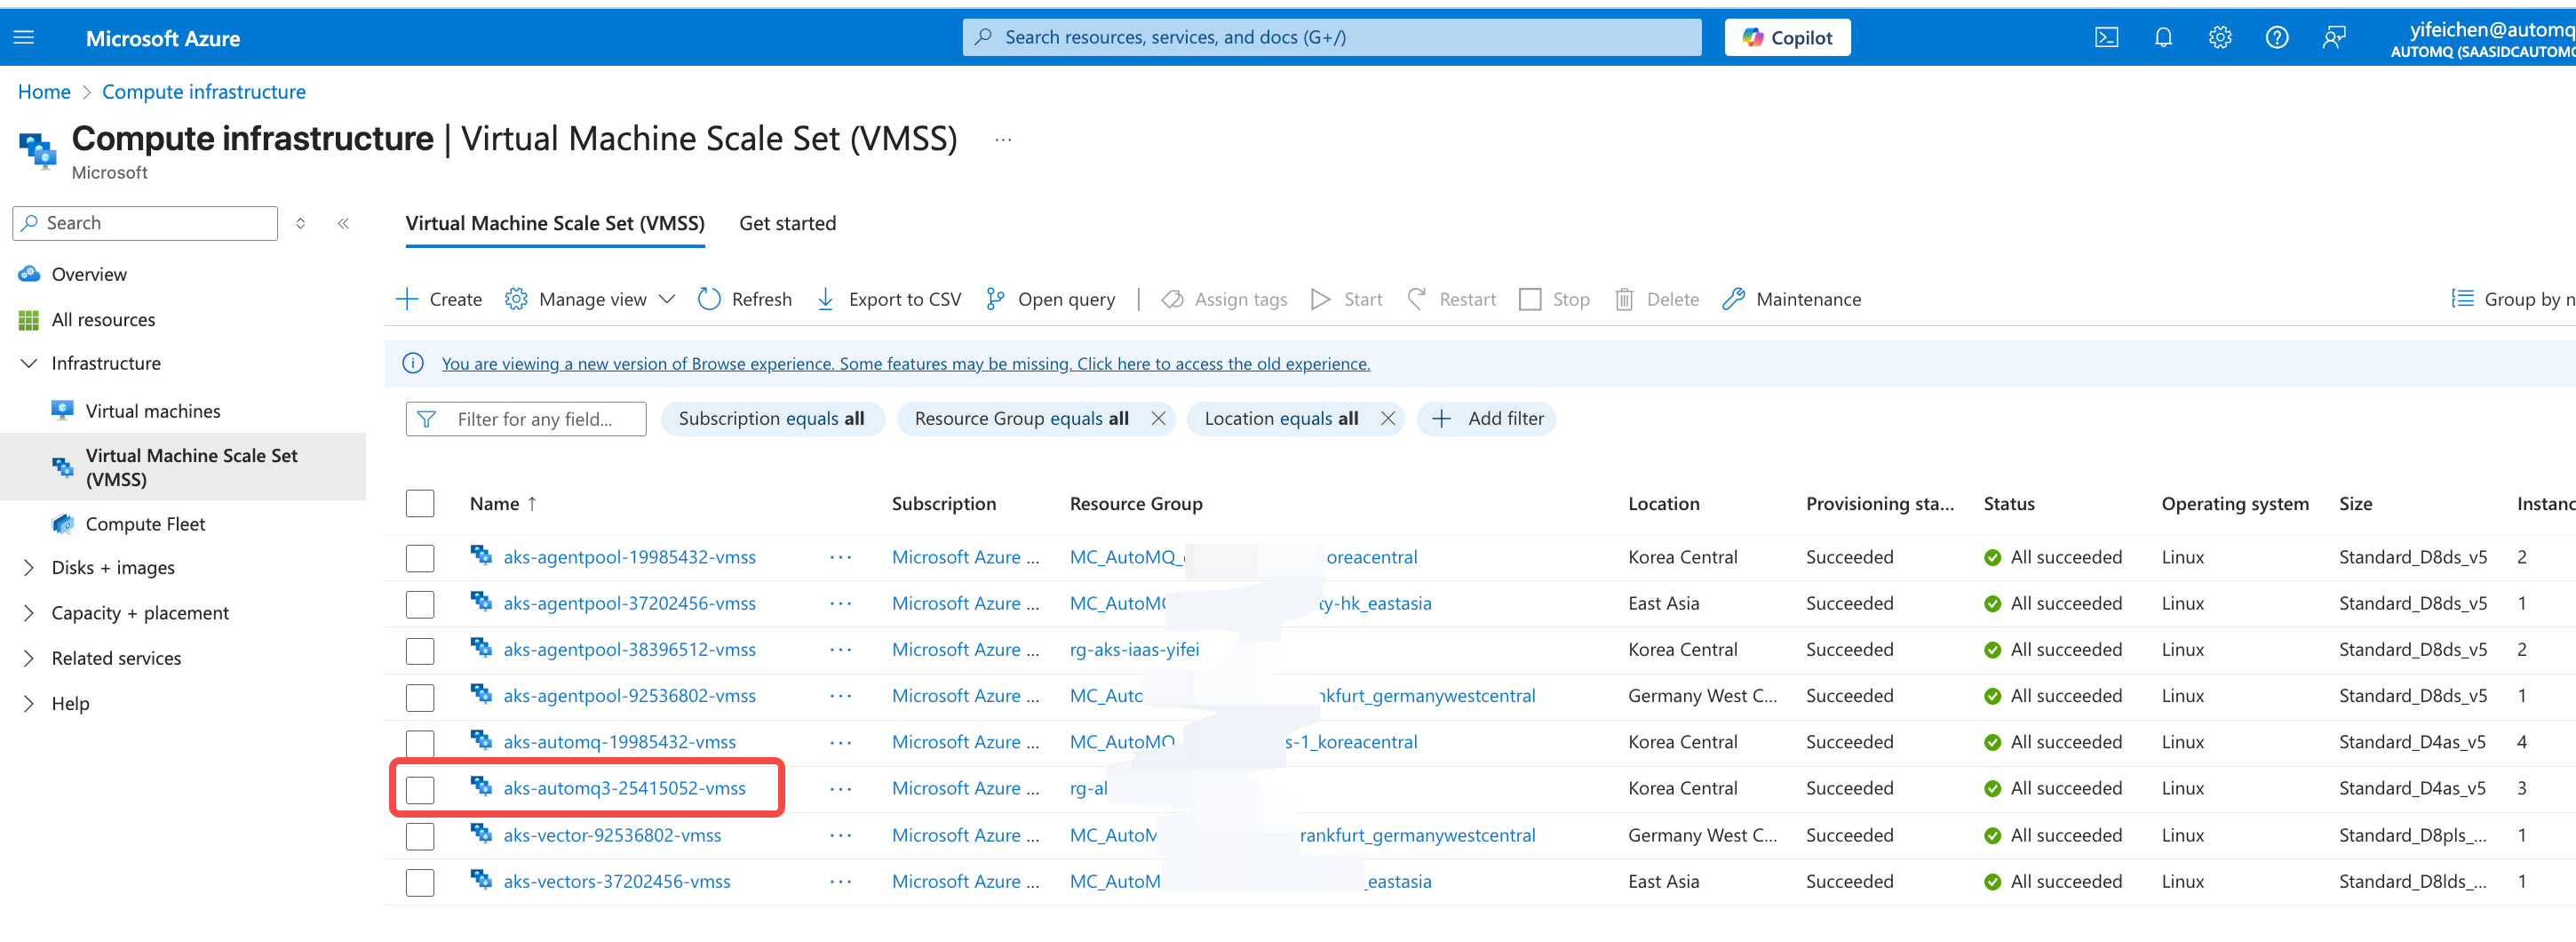
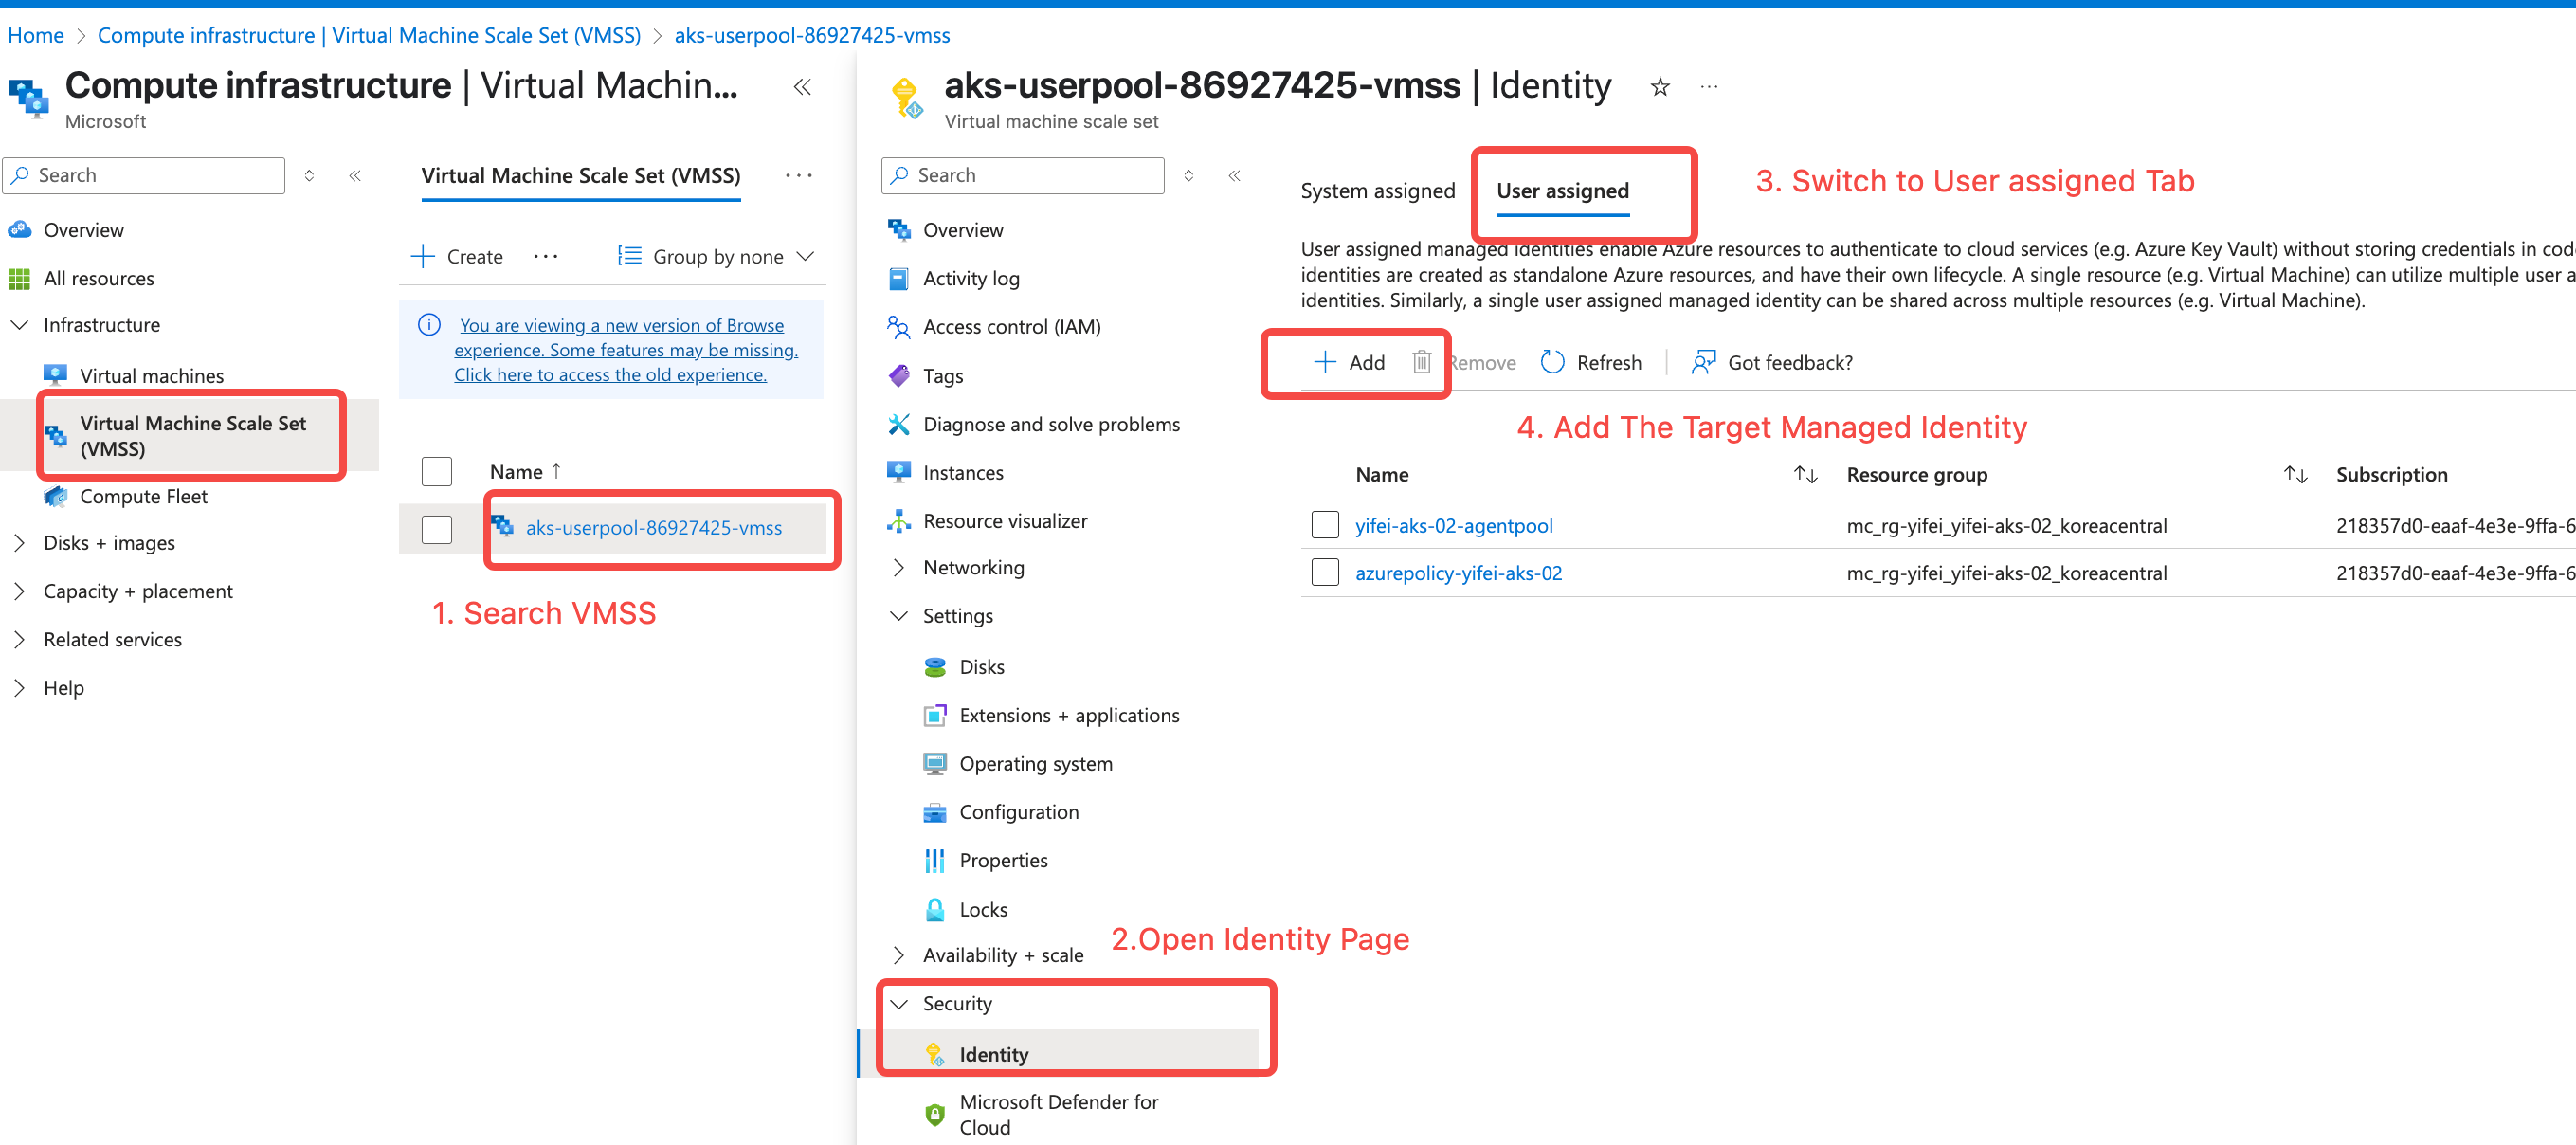
- Go to the VMSS Console. Find the VMSS associated with the AutoMQ dedicated node pool, and associate the Managed Identity created in step 2.
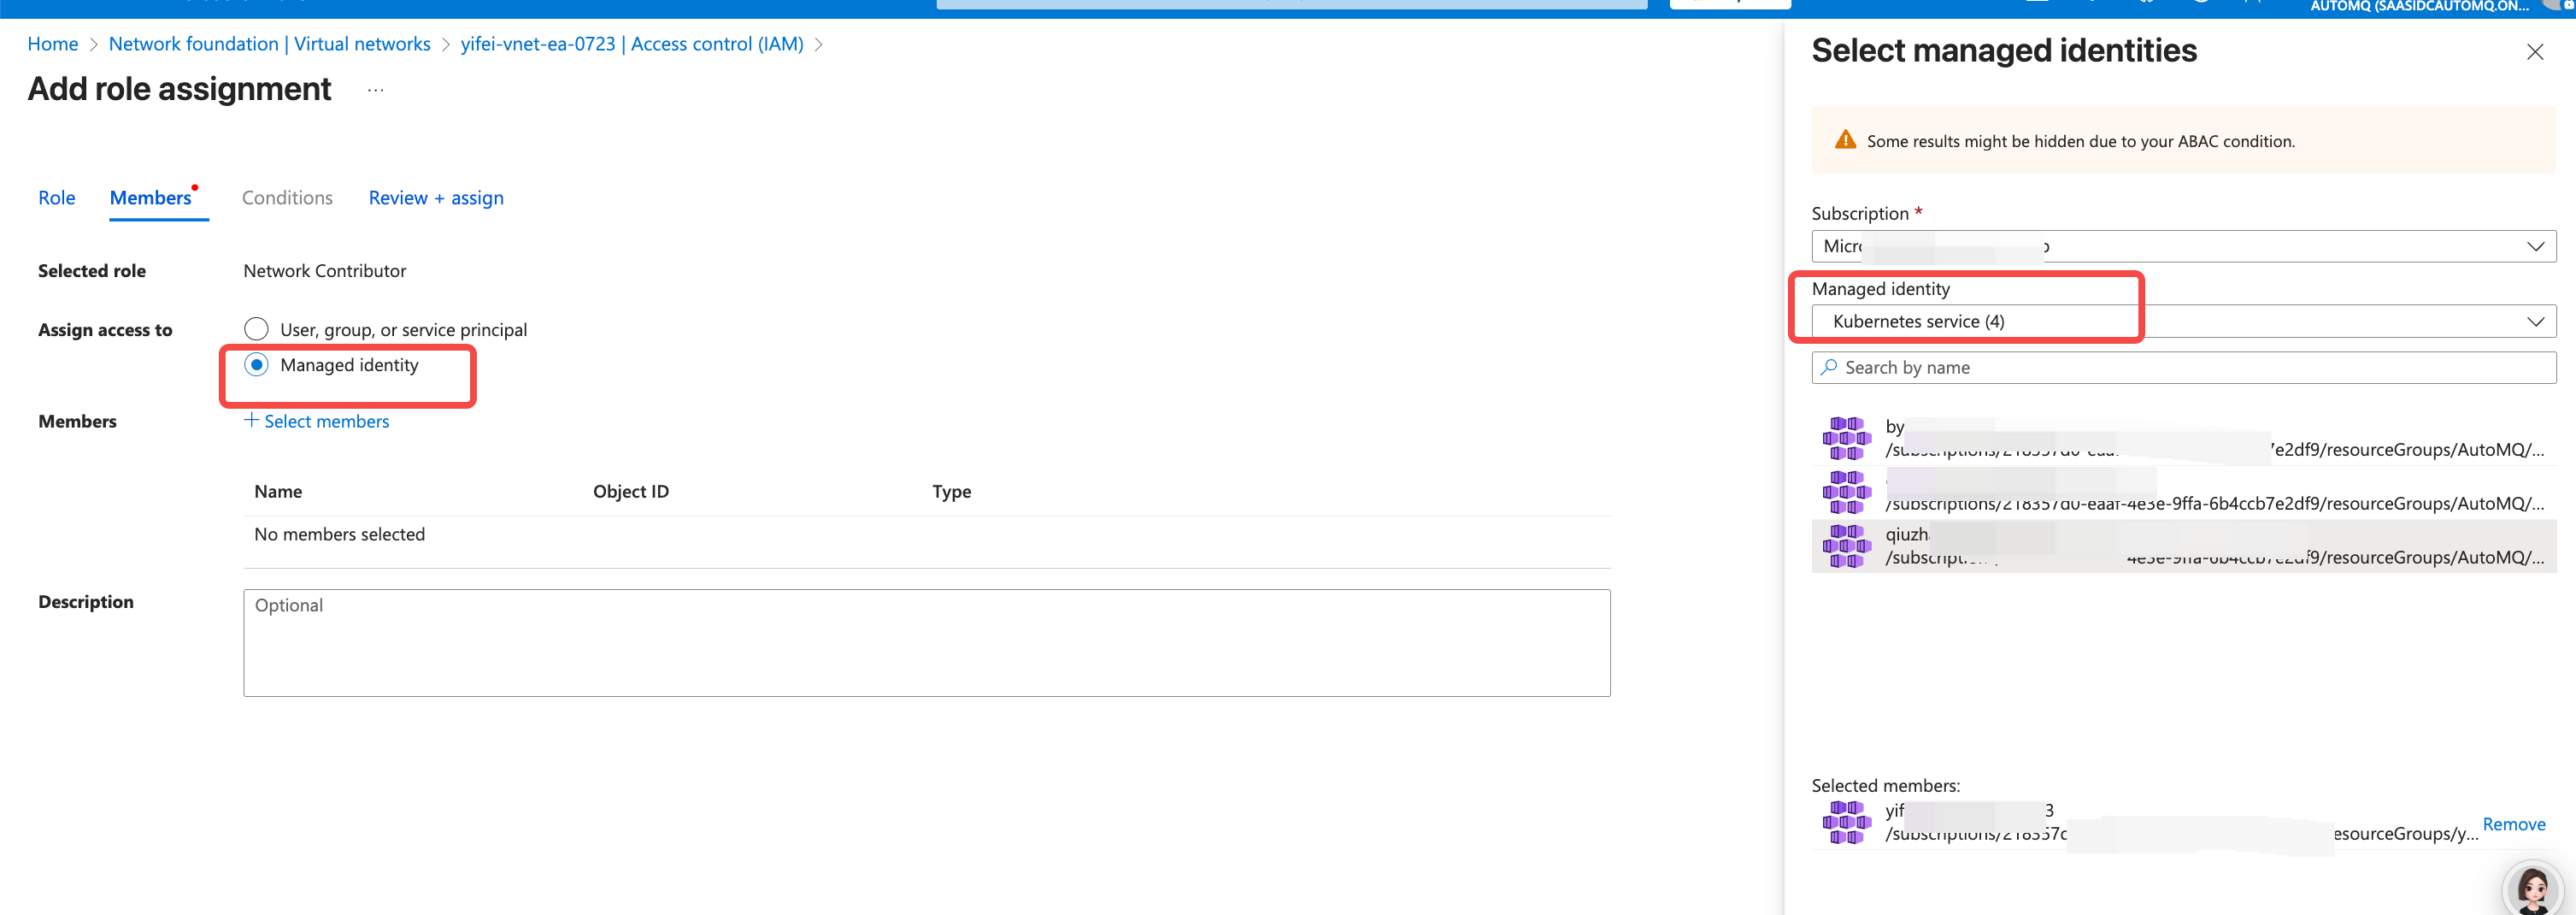
- Assign the
Network Contributorrole to the AKS cluster. Navigate to the Virtual Network console, find the network where the current AKS is located, click on the IAM option, and add a role assignment.
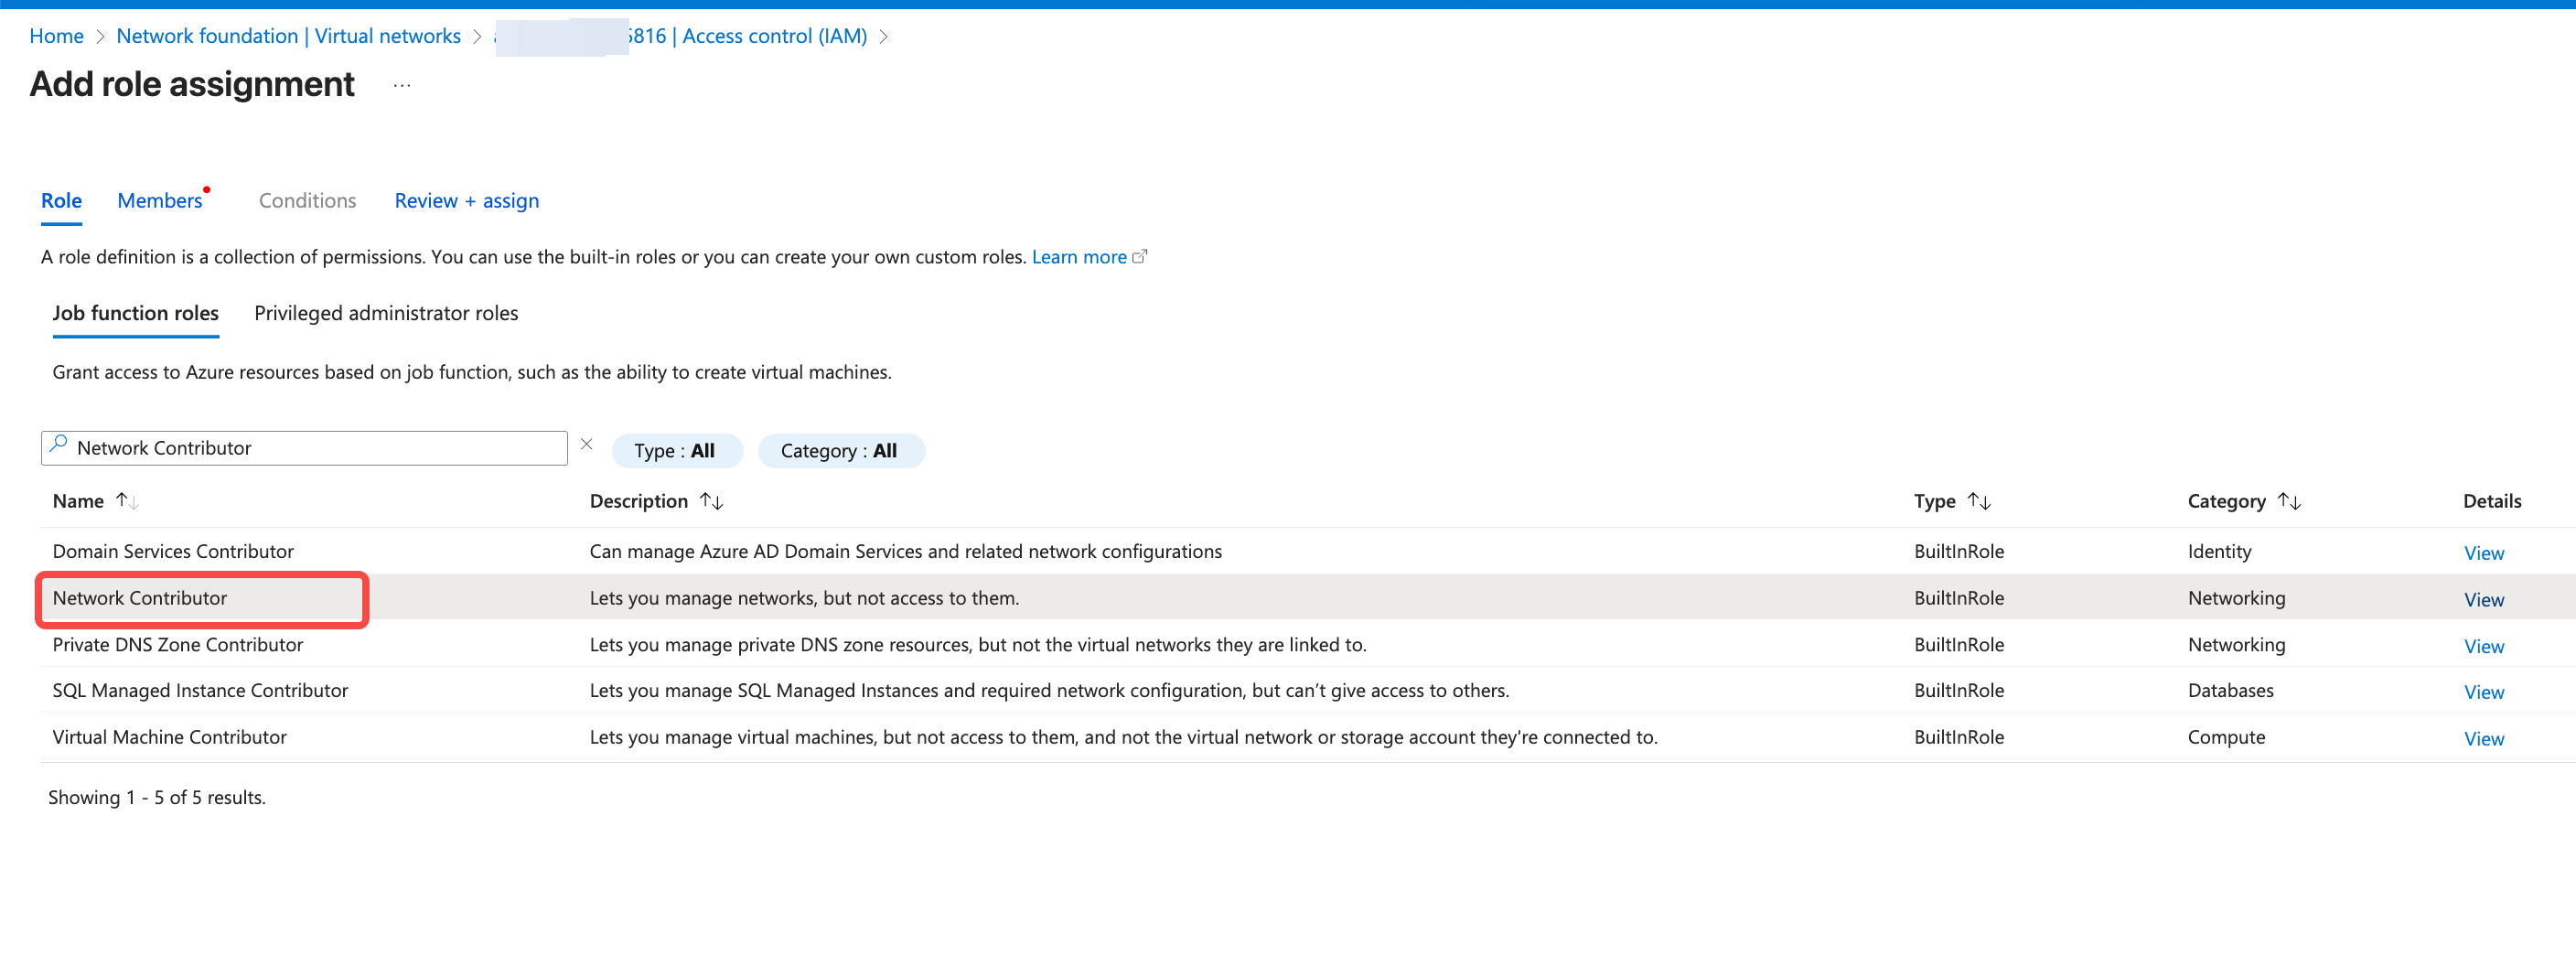
Network Contributor role, then search for System-assigned managed identity, and choose the managed identity used by the current AKS cluster.
- Create a Placeholder Deployment for the node pool used by AutoMQ to accelerate failover speed in node failure scenarios.
automq-low-priority.yaml, and execute the following command to create a priority declaration.
automq-aks-placeholder.yaml file. You may need to adjust the parameters within based on the actual node pool deployment:
-
metadata.name: It is recommended to modify this to a meaningful Placeholder name, such asplaceholder-for-nodegroup-A. -
replicas: This represents the number of placeholder pods reserved, with a default setting of 1. When deploying across multiple availability zones, it’s recommended to maintain 1 machine in each zone, setting the number equal to the available zones count. -
affinity.nodeAffinity: This is used to select nodes for Placeholder deployment. Adjust thematchExpressionswithinkeyandvaluesto accurately match the AutoMQ node pool. The example YAML file provides 2 node selection options.-
kubernetes.azure.com/agentpool: Utilize thekubernetes.azure.com/agentpooltag to filter specific node pools within Azure. -
node.kubernetes.io/instance-type: Use thenode.kubernetes.io/instance-typetag to filter specific node models on Azure.
-
-
resources:- CPU/memory limits should match the specific Node Group specifications, such as 2C16G.
- The CPU/memory requests are slightly below the specific specifications of the Node Group, for example, an actual usage ratio of 3/4. This ensures the Placeholder Pod can be scheduled to an additional Node, achieving exclusive occupancy. This avoids unexpected usage by other pods in the cluster, which could lead to scheduling failure due to insufficient resources during an actual Failover.
Running state and verify whether it has been scheduled to the expected node.
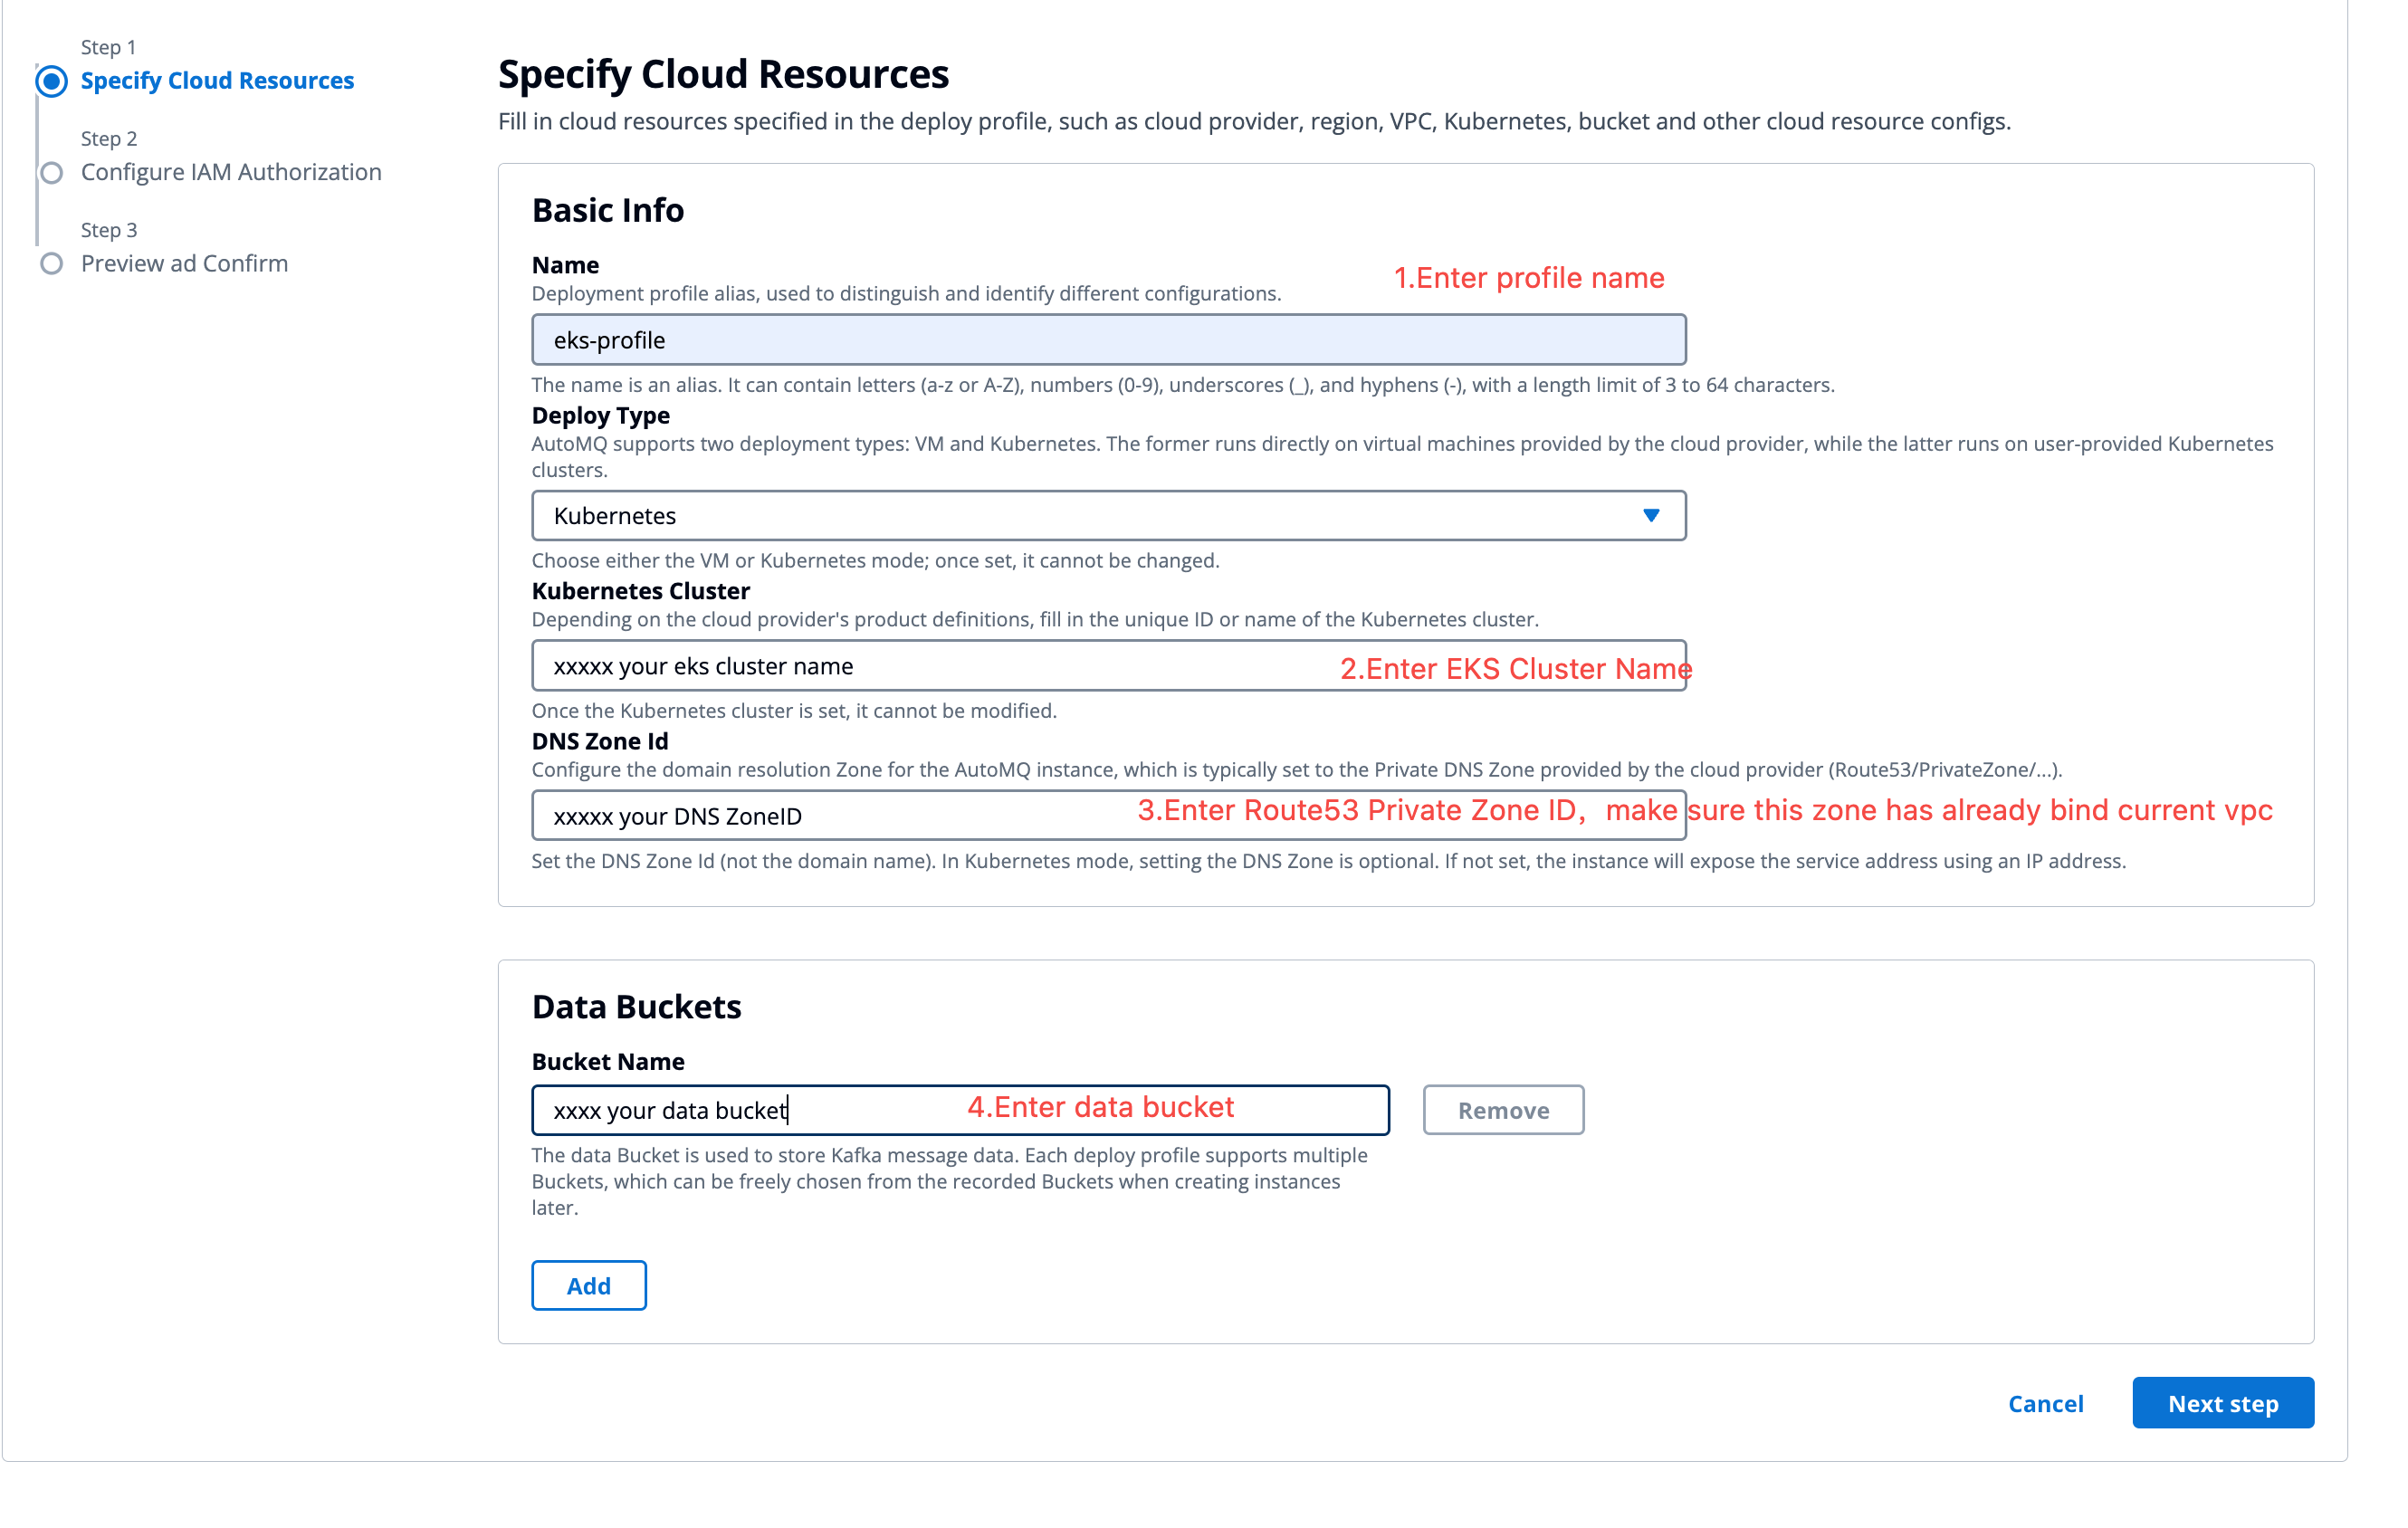
Step 4: Enter the Environment Console to Create a Deployment Configuration.
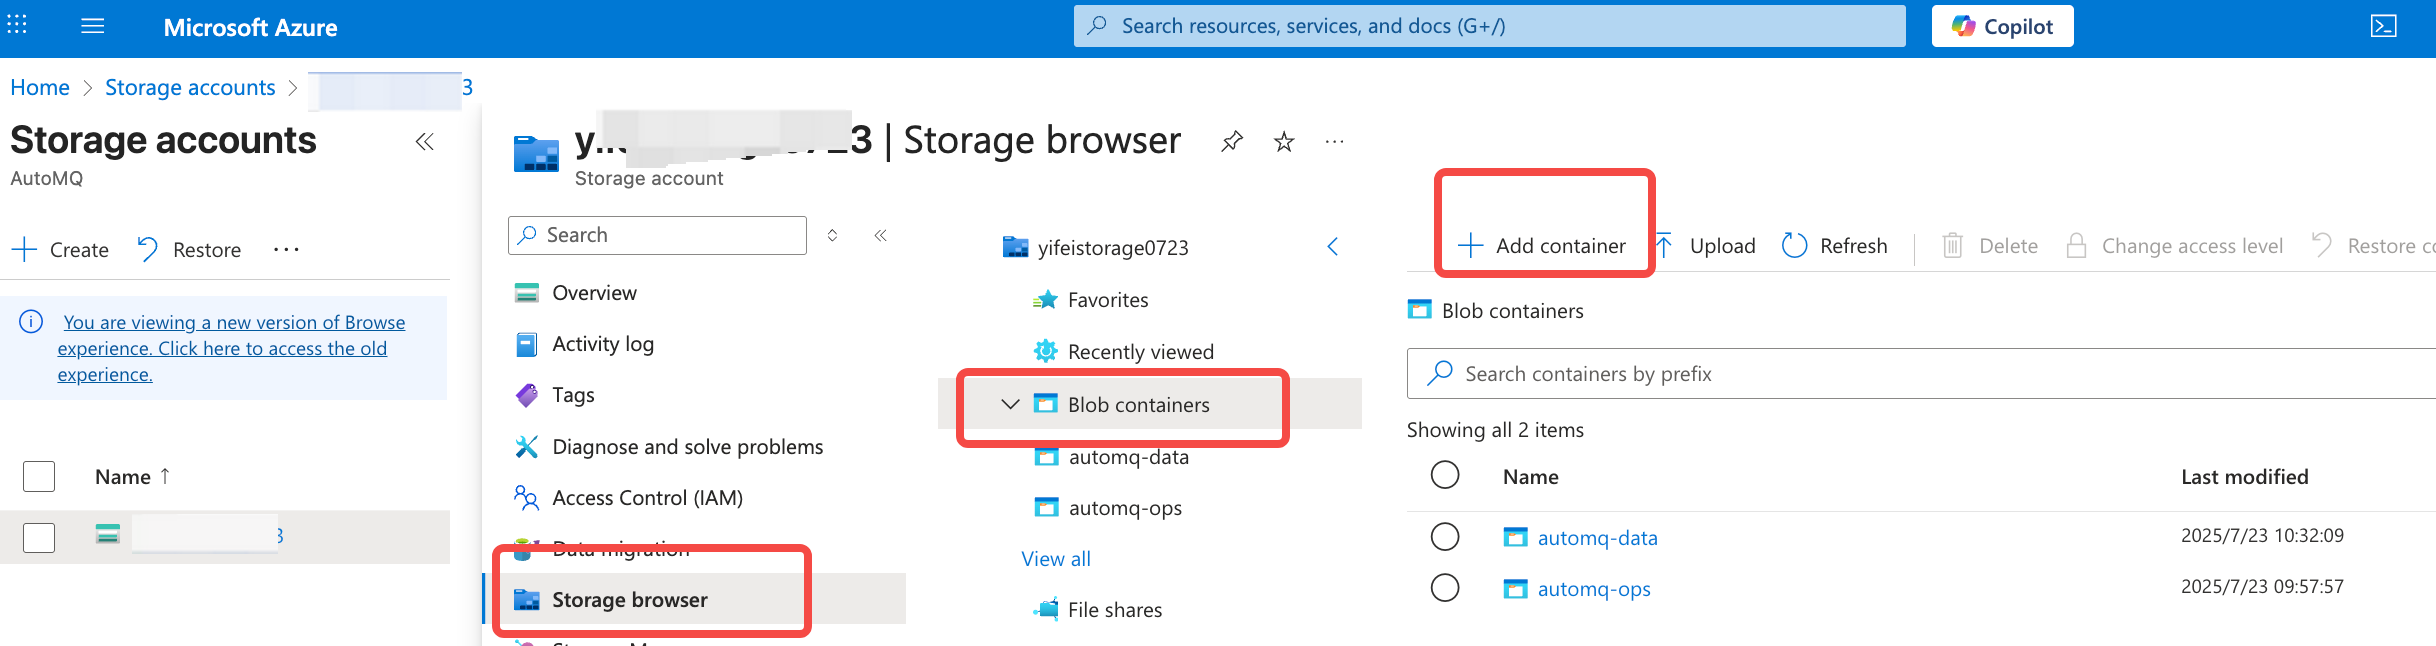
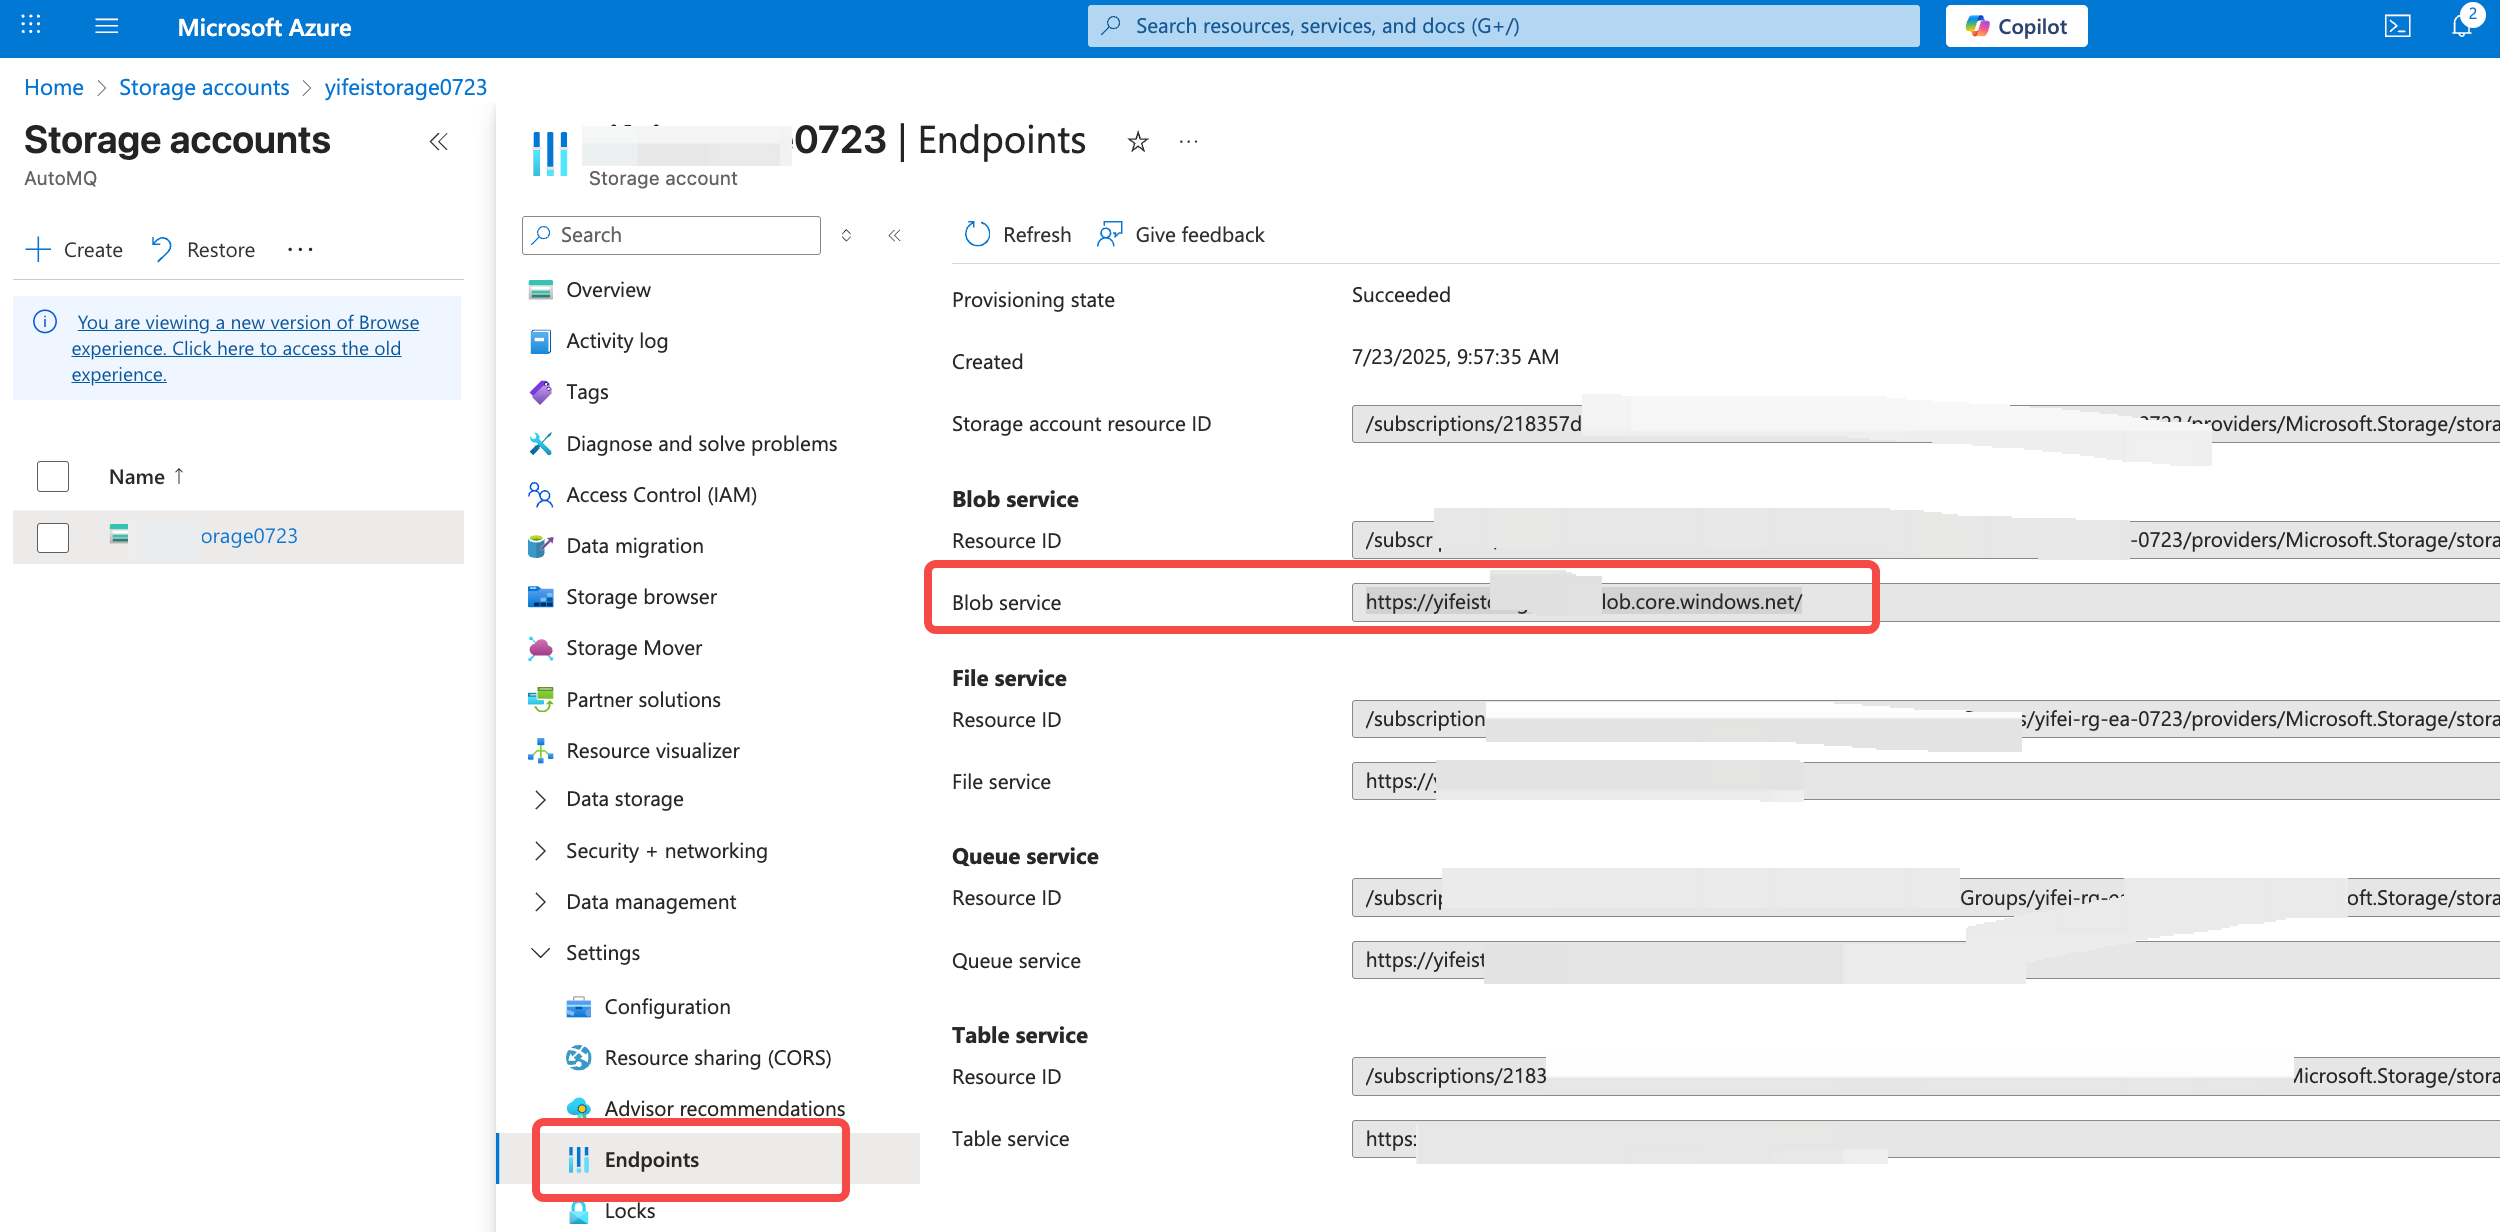
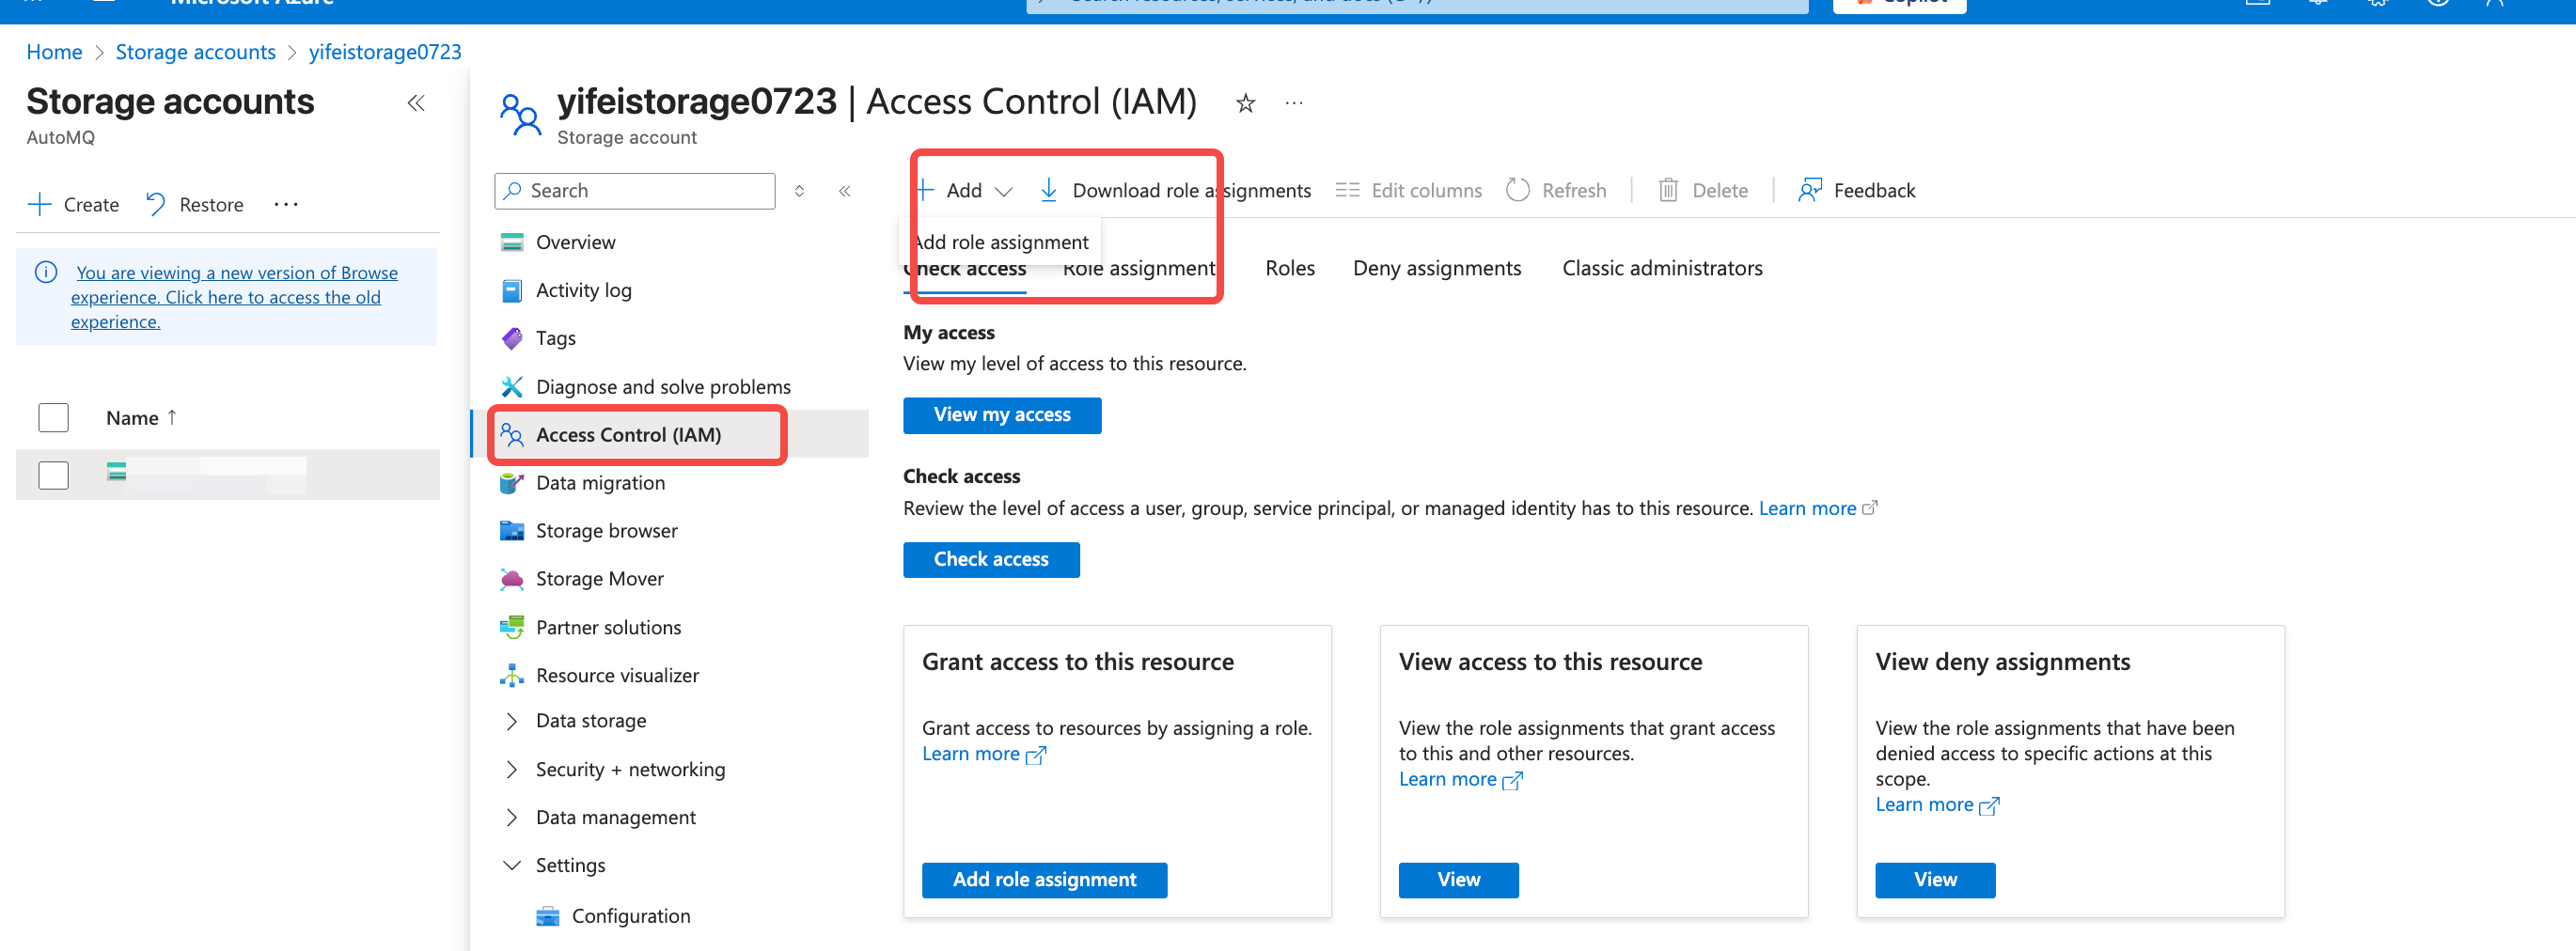
When first accessing the AutoMQ BYOC console, you need to prepare resources such as an object storage bucket and private DNS, create deployment configuration, and set Kubernetes cluster information and authorization for proper use.- Go to the Storage Account console and create a Blob Container to save data in the Data Bucket. Ensure that the region of the Storage Account aligns with the AutoMQ console and AKS, etc.
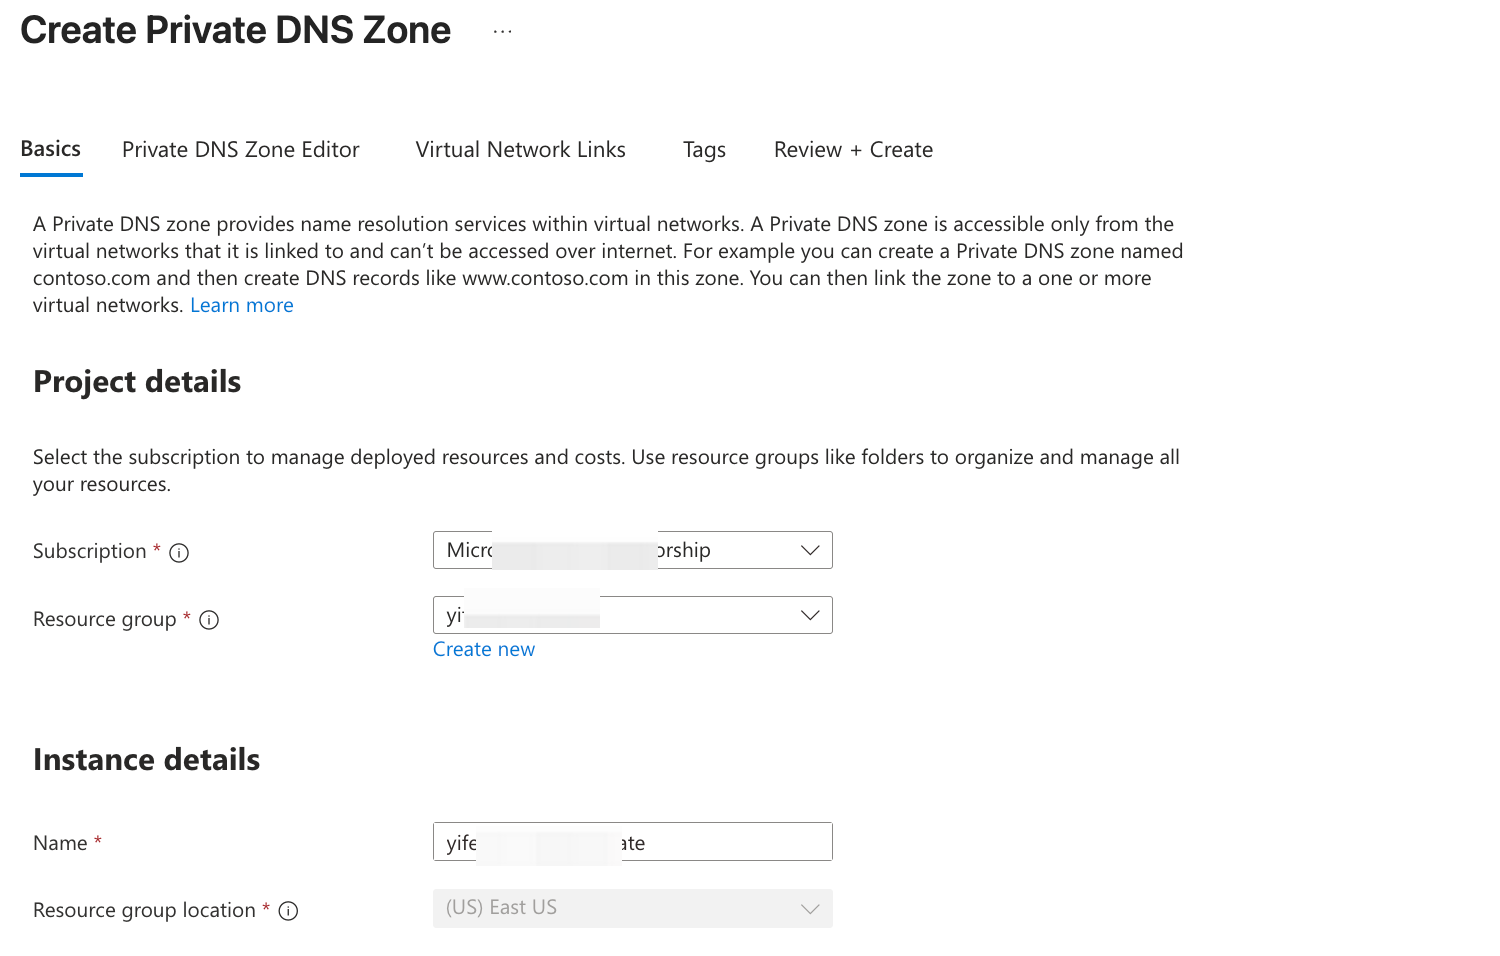
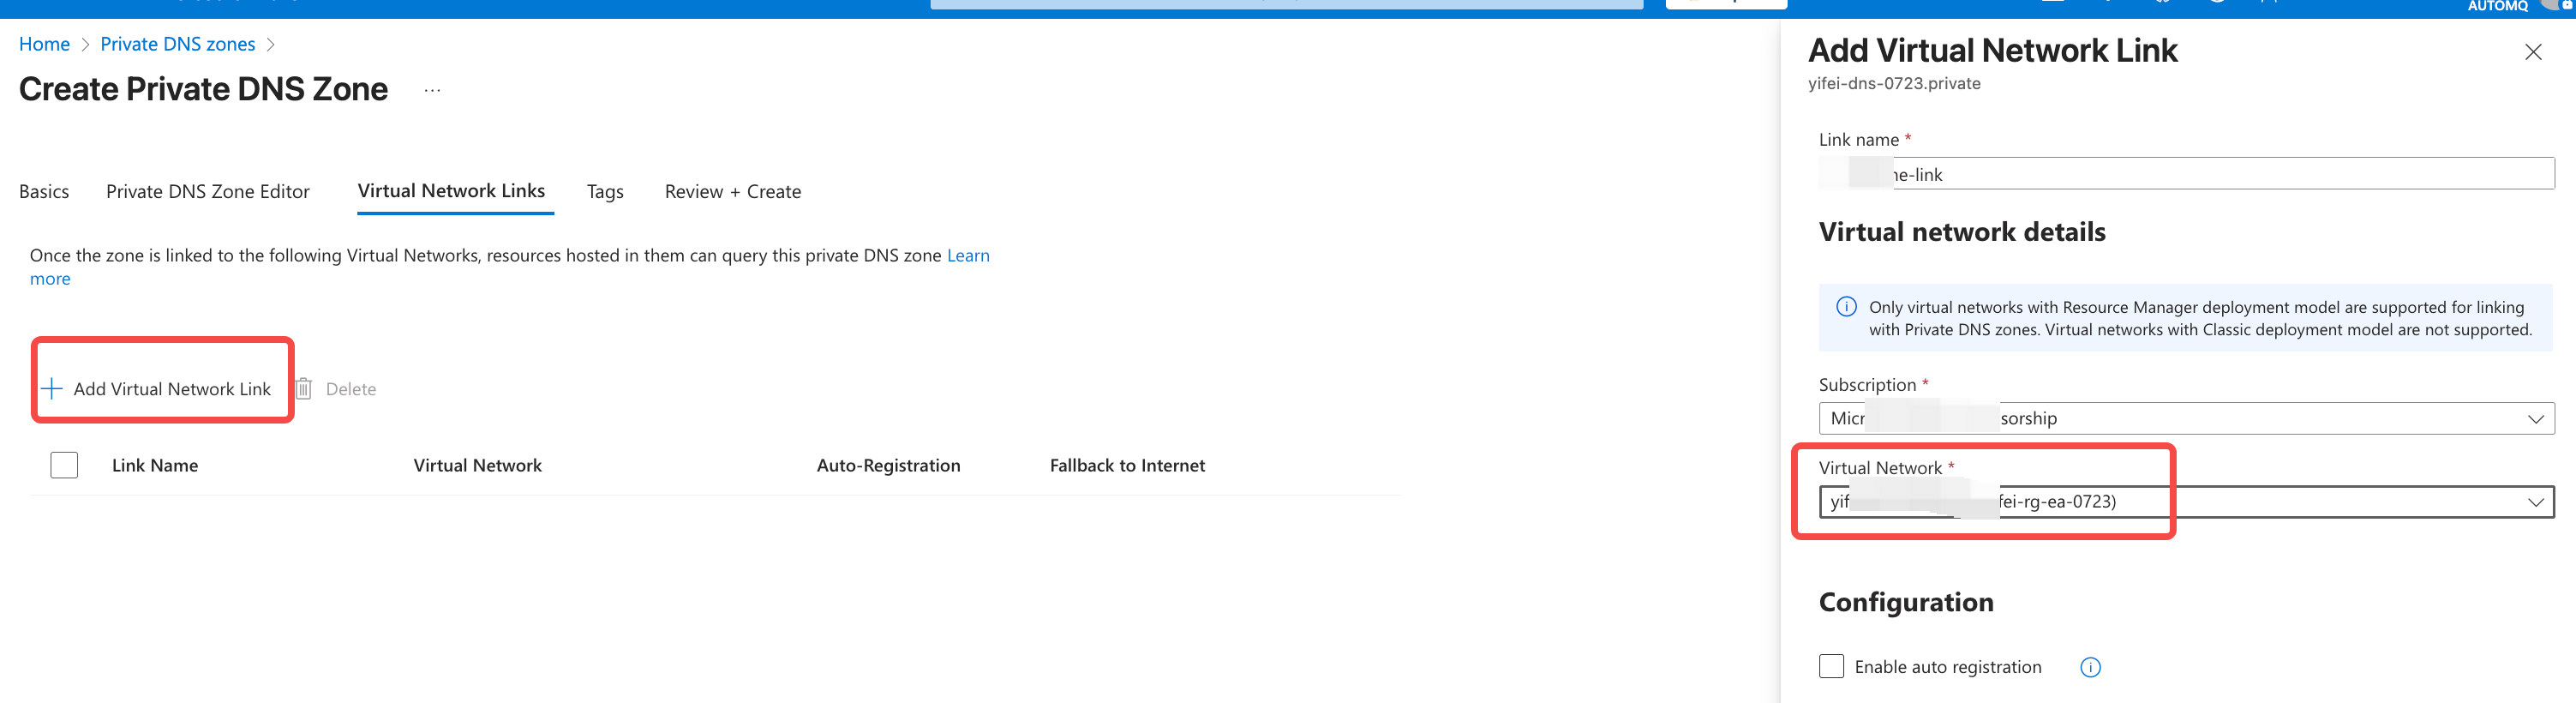
- Navigate to the Private DNS Zone product console and create a Private Zone for the subsequent access point resolution of AutoMQ instances. Ensure that the Zone’s region aligns with the AutoMQ console and AKS, etc.
-
Log in to the console, enter the cluster name and other configurations, then click next.
- Deployment Type: Select Kubernetes.
- Kubernetes Cluster: Enter the cluster name for the AKS (Azure Kubernetes Service) cluster.
- AKS Resource Group: Enter the resource group associated with the AKS cluster.
- DNS ZoneId: Enter the ZoneId of the private DNS zone used for deploying AutoMQ.
- DNS Resource Group: Specify the Resource Group for the Private DNS Zone being utilized to deploy AutoMQ.
- Bucket Name: Enter the data Bucket designated for storing messages during the AutoMQ deployment. Support for multiple Buckets is available.
- Bucket Endpoint: Provide the data Bucket endpoint intended for storing messages during the AutoMQ deployment. Support for multiple Buckets is available.
- Once you have entered the cloud resource information, refer to the console guidance to authorize the Managed Identity used by the data-plane node pool (i.e., the Managed Identity ClientID created in step 2). The authorization process is as follows:

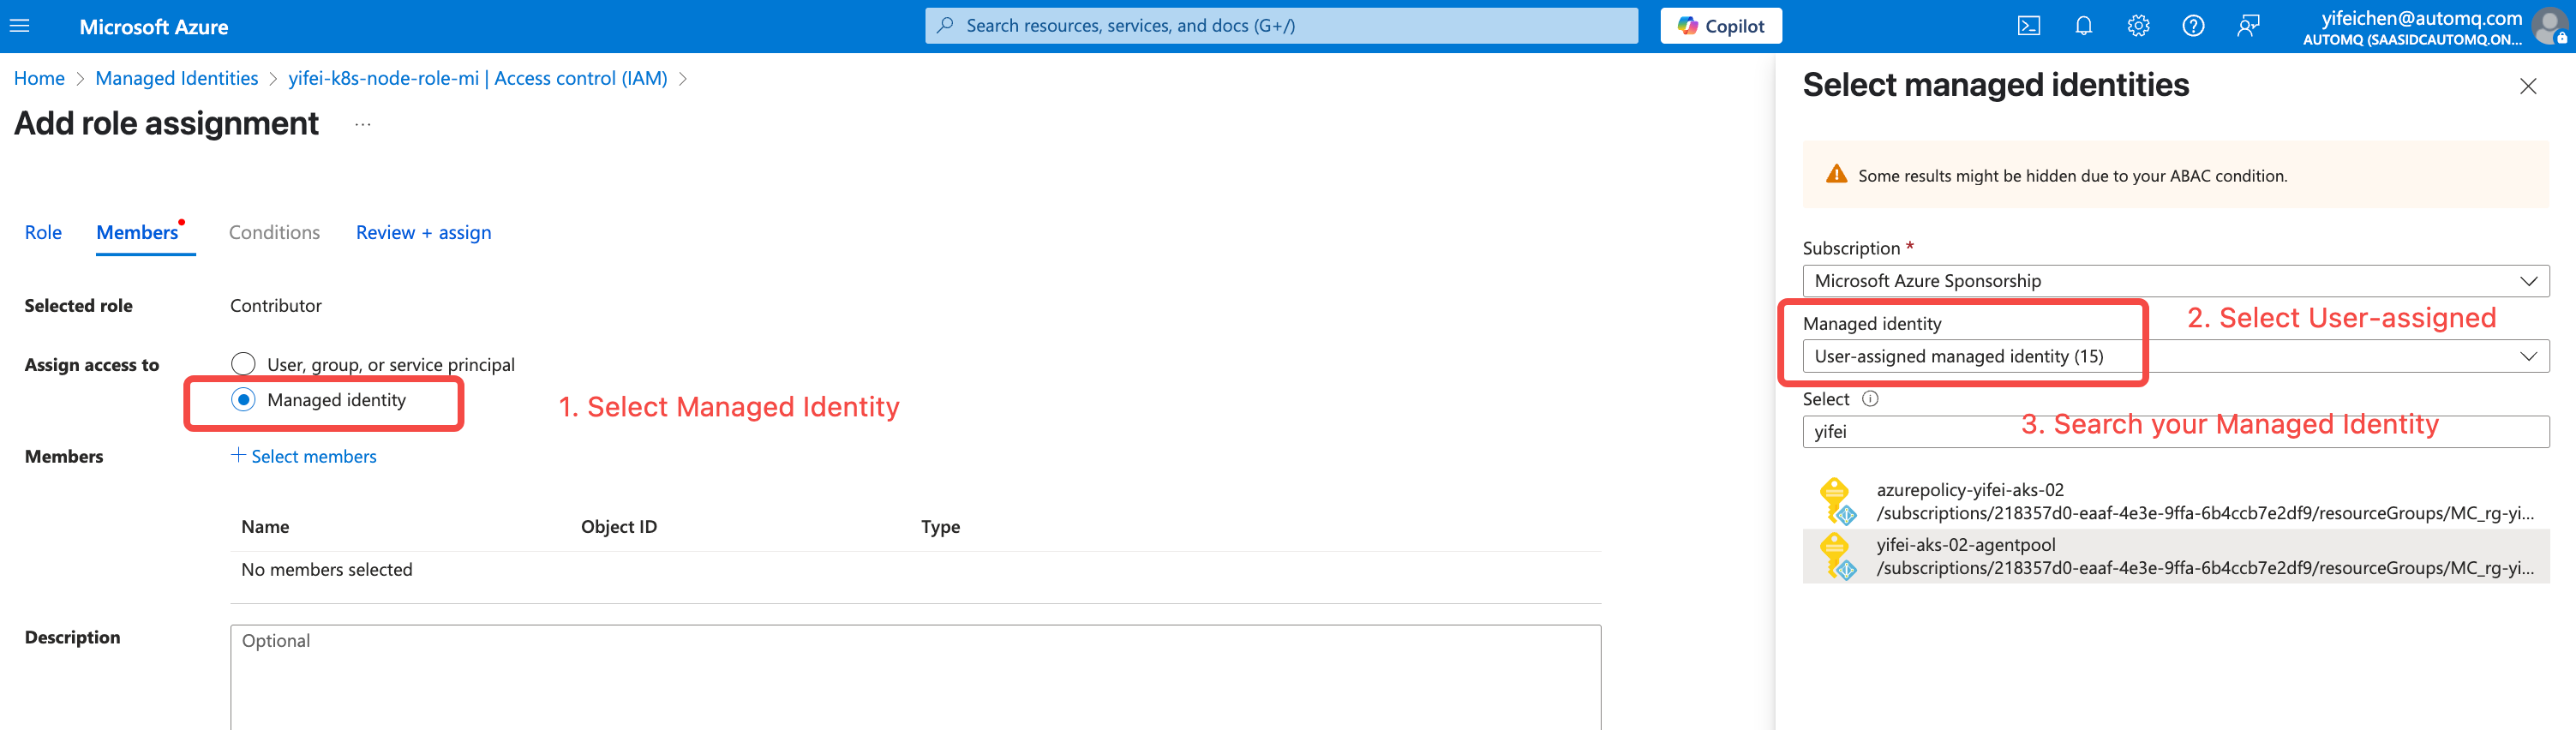
Storage Blob Data Contributor role.
- Preview the deployment configuration information and complete the creation. You can then go to the instance management page to create an instance.