
In this document, “AutoMQ,” “AutoMQ service provider,” and “the AutoMQ service” all refer to AutoMQ HK Limited and its affiliates.
Prepare VPC
For POC testing scenarios, it is recommended to create a new VPC and deploy AutoMQ and test applications within it. For production scenarios, you will likely use an existing VPC. In this case, you should check if the VPC meets AutoMQ’s installation requirements and make any necessary adjustments. To install the AutoMQ BYOC environment, you need to provide a VPC on AWS that meets the following conditions:| VPC Checklist | Description |
|---|---|
| Public Subnet: 1 |
|
| Private Subnet: 1 or 3 |
|
| S3 Endpoint: 1 |
|
| EC2 Endpoint: 1 |
|
| DNS Hostnames and Resolution: Enabled |
|
| Public NAT Gateway: 1 |
Note: If a public NAT gateway is not configured, you will not be able to install the AutoMQ cluster on EKS. |
Scenario 1: Create a New VPC
If you do not have an available VPC resource or want to use a new VPC for a POC test scenario, you can refer to the documentation below to create a new VPC.Step 1: Create a VPC and Enable the S3 Endpoint
Log in to the VPC console with your AWS cloud account. Taking the Singapore region as an example, visit the VPC console and click “Create VPC.”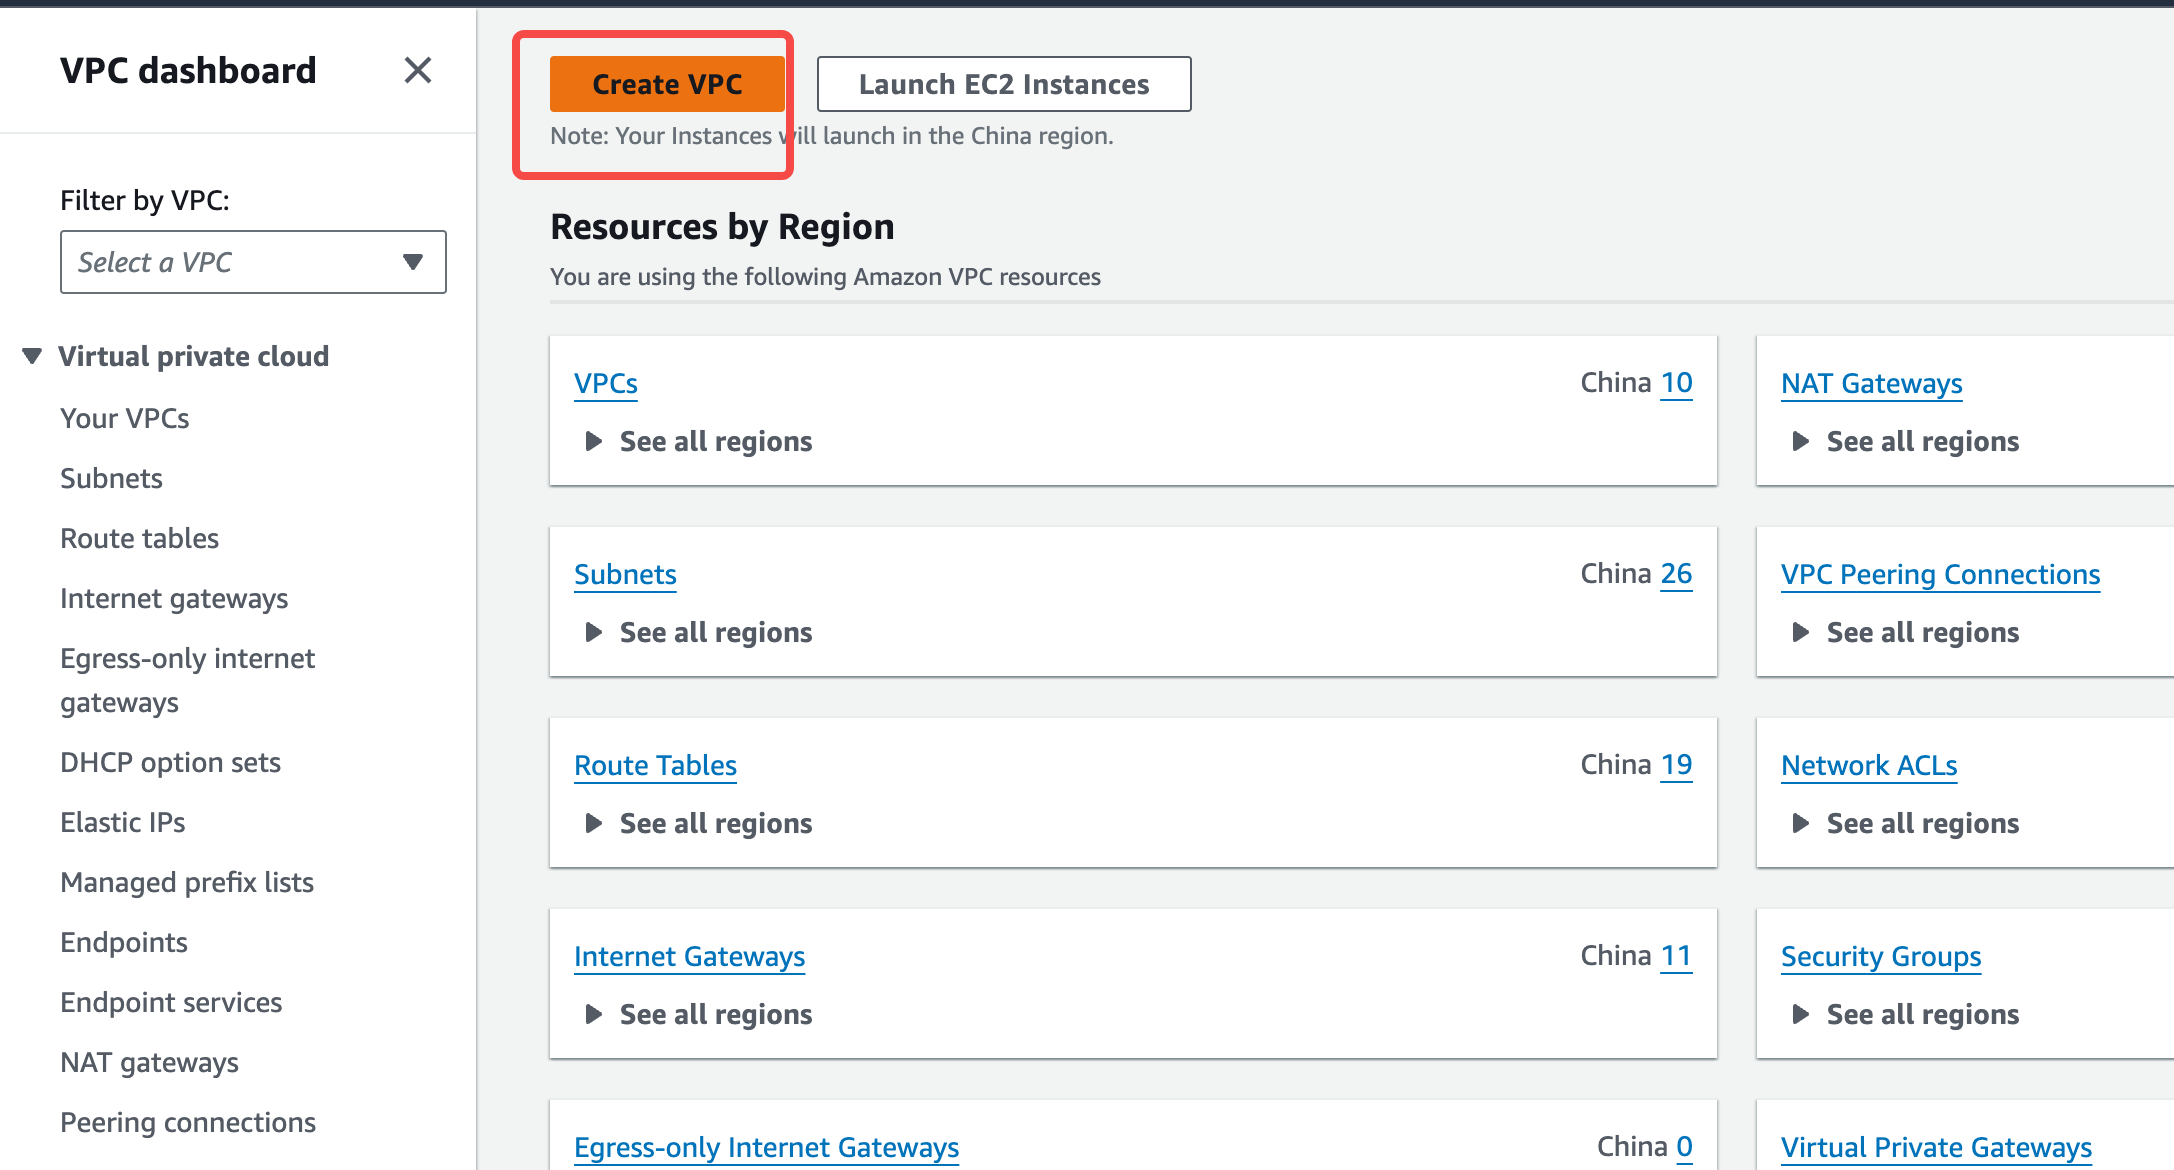
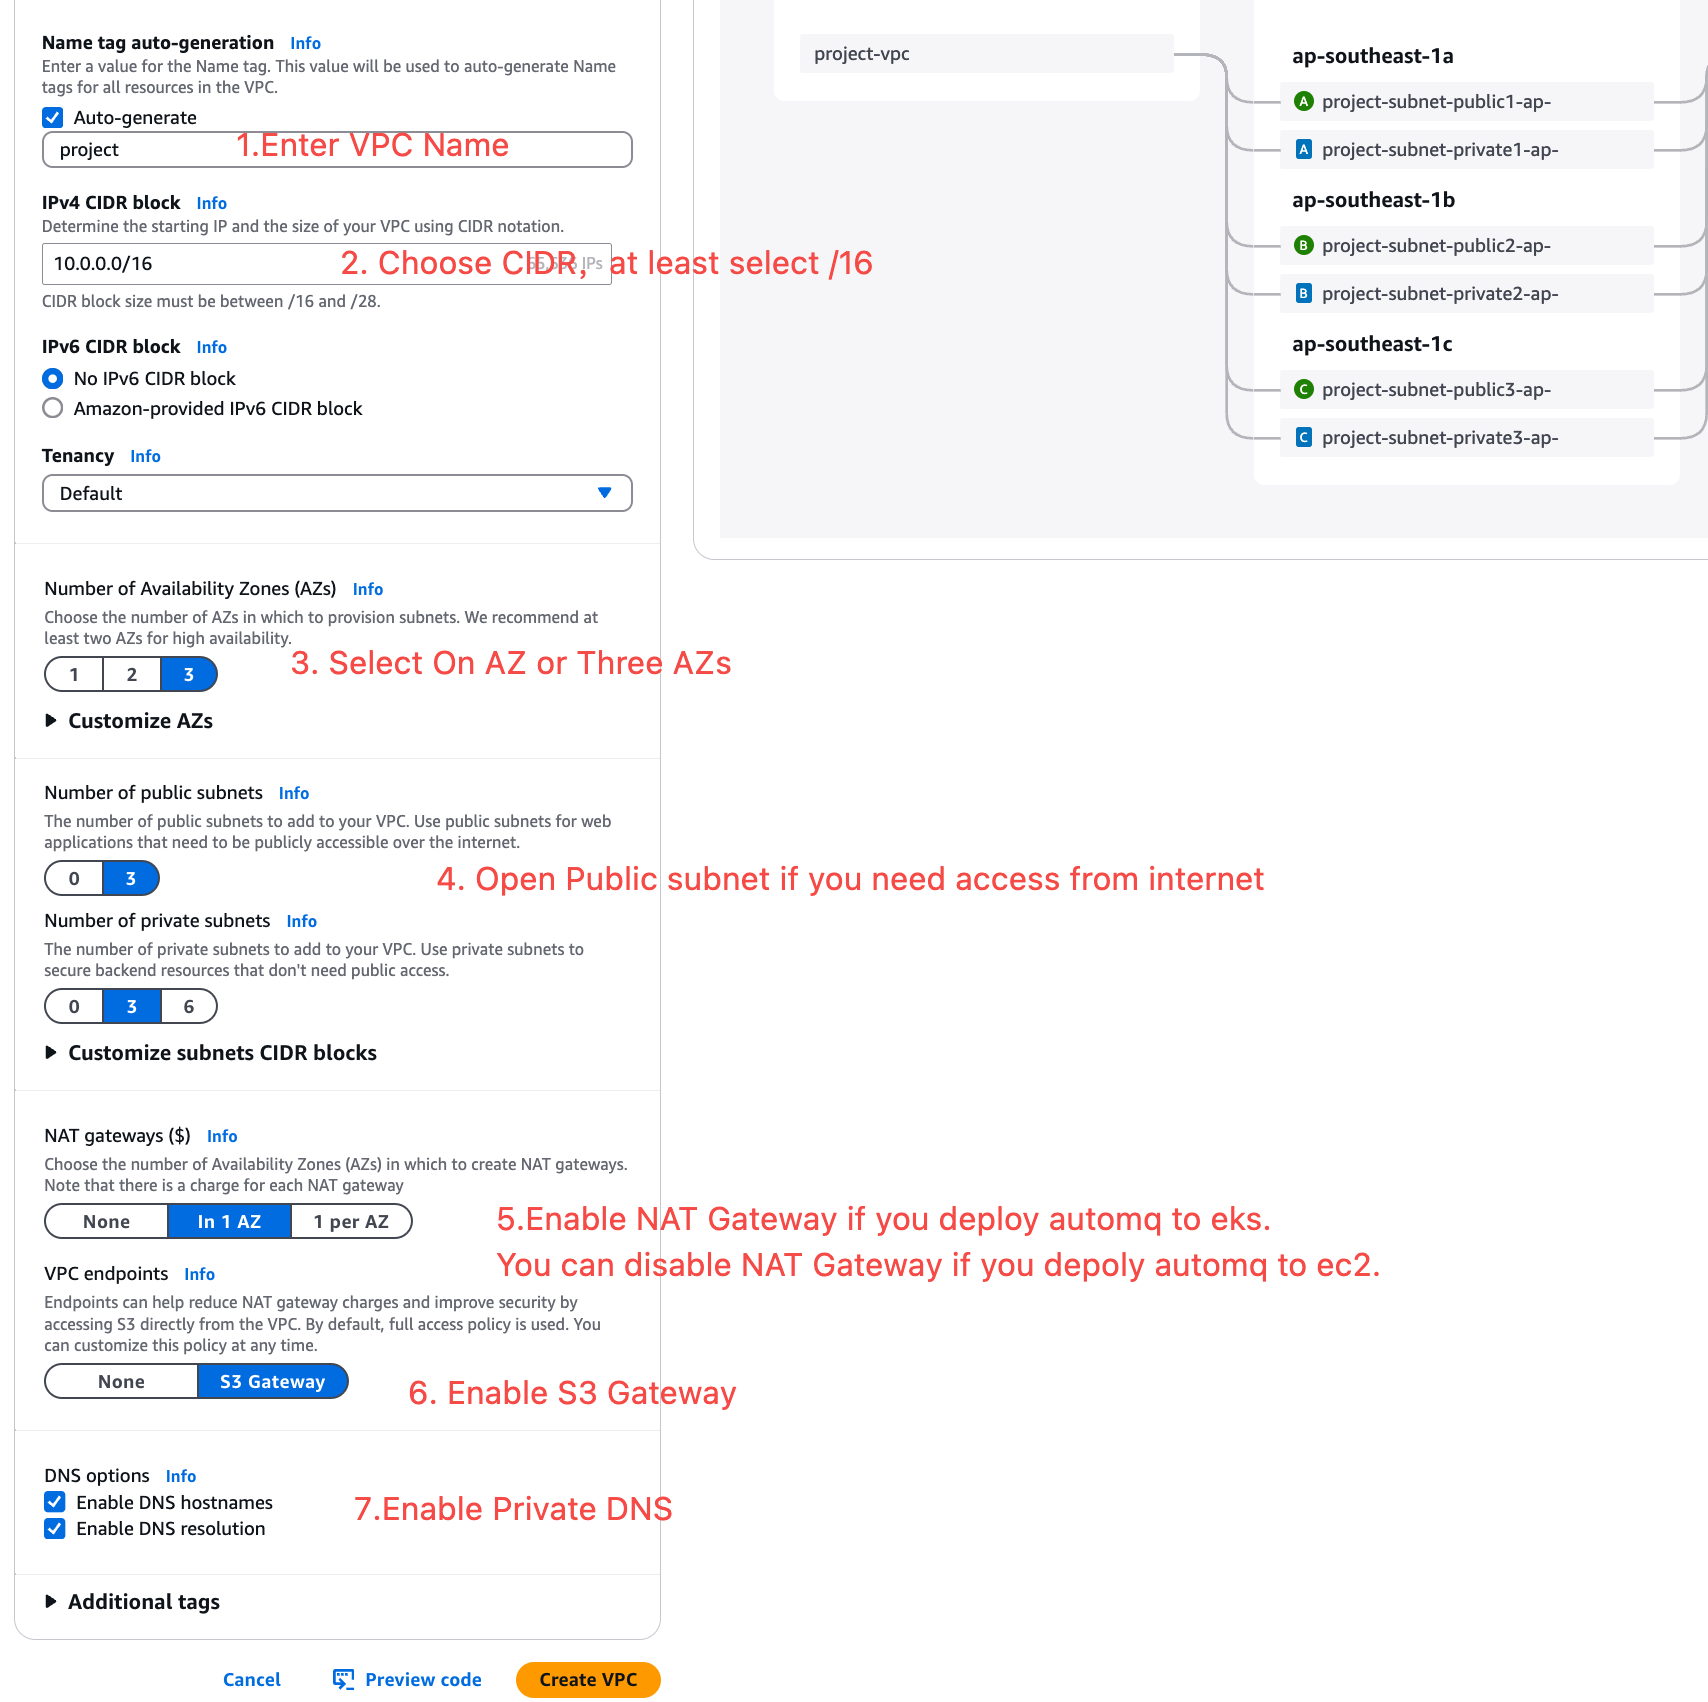
- VPC Name: Set a custom name for the VPC.
- CIDR: Set a reasonable CIDR block.
- Availability Zones: It is recommended to select 1-3 zones based on your business deployment.
- Public Configuration: If you need to access the AutoMQ environment console from the public network, you need to configure this.
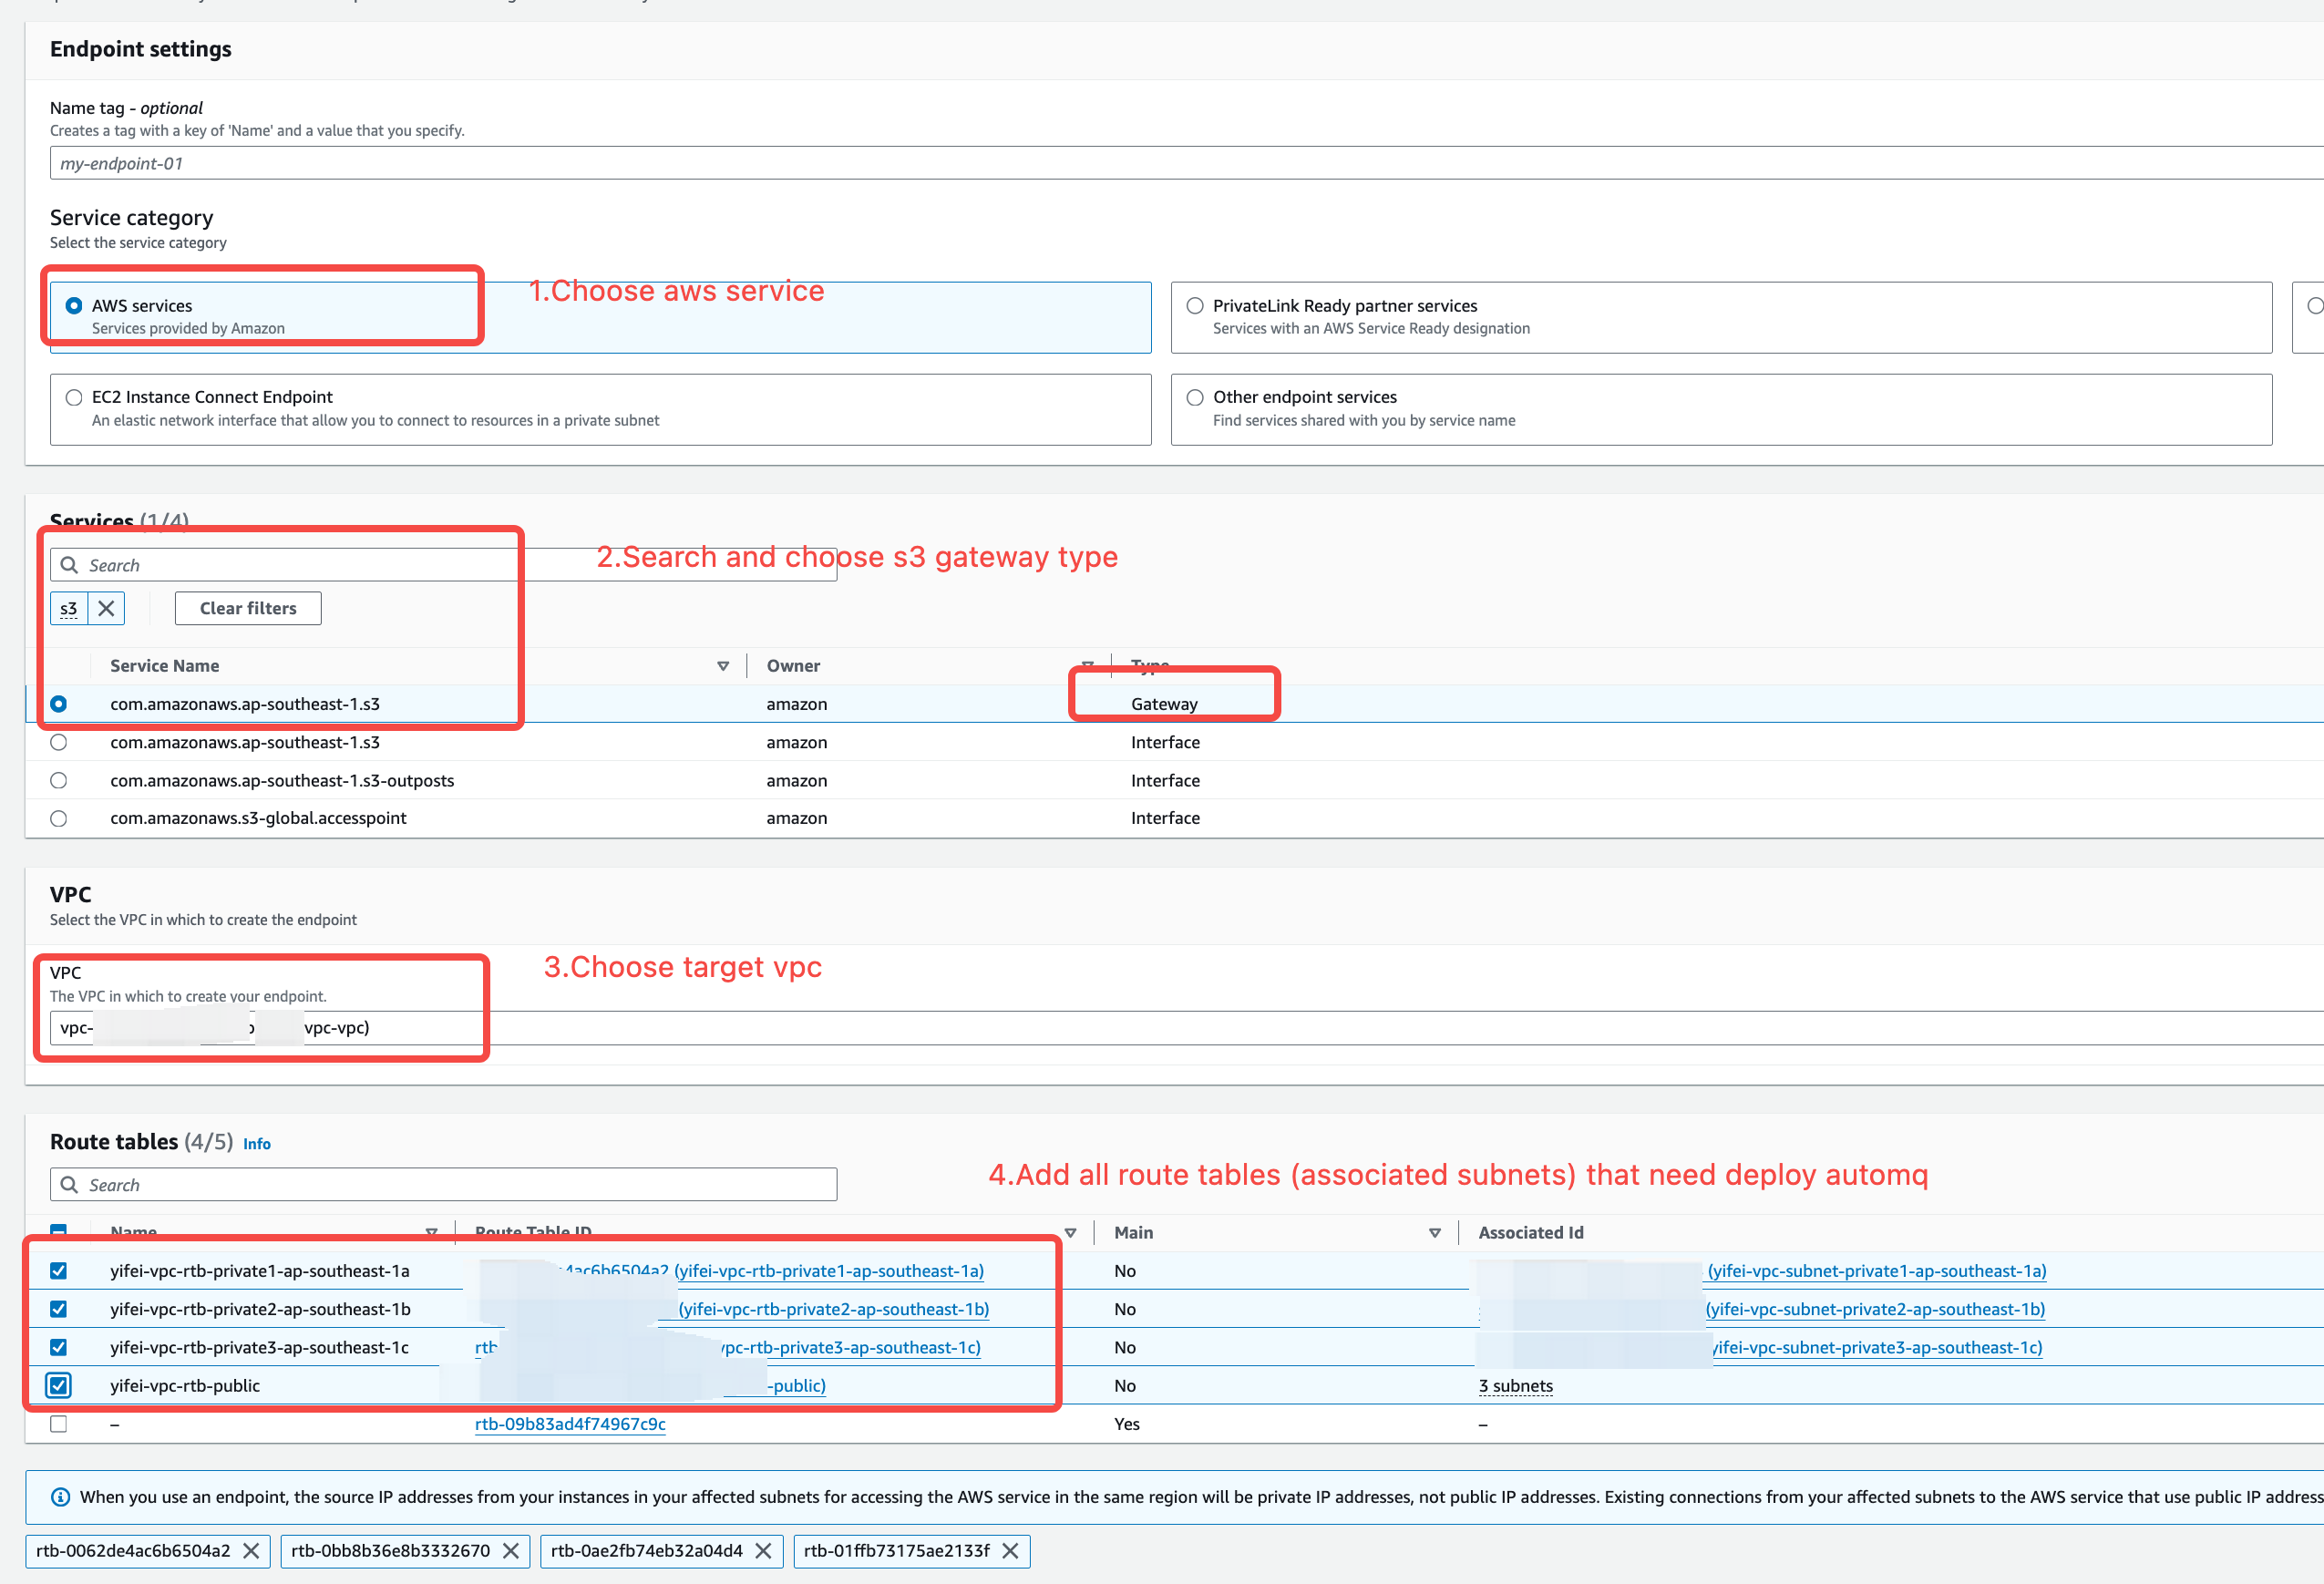
- VPC Endpoints: Be sure to open the configuration and create an S3 gateway.
- DNS Options: Ensure that both “Enable DNS hostnames” and “Enable DNS resolution” are enabled. The Kafka cluster access point will rely on the DNS service for domain name resolution.
- NAT Gateway: If you are deploying AutoMQ on EKS, you need to enable the NAT Gateway.
Step 2: Create an EC2 Endpoint
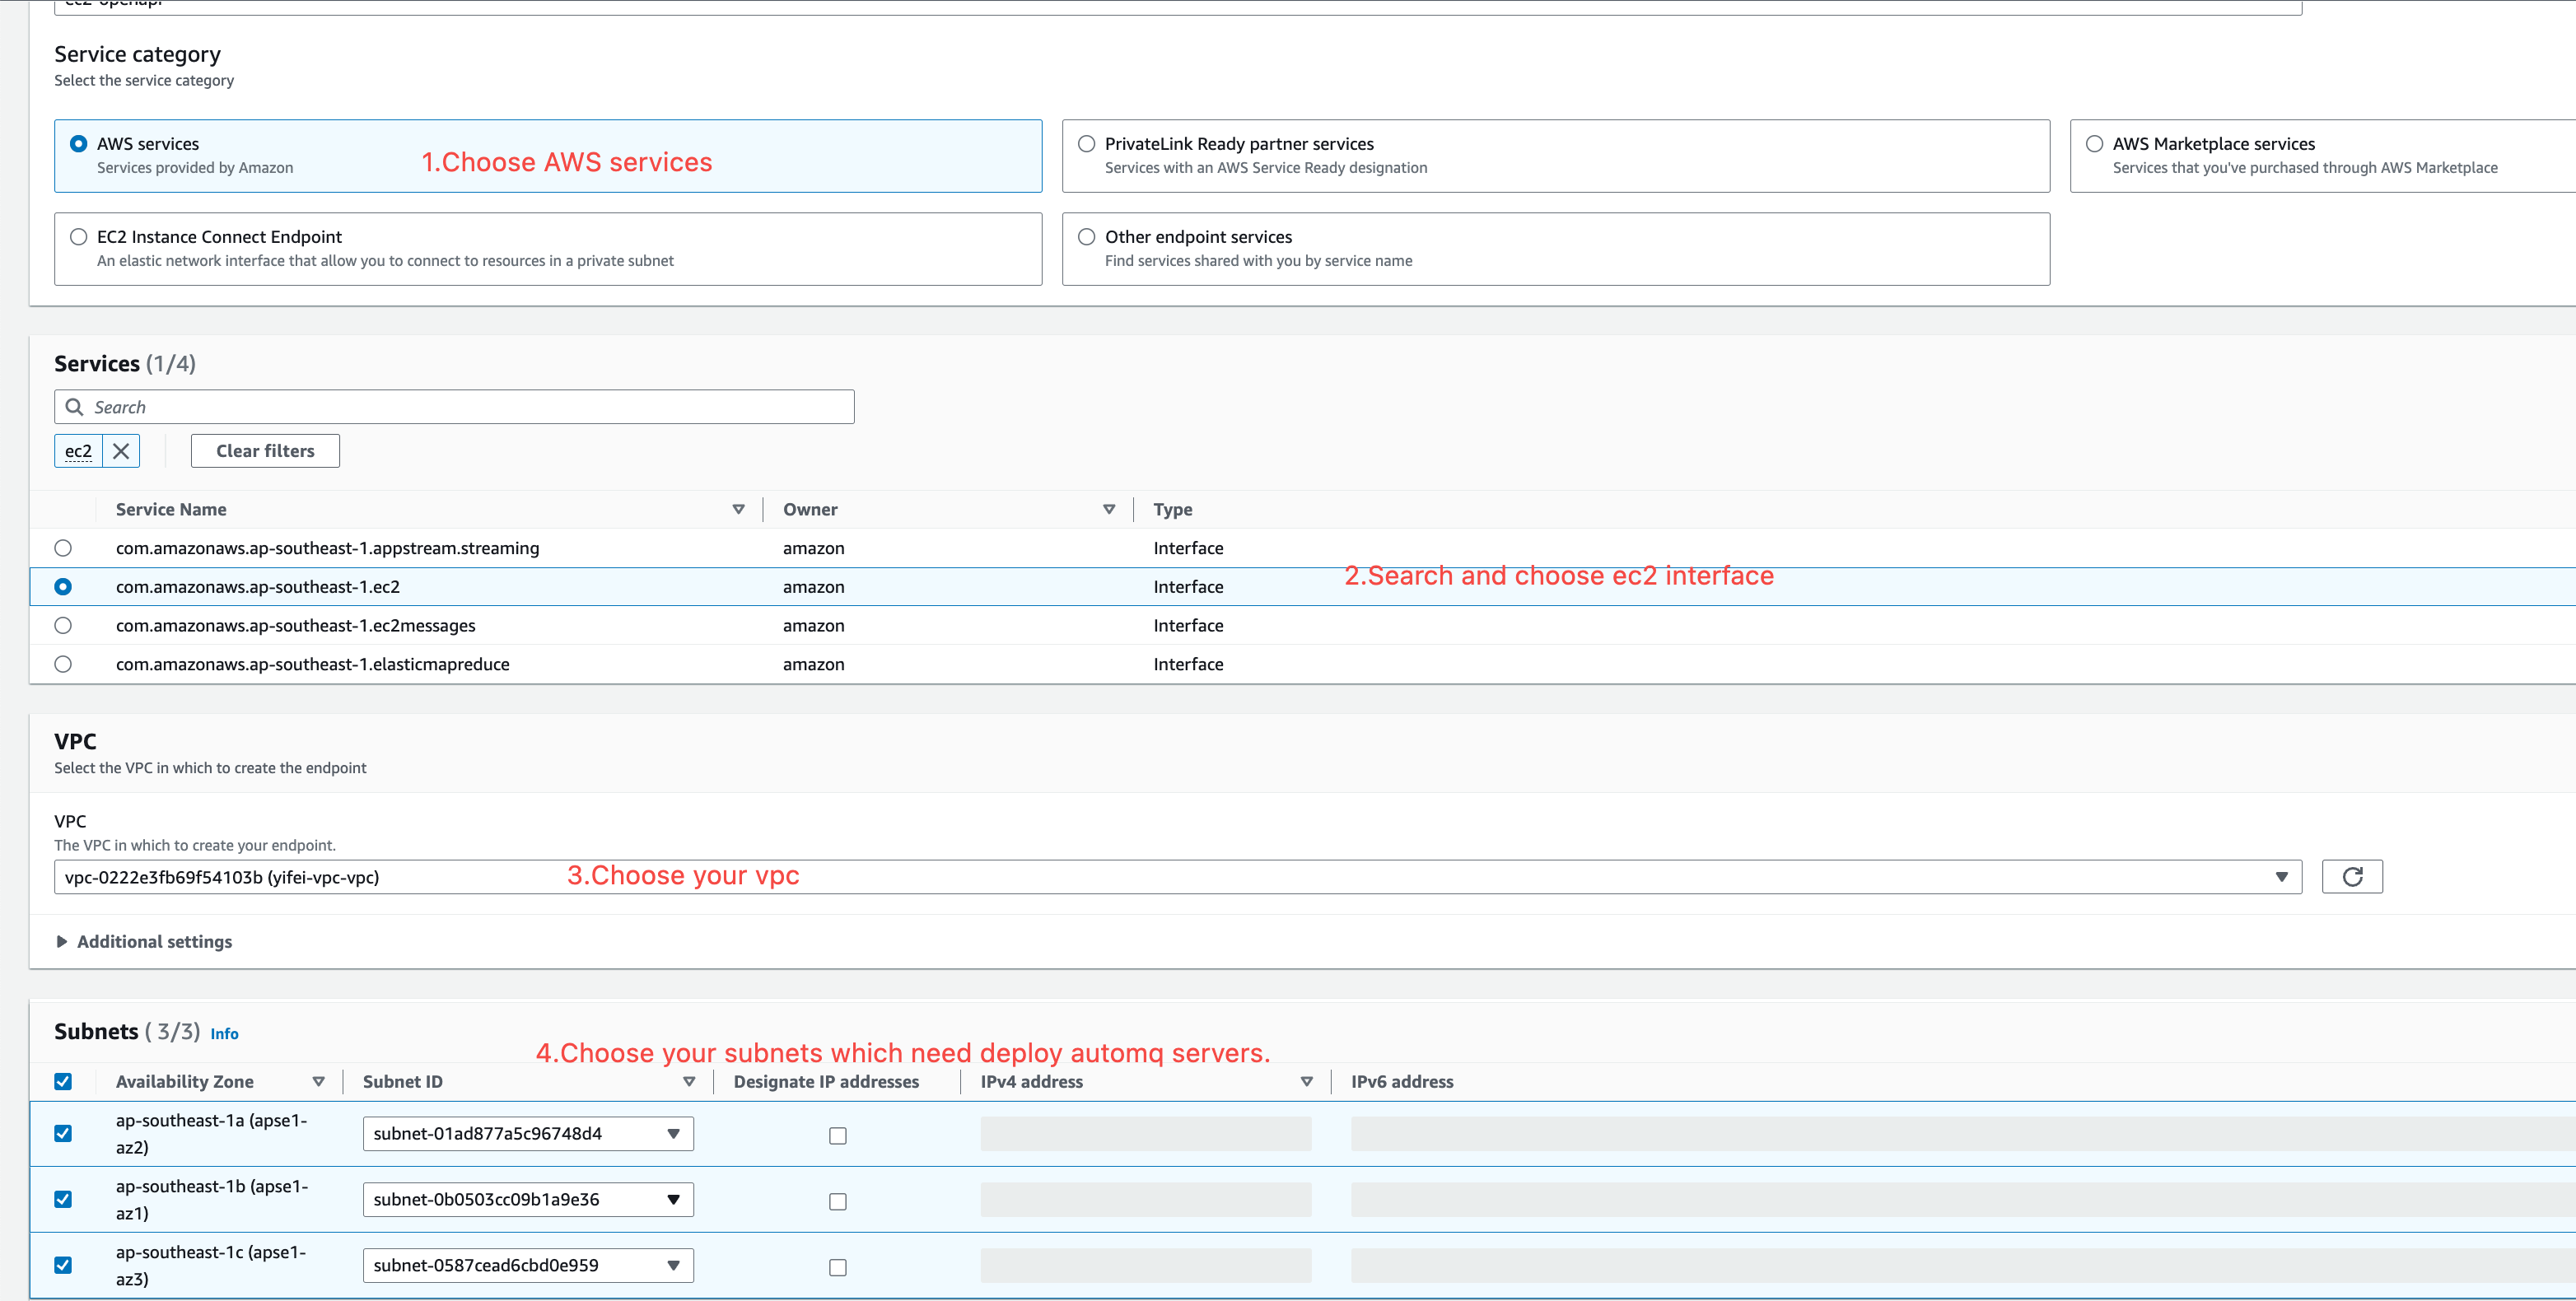
Create an EC2 Endpoint within the current VPC to allow subsequent AutoMQ data nodes to access the EC2 API via the VPC private network.
- Service Type: Select “AWS services.”
- VPC: Select the VPC where you need to deploy AutoMQ.
- Availability Zones and Subnets: Select all the availability zones and subnets where you need to deploy AutoMQ.
-
Security Group: It is recommended to create a new security group and ensure that an inbound rule is set to allow access to port 443 from
0.0.0.0/0.

Scenario 2: Configure an Existing VPC
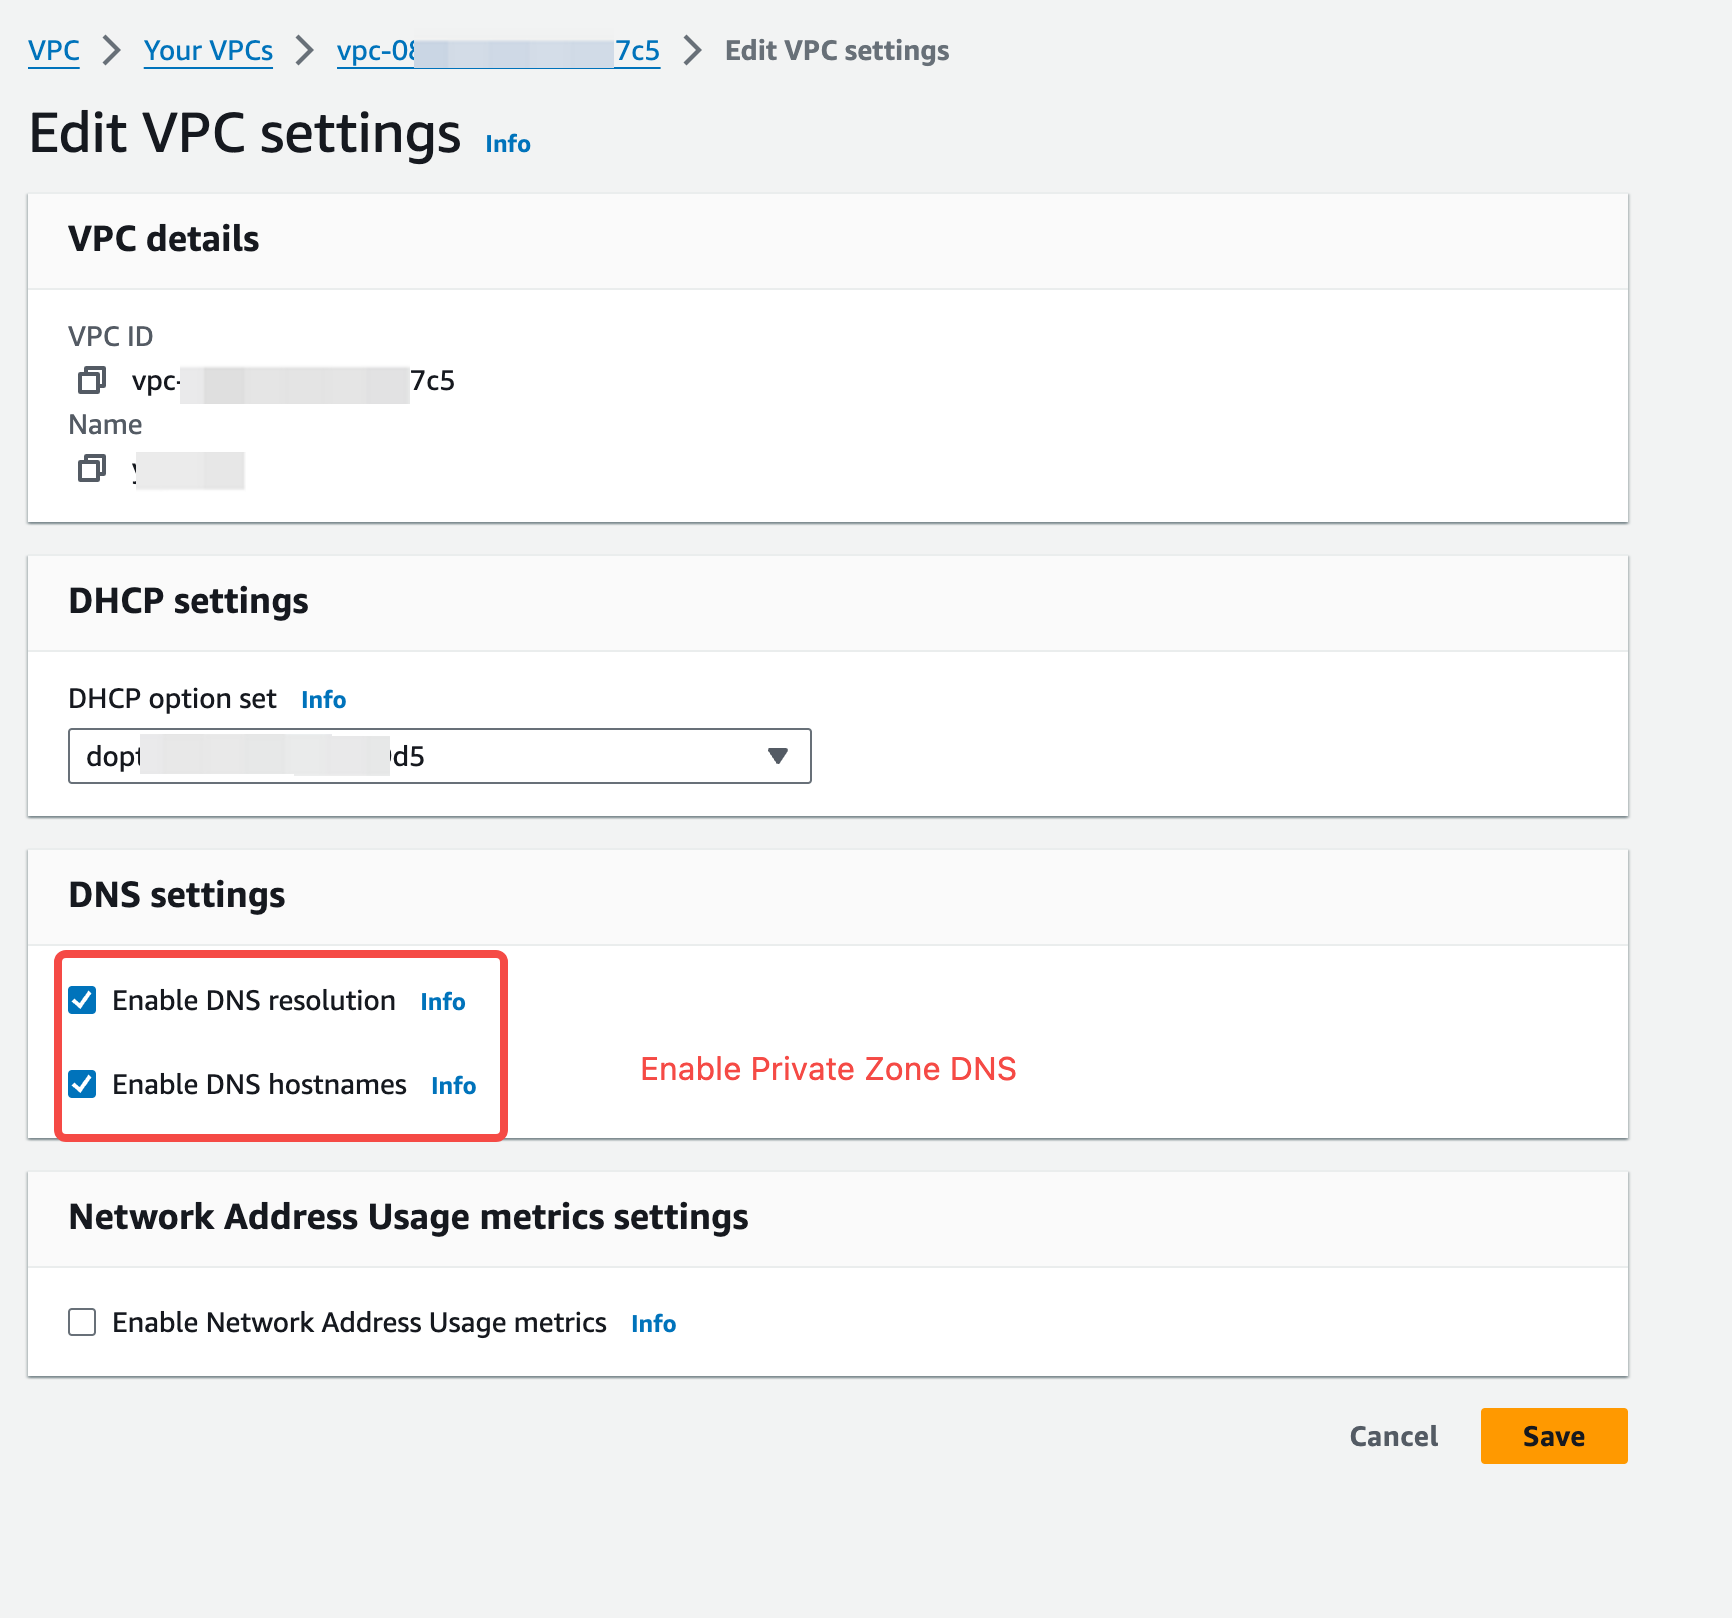
If you already have an available VPC network in your current production environment and your application is already deployed in it, you will need to install the AutoMQ environment in the existing VPC network. In this case, you still need to check whether the current VPC configuration meets the constraints.Step 1: Check and Enable DNS Configuration
Access the existing VPC network, click on “Details,” and view the VPC configuration.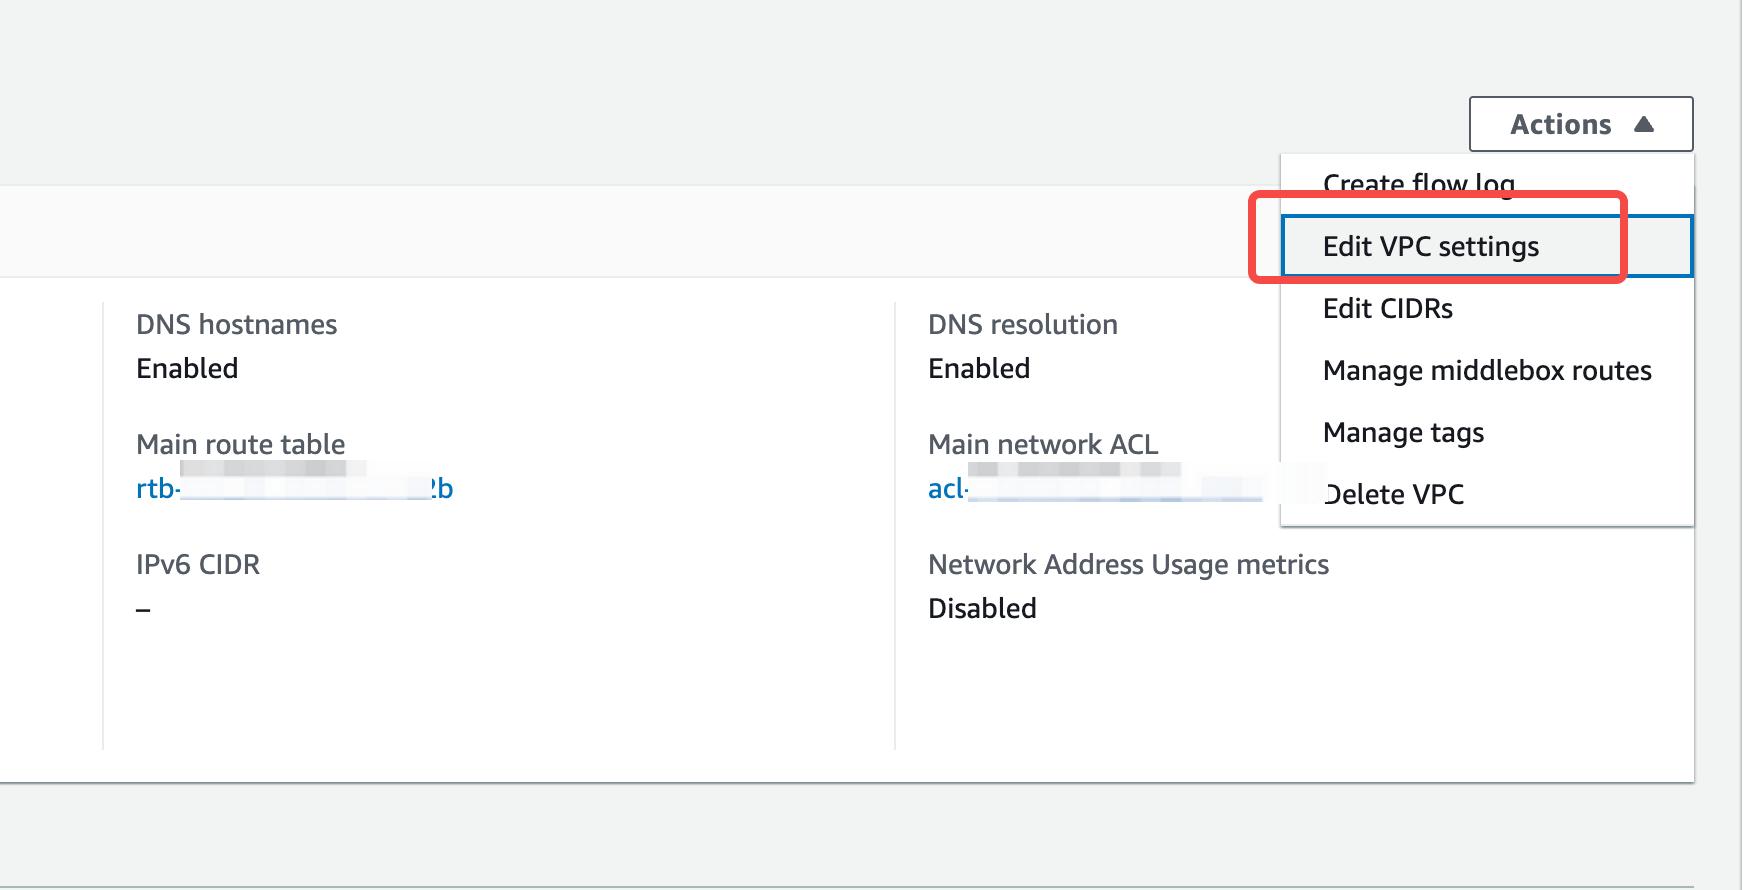
Step 2: Check and Create S3 Endpoints
Confirm whether an S3 gateway endpoint has been created for the current VPC. If there is no S3 endpoint, you need to create one.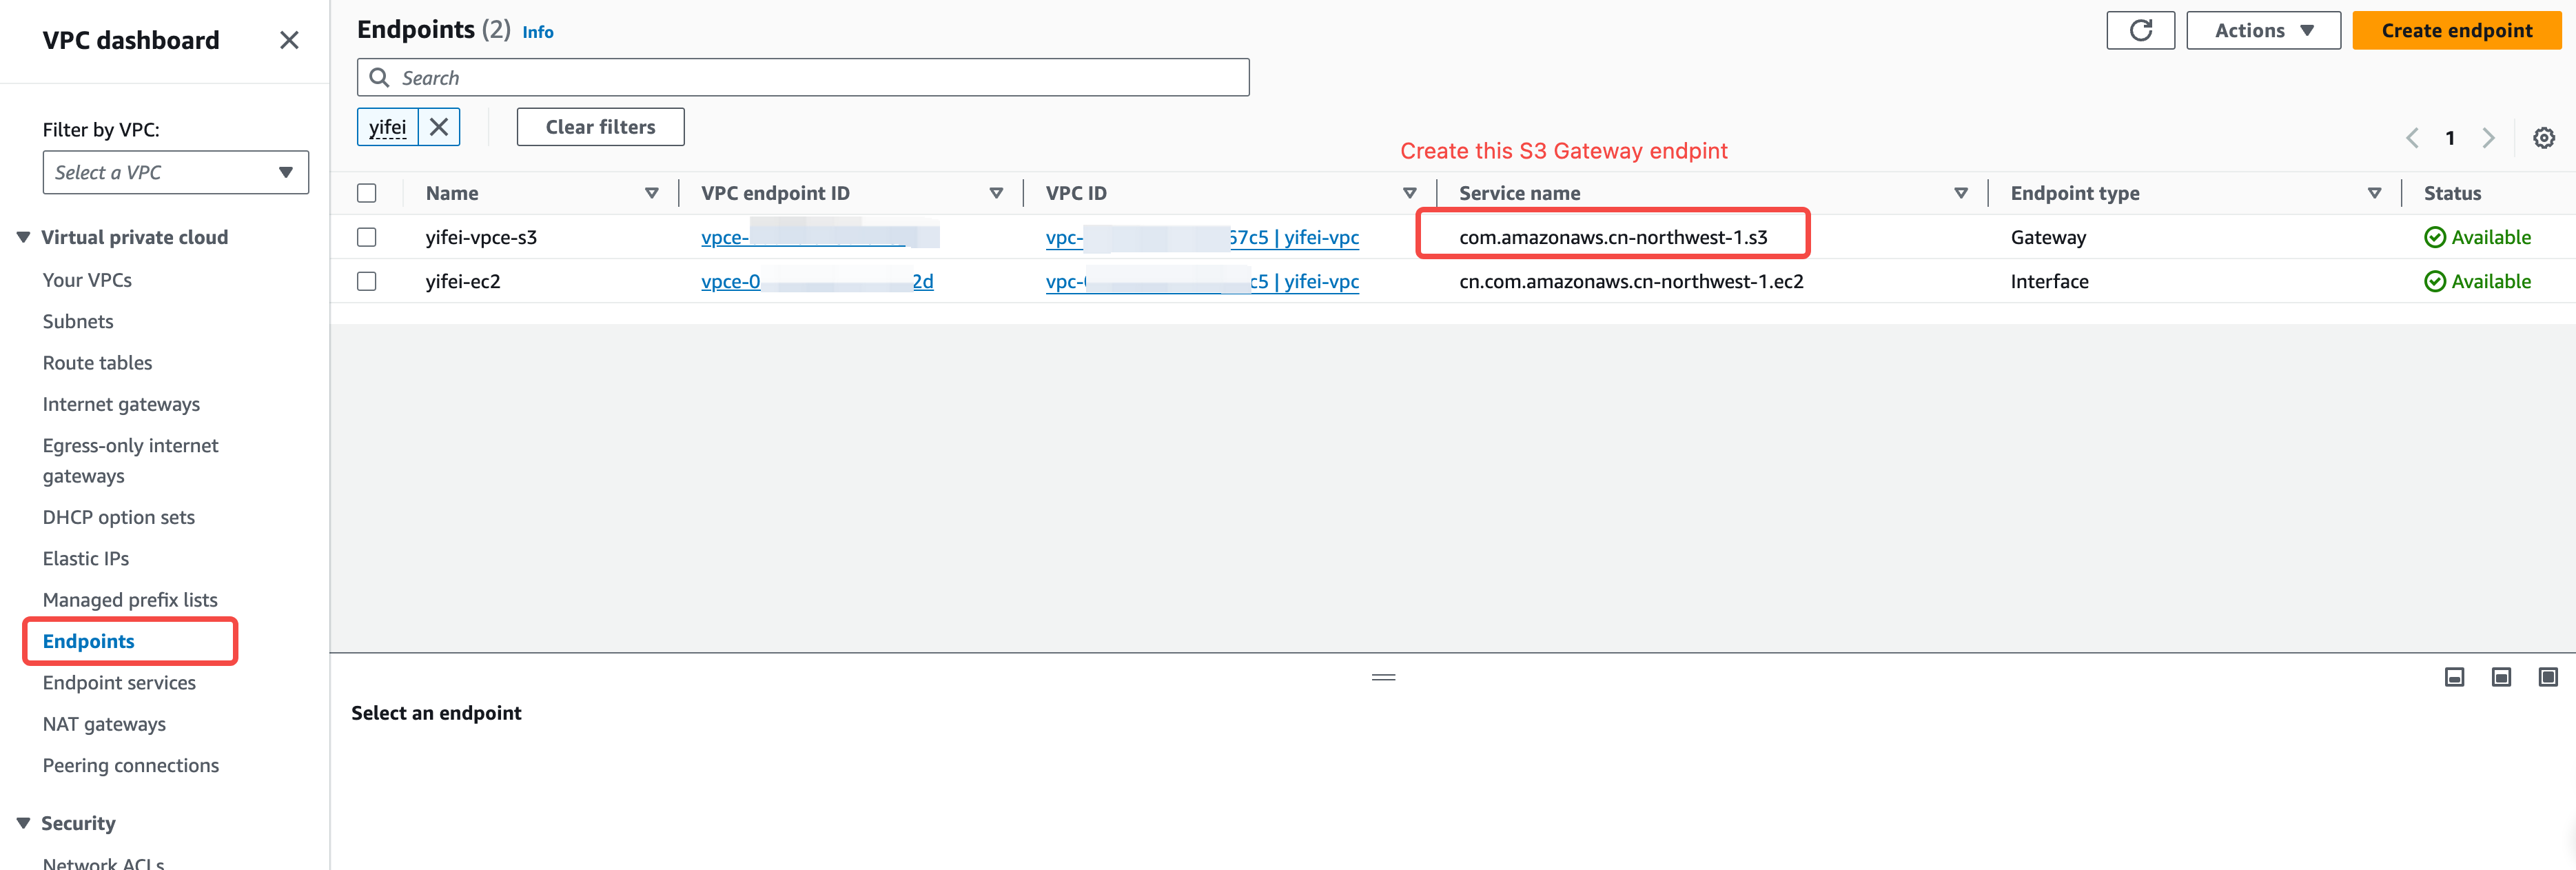
Step 3: Check and Create EC2 Endpoints
Check and create an EC2 Endpoint in the current VPC to allow subsequent data nodes to access the EC2 API via the private network.
- Service Type: Select “AWS services.”
- VPC: Select the VPC where you need to deploy AutoMQ.
- Availability Zones and Subnets: Select all the availability zones and subnets where you need to deploy AutoMQ.
-
Security Group: It is recommended to create a new security group and ensure that an inbound rule is set to allow access to port 443 from
0.0.0.0/0.
Prepare EC2 for Deploying AutoMQ Console
The AutoMQ console is the core component for managing the AutoMQ Cloud BYOC environment, and it is deployed on a separate EC2 instance. Therefore, you need to prepare this EC2 instance before installation.Basic Requirements
To ensure the stable operation of the console, the EC2 instance you prepare needs to meet the following basic requirements:- Instance Specifications:
- Configuration: At least 2-core CPU and 8 GB of memory.
- System Volume: At least 20 GiB of storage space.
- Data Volume: An additional data volume must be mounted to store metadata, with a space of no less than 20 GiB.
-
Network Location:
- This EC2 instance must be located in the same VPC as the subsequently deployed AutoMQ cluster.
- Typically, this VPC should also be consistent with the VPC where your application services are located to ensure network connectivity.
-
Public Network Access:
- This EC2 instance must be able to access the Internet to download installation packages and synchronize necessary metadata. You can achieve this by associating an EIP (Elastic Public IP) or configuring a public NAT gateway.
Creation Steps
- Log in to the AWS EC2 console and click Launch instance.
- Operating System (AMI): Choose a Linux distribution you are familiar with, such as Amazon Linux 2 or Ubuntu.
- Instance Type: Select an instance type that meets the above specification requirements (e.g.,
t3.largeor higher). - Network Settings:
- Select the target VPC and a public subnet (if using an EIP) or a private subnet (if using a NAT gateway).
- Ensure that the security group opens the necessary ports, such as the SSH (22) port for you to log in and manage, and the console service’s service port (default is 8080). The access source can be set to
0.0.0.0/0(allowing all IP access, suitable for test environments) or restricted to a specific IP range according to your needs.
- Storage Configuration:
- Configure the system volume (root volume) size to be at least 20 GiB.
- Click Add new volume to add an additional data volume and ensure its size is not less than 20 GiB.
- After completing other configurations, launch the instance.
- Mount the Data Volume:
- After the instance starts, log in to the EC2 instance.
- Mount the additional data volume you added in the Storage Configuration to a specified directory in the operating system (e.g.,
/data). - This path will be used as the data mount path when starting the Docker container later.
- Please ensure that the mount point has the correct permissions.
- Install and Start the Docker Service:
- Install Docker on the EC2 instance. For specific installation steps, please refer to the official Docker documentation.
- After installation, start the Docker service and configure it to start on boot.
Prepare Private DNS
The AutoMQ cluster exposes service addresses to applications through Private DNS, which relies on private domain name resolution within the VPC. Therefore, a Private DNS must be configured to provide reliable domain name resolution services. Generally, Private DNS is created at the same time as the VPC. If your VPC does not have a Private DNS, or if you need to create a new one, you can refer to the steps below for configuration.Private DNS Prerequisites
When configuring Private DNS, the following two key conditions must be met:| Condition | Description | Importance |
|---|---|---|
| Associated VPC | The Private DNS must be associated with the VPC where AutoMQ is deployed. | Required |
| Domain Name and TLS Consistency | If you need to use the TLS feature later, the domain name of the Private DNS must be consistent with the domain name in the TLS certificate. | As needed |
Private DNS Configuration Steps
Step 1: Check Existing Private DNS
- Log in to the AWS console and visit the Route53 console.
- In the left navigation bar, select Hosted zones.
- Check if a Private DNS associated with the target VPC already exists.
Step 2: Create or Configure Private DNS(Optional)
If a Private DNS already exists:- Select the target Private DNS and click Details.
- Confirm that the Type is Private hosted zone.
- Check the VPCs section to ensure it includes the VPC where AutoMQ is deployed.
- Record the domain name information for subsequent TLS feature configuration.
- Click Create hosted zone.
- Configure the basic information:
- Domain name: Enter a private domain name (e.g.,
internal.example.com). - Type: Select Private hosted zone.
- VPC: Select the VPC where AutoMQ is deployed and the corresponding region.
- Domain name: Enter a private domain name (e.g.,
- Click Create hosted zone.
Step 3: Verify the Configuration
- On the Private DNS details page, confirm the VPC association status.
- Check if the domain name configuration meets the planning requirements for the TLS feature.
- Record the ID and domain name of the Private DNS, which will be provided to the AutoMQ components during subsequent installation.