
Introduction
Tigris[1] is a globally distributed S3-compatible object storage service that enables you to store and retrieve unlimited data across a broad range of use cases. Tigris intelligently distributes data near the user's location, simplifying data replication and caching complexities.
Tigris is applicable in various use cases, including:
-
Storage solutions for real-time applications
-
Hosting for web content and multimedia (images, videos, etc.)
-
IoT (Internet of Things) applications storage
-
Data analytics, big data, and batch processing
-
Storage for machine learning models and datasets
-
Backup and archiving
Tigris supports the S3 API, allowing the use of standard S3 SDKs, tools, and libraries within its framework. This article will guide you on deploying an AutoMQ[3] cluster in your private data center's Tigris environment.
Prerequisites
-
Ensure a functional Tigris environment is in place. If you do not have a Tigris environment, please consult the official documentation[8] for setup instructions.
-
Prepare five hosts for the AutoMQ cluster deployment. It is advisable to use Linux amd64 hosts with 2 cores and 16GB of memory, and configure them with two virtual storage volumes. Here is an example:
| Role | IP | Node ID | System volume | Data volume |
|---|---|---|---|---|
| CONTROLLER | 192.168.0.1 | 0 | EBS 20GB | EBS 20GB |
| CONTROLLER | 192.168.0.2 | 1 | EBS 20GB | EBS 20GB |
| CONTROLLER | 192.168.0.3 | 2 | EBS 20GB | EBS 20GB |
| BROKER | 192.168.0.4 | 3 | EBS 20GB | EBS 20GB |
| BROKER | 192.168.0.5 | 4 | EBS 20GB | EBS 20GB |
Tips:
Ensure that the machines can communicate with each other. It is advisable to use the same subnet and IP addresses as provided in this example when acquiring computing resources, which facilitates easy replication of command operations.
In a non-production setting, a single Controller can be deployed, which by default, also functions as a Broker.
-
Download the latest official binary installation package from AutoMQ Github Releases to install AutoMQ.
-
Create buckets for Tigris
- Set environment variables to configure the AWS CLI with the necessary Access Key and Secret Key.
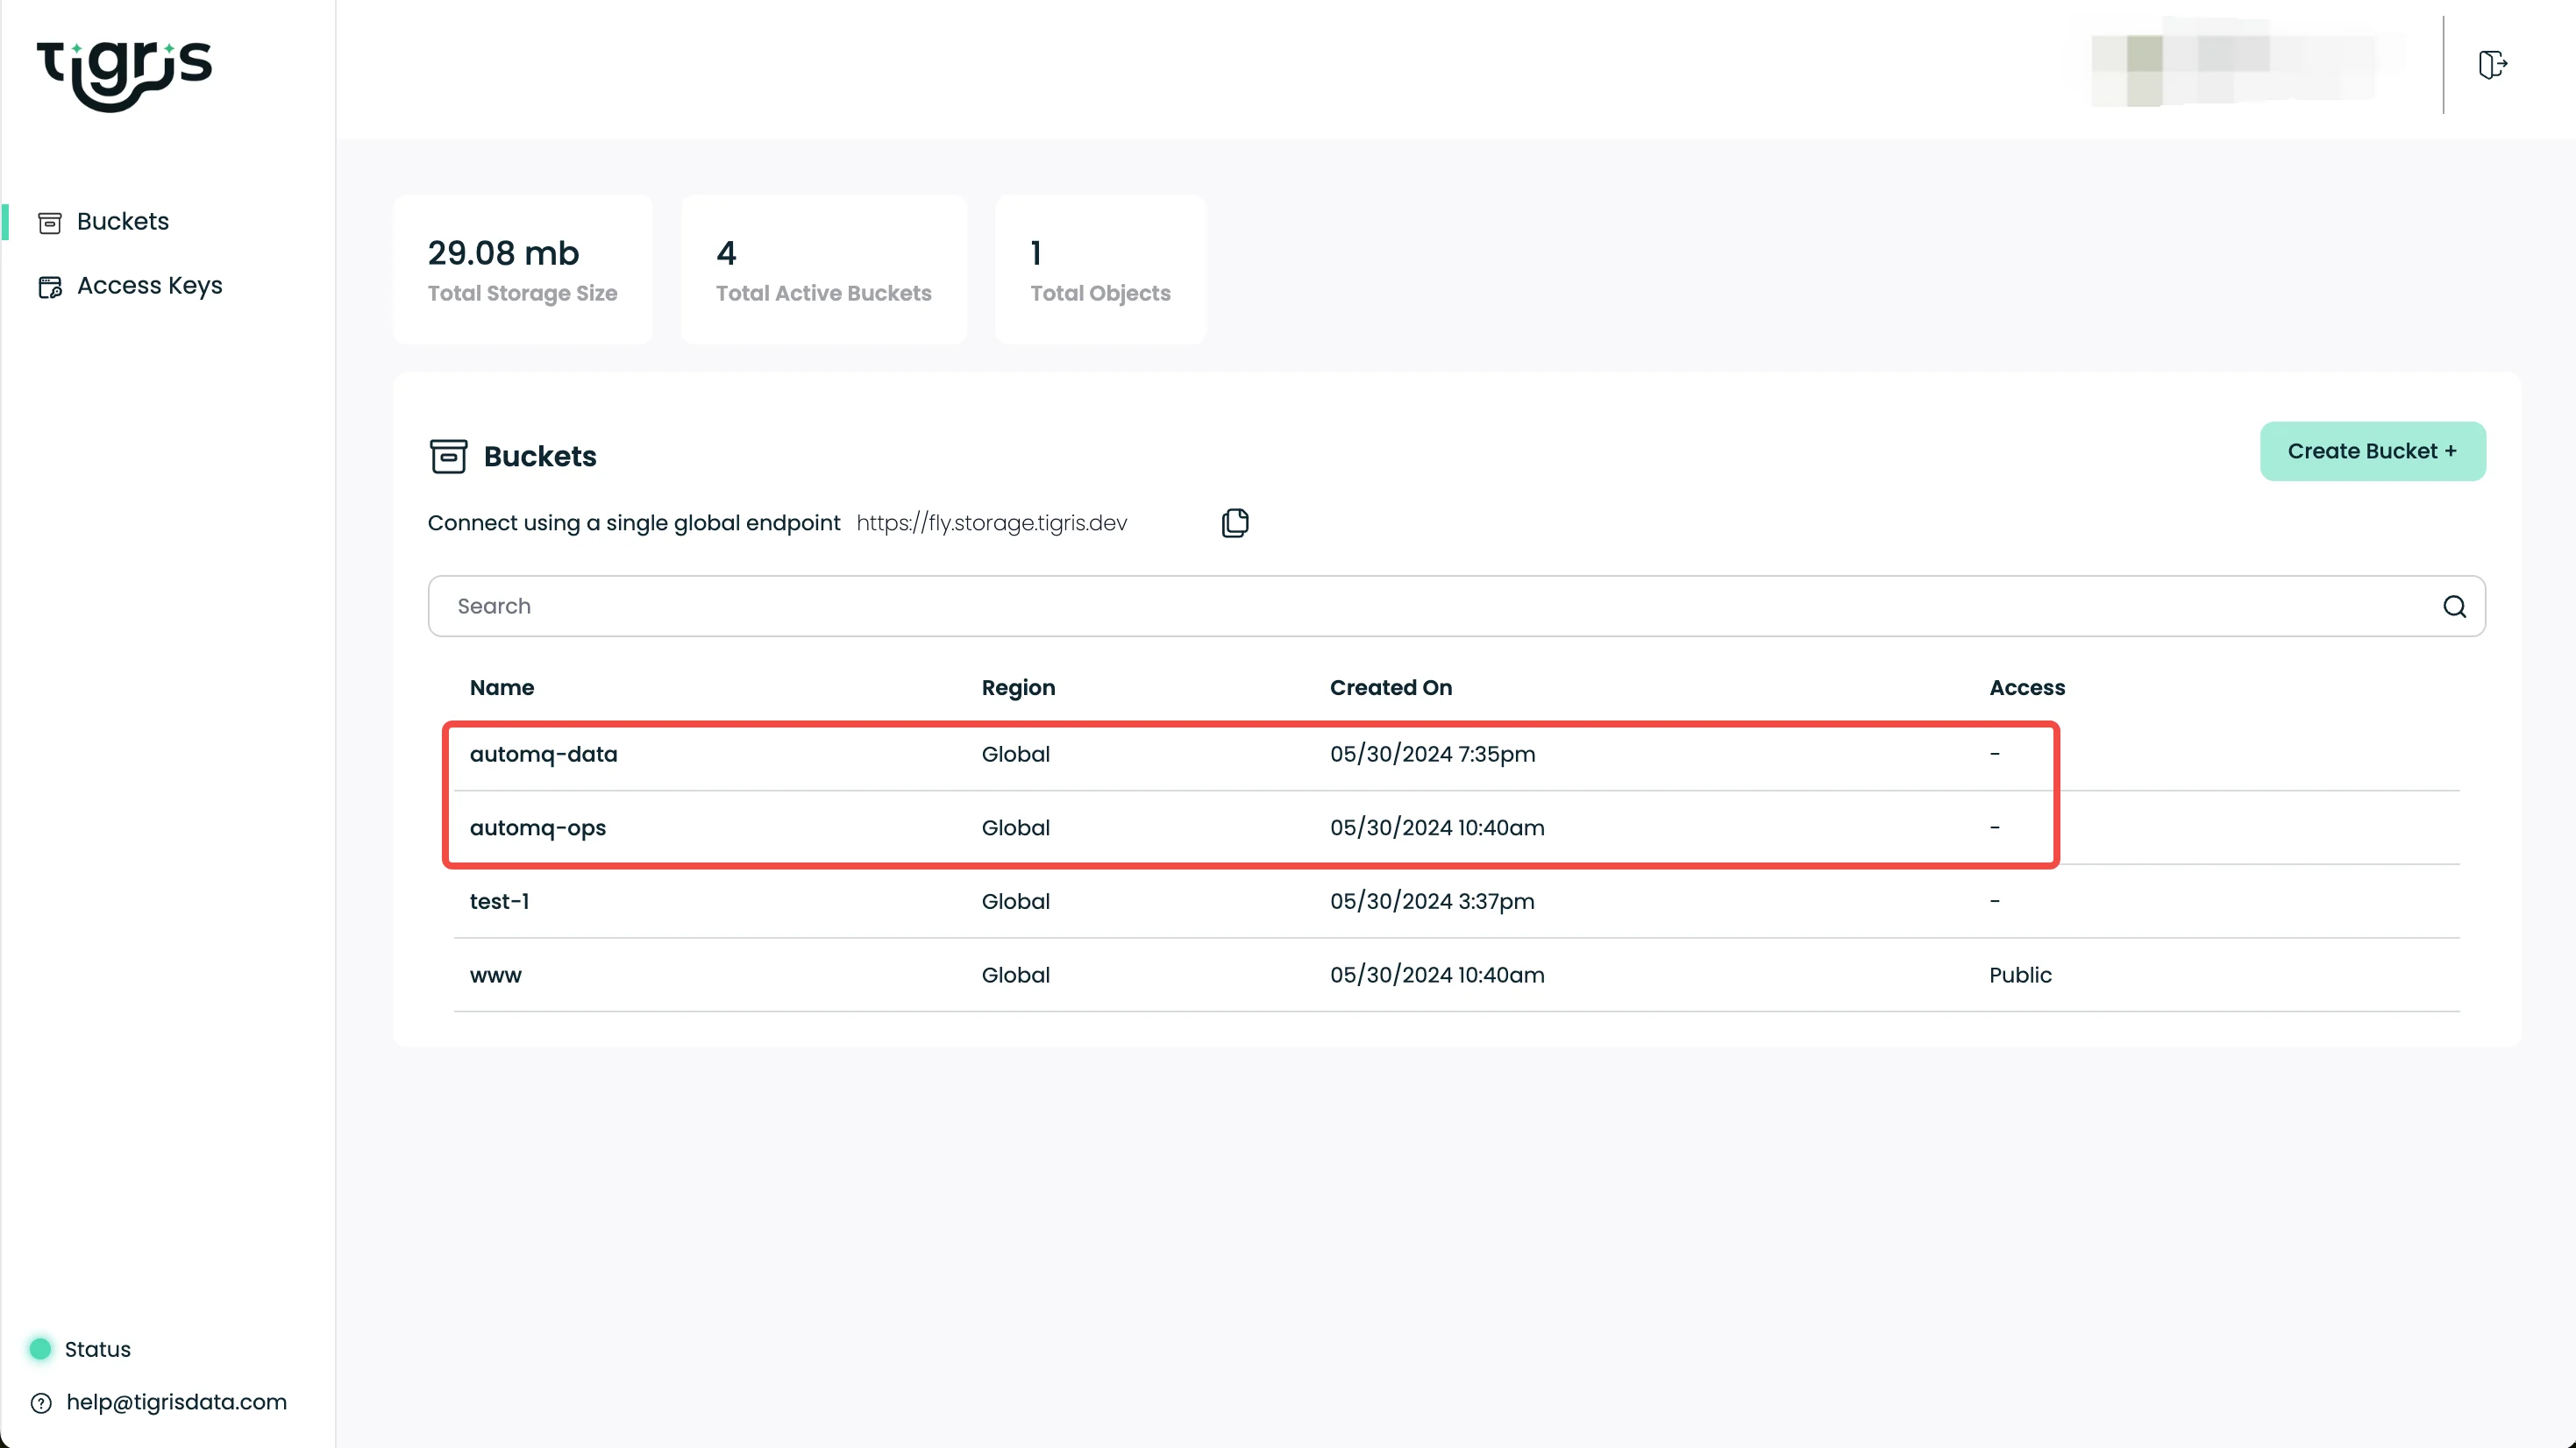
bashexport AWS_ACCESS_KEY_ID=tid_avqGWWSohRwMErSDZoYAUOqcNiOYnyrzVEyatwqUlAskBBDCNA export AWS_SECRET_ACCESS_KEY=tsec_4J9qtNpHC4E+c9mZeHTQv91uId7+8FbL7Ob6NvtiPJoo0301DU99uNTuOqFzX9b-UxAgkl- Use the AWS CLI to create an S3 bucket.
bashaws s3api create-bucket --bucket automq-data --endpoint=https://fly.storage.tigris.dev aws s3api create-bucket --bucket automq-ops --endpoint=https://fly.storage.tigris.dev
Tips:
Tigris is a global caching and S3-compatible object storage service based on the Fly.io infrastructure. The creation and management of buckets are fully handled through the Fly CLI. For more details, please visit the Fly official website to view the documentation about Tigris.
Tigris offers a control panel for creating buckets and Access Keys, which you can access by logging into your Fly account.
Install and launch the AutoMQ cluster
Configure S3URL
Step 1: Generate S3 URL
AutoMQ provides the automq-kafka-admin.sh tool for quick launch of AutoMQ. By simply providing an S3 URL containing the required S3 endpoint and authentication details, you can start AutoMQ with one click, without the need to manually generate a cluster ID or perform storage formatting.
bin/automq-kafka-admin.sh generate-s3-url \
--s3-access-key=xxx  \
--s3-secret-key=yyy \
--s3-region=cn-northwest-1  \
--s3-endpoint=s3.cn-northwest-1.amazonaws.com.cn \
--s3-data-bucket=automq-data \
--s3-ops-bucket=automq-ops
When utilizing Tigris, the following setup can be implemented to create a specific S3URL.
| Parameter Name | Default value in this example | Description |
|---|---|---|
| --s3-access-key | tid_avqGWWSohRwMErSDZoYAUOqcNiOYnyrzVEyitwqUlAskBBDCNA | Replace with your own key as needed |
| --s3-secret-key | tsec_4J9qtNpHC4E+c9mZeHTQv91uId7+8FbL7Ob6NvtiPJoo0301DU99uNTuOqFzX9b-UxAgkl | Replace with your own key as needed |
| --s3-region | auto | This parameter has no effect in Tigris; it can be set to any value, such as auto |
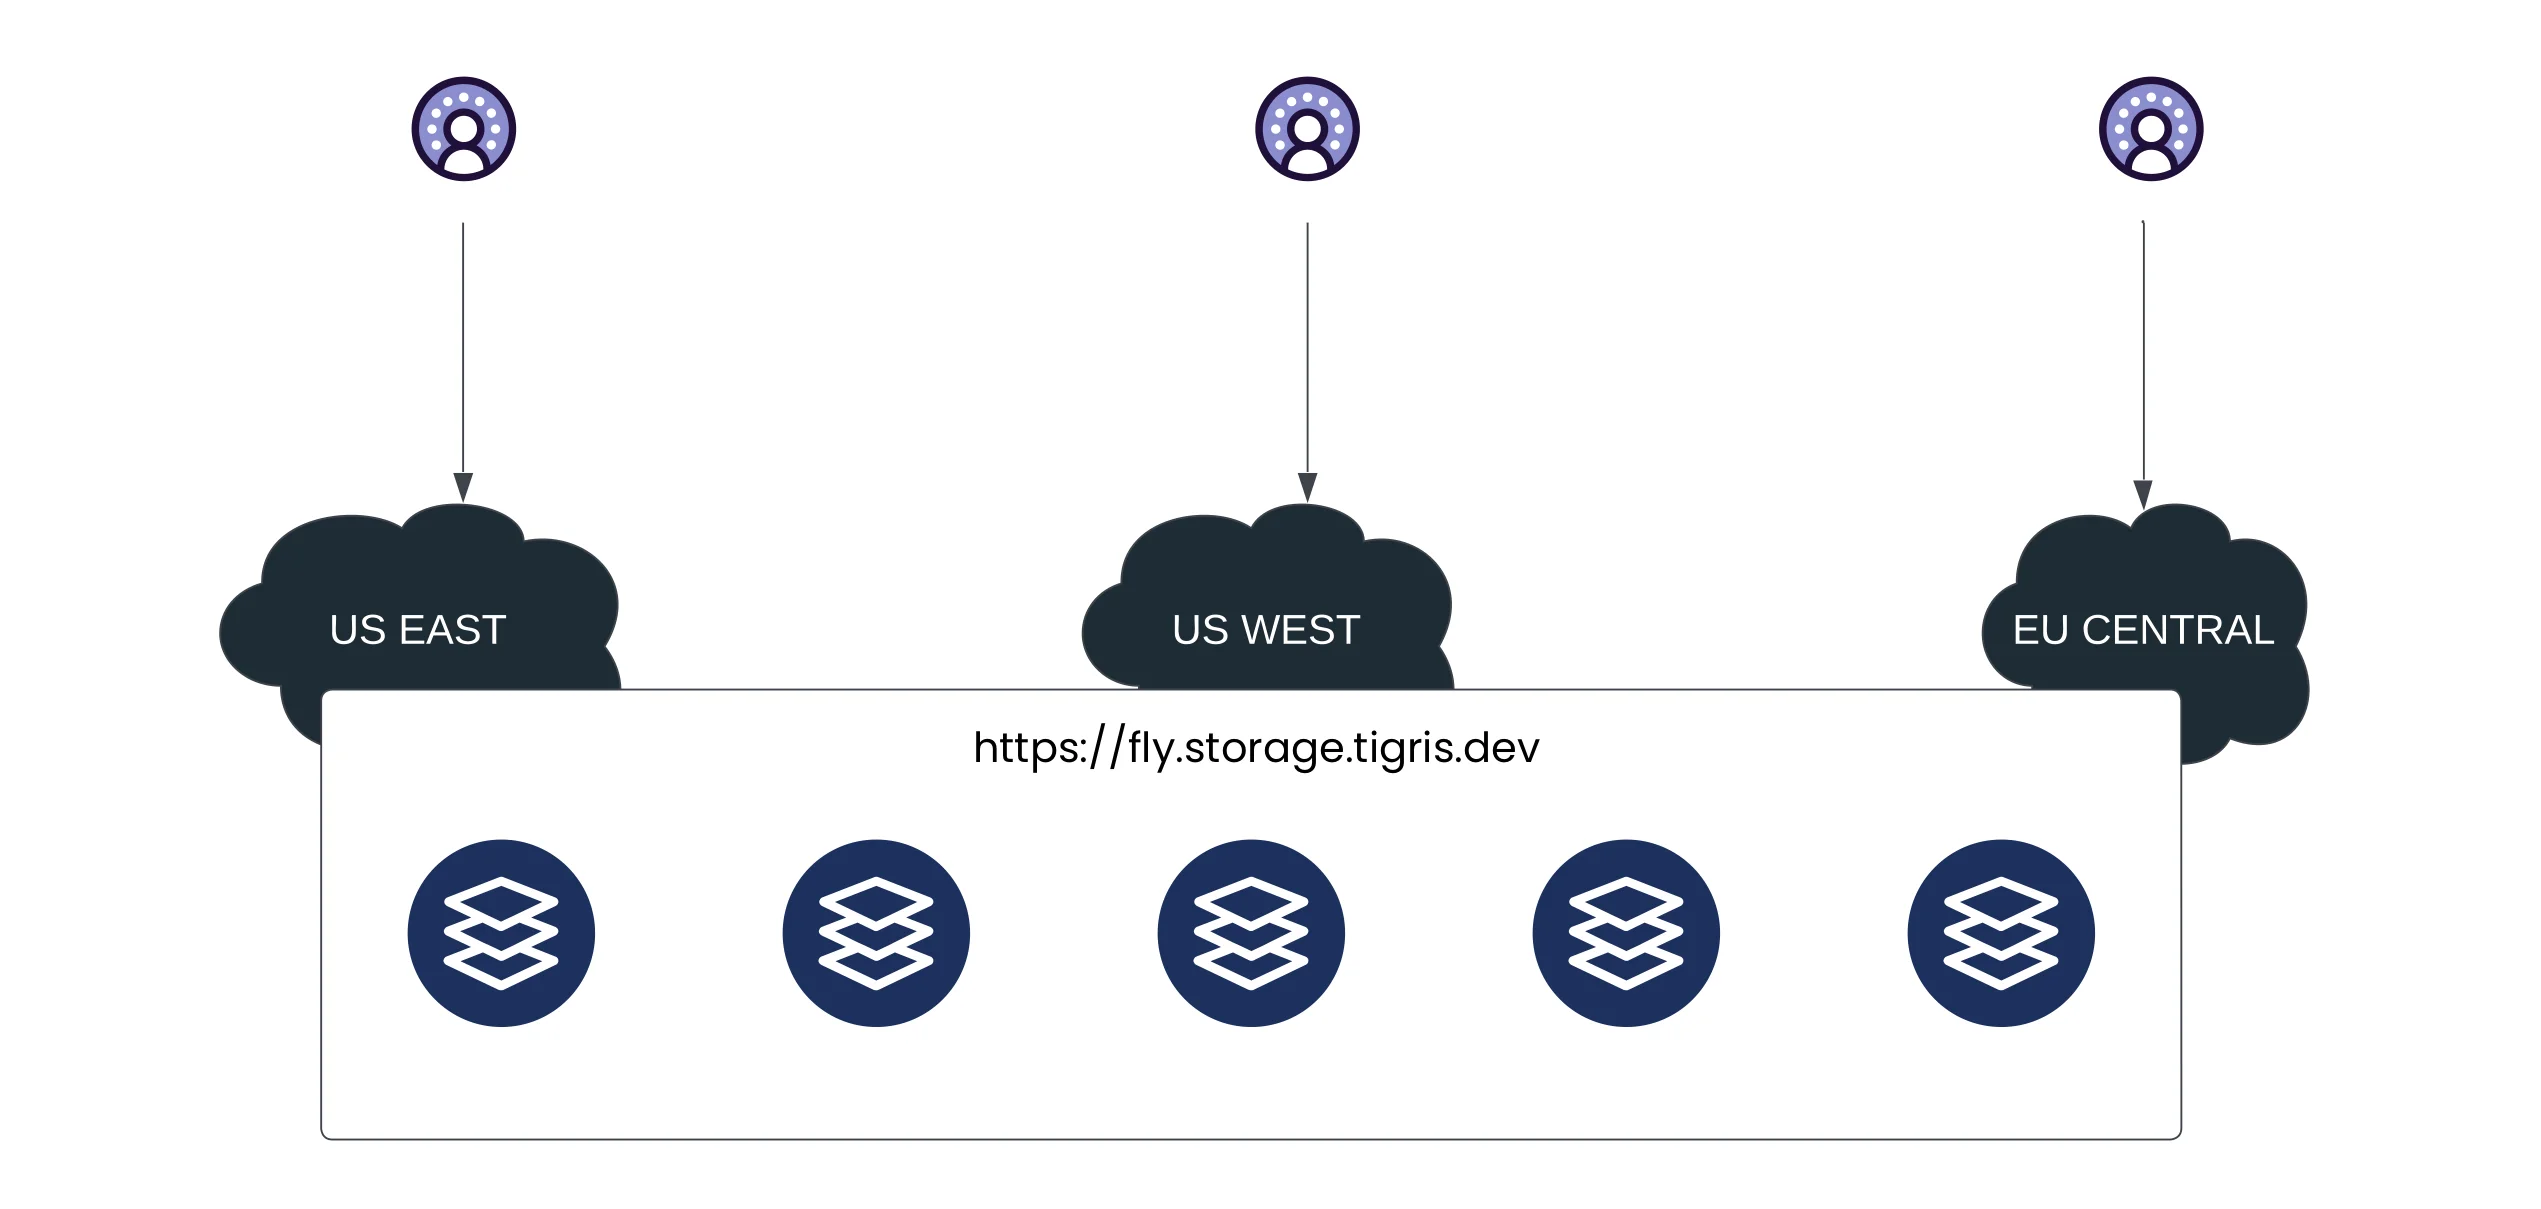
| --s3-endpoint | https://fly.storage.tigris.dev | The global endpoint provides a unified access point for your Tigris datasets worldwide |
| --s3-data-bucket | automq-data | - |
| --s3-ops-bucket | automq-ops | - |
About Fly[4]:
fly.io is a containerized deployment platform that simplifies the process by only requiring a Dockerfile to deploy code to its servers, while also automatically generating domain names.
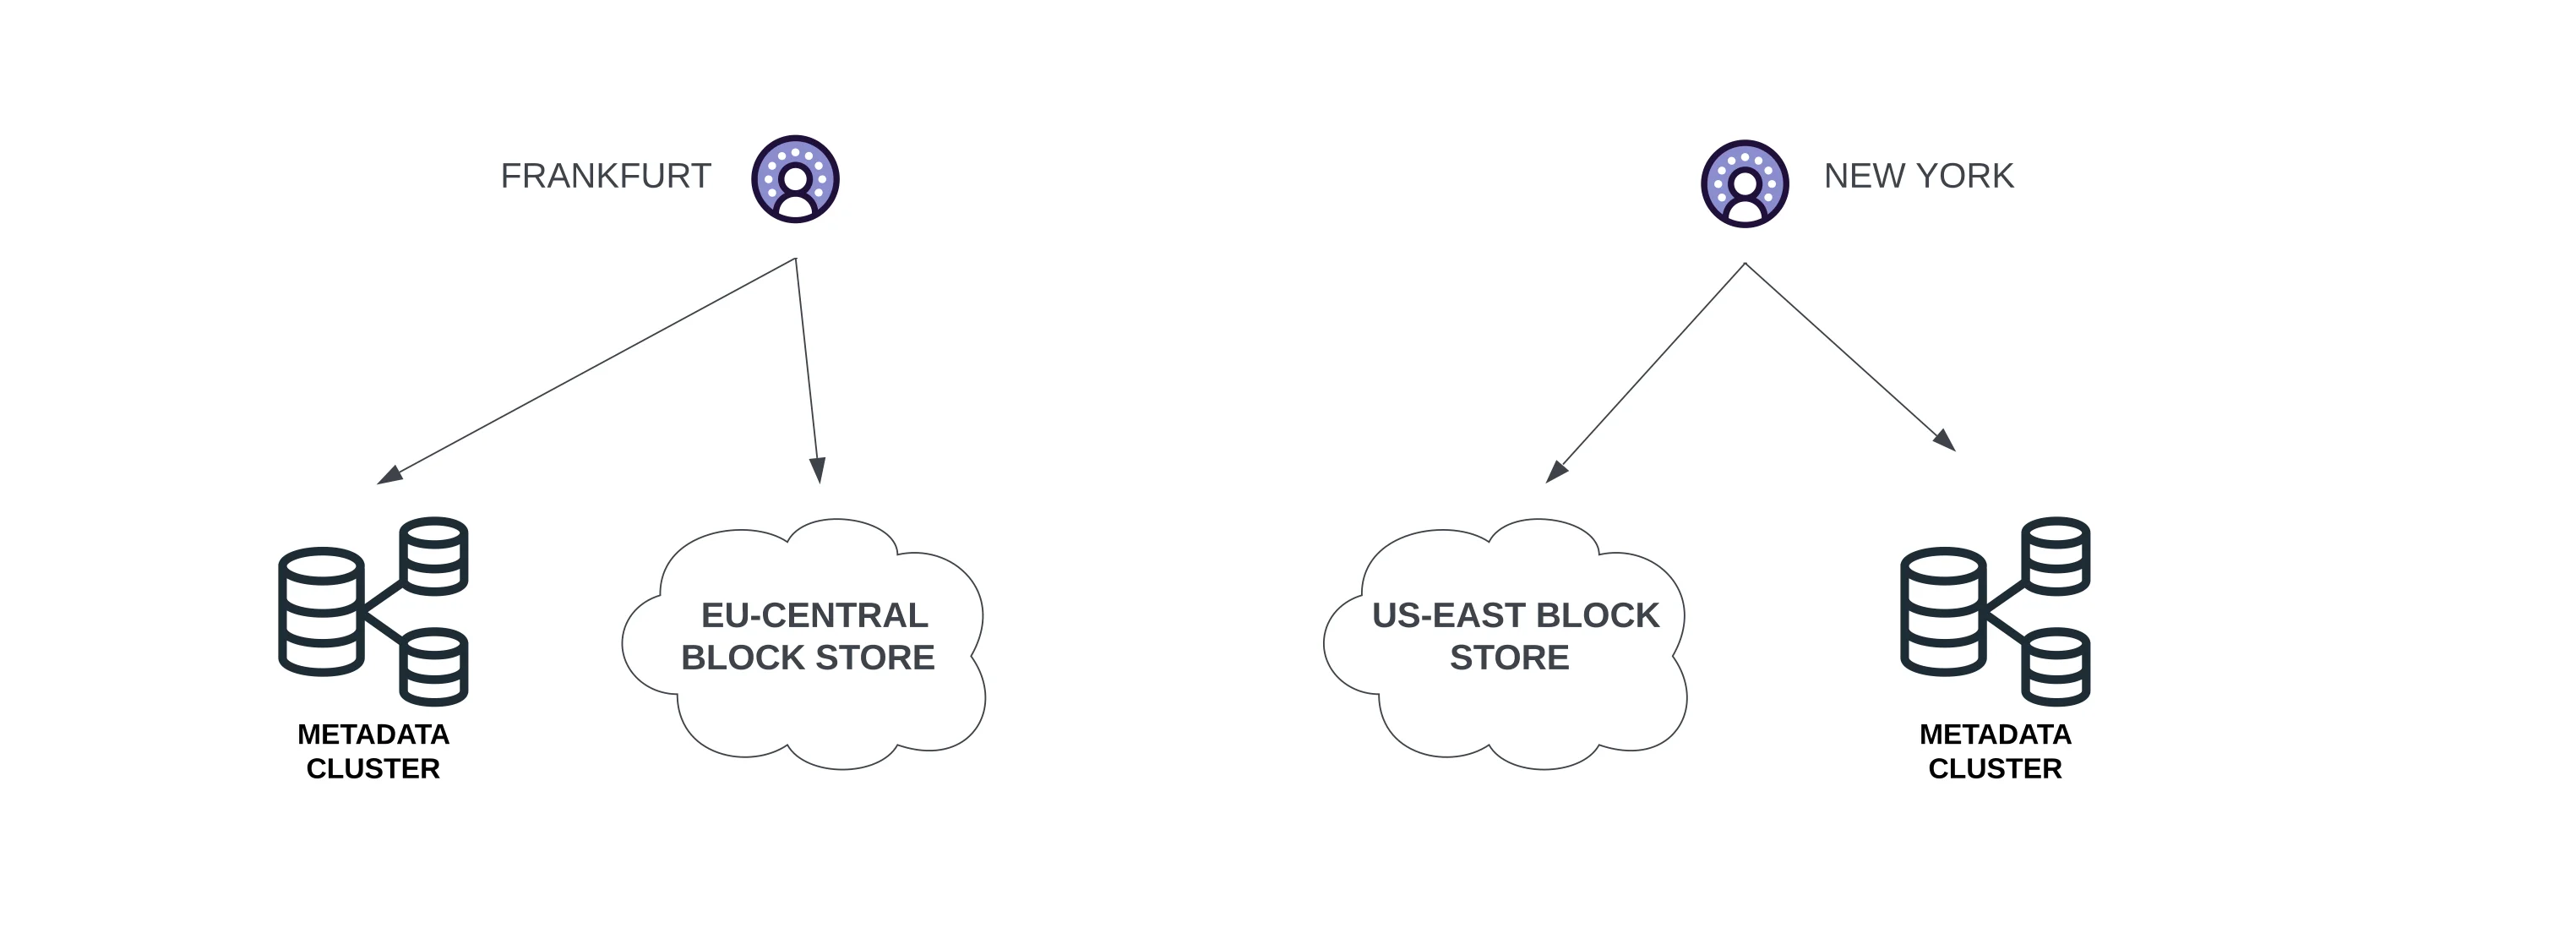
Tigris is an object storage service leveraging Fly's global caching infrastructure, where buckets are inherently global. This setup means that objects are initially stored in the region from which the request originates. To enhance performance and minimize latency, these objects are intelligently redistributed to other regions based on access patterns observed over time.
Output result
Once this command is executed, it automatically progresses through the following stages:
-
Utilizing the provided accessKey and secretKey, the core features of S3 are tested to ensure compatibility with AutoMQ.
-
An s3url is created using the supplied identity and endpoint information.
-
The s3url includes a sample command to initiate AutoMQ. Within the command, replace --controller-list and --broker-list with the actual CONTROLLER and BROKER that are to be deployed.
Here's an example of the execution results:
############  Ping s3 ########################

[ OK ] Write object
[ OK ] RangeRead object
[ OK ] Delete object
[ OK ] CreateMultipartUpload
[ OK ] UploadPart
[ OK ] CompleteMultipartUpload
[ OK ] UploadPartCopy
[ OK ] Delete objects
############  String of s3url ################

Your s3url is:

s3://fly.storage.tigris.dev?s3-access-key=tid_avqGWWSohRwMErSDZoYAUOqcNiOYnyrzVEyitwqUlAskBBDCNA&s3-secret-key=tsec_4J9qtNpHC4E+c9mZeHTQv91uId7+8FbL7Ob6NvtiPJoo0301DU99uNTuOqFzX9b-UxAgkl&s3-region=hz&s3-endpoint-protocol=https&s3-data-bucket=automq-data&s3-path-style=false&s3-ops-bucket=automq-ops&cluster-id=2q6YM-ydTYKGVs5Q9z21pA

############  Usage of s3url  ################
To start AutoMQ, generate the start commandline using s3url.
bin/automq-kafka-admin.sh generate-start-command \
--s3-url="s3://fly.storage.tigris.dev?s3-access-key=tid_avqGWWSohRwMErSDZoYAUOqcNiOYnyrzVEyitwqUlAskBBDCNA&s3-secret-key=tsec_4J9qtNpHC4E+c9mZeHTQv91uId7+8FbL7Ob6NvtiPJoo0301DU99uNTuOqFzX9b-UxAgkl&s3-region=auto&s3-endpoint-protocol=https&s3-data-bucket=automq-data&s3-path-style=false&s3-ops-bucket=automq-ops&cluster-id=2q6YM-ydTYKGVs5Q9z21pA" \
--controller-list="192.168.0.1:9093;192.168.0.2:9093;192.168.0.3:9093"  \
--broker-list="192.168.0.4:9092;192.168.0.5:9092"

TIPS: Please replace the controller-list and broker-list with your actual IP addresses.
Step 2: Generate the list of startup commands
Replace the --controller-list and --broker-list in the commands generated in the previous step with your host information, specifically, replace them with the IP addresses of the 3 CONTROLLERS and 2 BROKERS mentioned in the environment preparation, using the default ports 9092 and 9093.
bin/automq-kafka-admin.sh generate-start-command \
--s3-url="s3://s3.cn-northwest-1.amazonaws.com.cn?s3-access-key=XXX&s3-secret-key=YYY&s3-region=cn-northwest-1&s3-endpoint-protocol=https&s3-data-bucket=automq-data&s3-path-style=false&s3-ops-bucket=automq-ops&cluster-id=40ErA_nGQ_qNPDz0uodTEA" \
--controller-list="192.168.0.1:9093;192.168.0.2:9093;192.168.0.3:9093"  \
--broker-list="192.168.0.4:9092;192.168.0.5:9092"
Parameter description
| Parameter Name | Required | Description |
|---|---|---|
| --s3-url | is | Generated by the command line tool bin/automq-kafka-admin.sh generate-s3-url, which includes authentication, cluster ID, and other information |
| --controller-list | is | At least one address is required as the IP and port list for the CONTROLLER host. Format: IP1:PORT1; IP2:PORT2; IP3:PORT3 |
| --broker-list | is | At least one address is required as the IP and port list for the BROKER host. Format: IP1:PORT1; IP2:PORT2; IP3:PORT3 |
| --controller-only-mode | No | Determines whether the CONTROLLER node solely assumes the CONTROLLER role. By default, this is set to false, indicating that the deployed CONTROLLER node also functions as a BROKER. |
Output result
After executing the command, it generates the commands for starting AutoMQ.
############  Start Commandline ##############
To start an AutoMQ Kafka server, please navigate to the directory where your AutoMQ tgz file is located and run the following command.

Before running the command, make sure that Java 17 is installed on your host. You can verify the Java version by executing 'java -version'.

bin/kafka-server-start.sh --s3-url="s3://s3.cn-northwest-1.amazonaws.com.cn?s3-access-key=XXX&s3-secret-key=YYY&s3-region=cn-northwest-1&s3-endpoint-protocol=https&s3-data-bucket=automq-data&s3-path-style=false&s3-ops-bucket=automq-ops&cluster-id=40ErA_nGQ_qNPDz0uodTEA" --override process.roles=broker,controller --override node.id=0 --override controller.quorum.voters=0@192.168.0.1:9093,[email protected]:9093,[email protected]:9093 --override listeners=PLAINTEXT://192.168.0.1:9092,CONTROLLER://192.168.0.1:9093 --override advertised.listeners=PLAINTEXT://192.168.0.1:9092

bin/kafka-server-start.sh --s3-url="s3://s3.cn-northwest-1.amazonaws.com.cn?s3-access-key=XXX&s3-secret-key=YYY&s3-region=cn-northwest-1&s3-endpoint-protocol=https&s3-data-bucket=automq-data&s3-path-style=false&s3-ops-bucket=automq-ops&cluster-id=40ErA_nGQ_qNPDz0uodTEA" --override process.roles=broker,controller --override node.id=1 --override controller.quorum.voters=0@192.168.0.1:9093,[email protected]:9093,[email protected]:9093 --override listeners=PLAINTEXT://192.168.0.2:9092,CONTROLLER://192.168.0.2:9093 --override advertised.listeners=PLAINTEXT://192.168.0.2:9092

bin/kafka-server-start.sh --s3-url="s3://s3.cn-northwest-1.amazonaws.com.cn?s3-access-key=XXX&s3-secret-key=YYY&s3-region=cn-northwest-1&s3-endpoint-protocol=https&s3-data-bucket=automq-data&s3-path-style=false&s3-ops-bucket=automq-ops&cluster-id=40ErA_nGQ_qNPDz0uodTEA" --override process.roles=broker,controller --override node.id=2 --override controller.quorum.voters=0@192.168.0.1:9093,[email protected]:9093,[email protected]:9093 --override listeners=PLAINTEXT://192.168.0.3:9092,CONTROLLER://192.168.0.3:9093 --override advertised.listeners=PLAINTEXT://192.168.0.3:9092

bin/kafka-server-start.sh --s3-url="s3://s3.cn-northwest-1.amazonaws.com.cn?s3-access-key=XXX&s3-secret-key=YYY&s3-region=cn-northwest-1&s3-endpoint-protocol=https&s3-data-bucket=automq-data&s3-path-style=false&s3-ops-bucket=automq-ops&cluster-id=40ErA_nGQ_qNPDz0uodTEA" --override process.roles=broker --override node.id=3 --override controller.quorum.voters=0@192.168.0.1:9093,[email protected]:9093,[email protected]:9093 --override listeners=PLAINTEXT://192.168.0.4:9092 --override advertised.listeners=PLAINTEXT://192.168.0.4:9092

bin/kafka-server-start.sh --s3-url="s3://s3.cn-northwest-1.amazonaws.com.cn?s3-access-key=XXX&s3-secret-key=YYY&s3-region=cn-northwest-1&s3-endpoint-protocol=https&s3-data-bucket=automq-data&s3-path-style=false&s3-ops-bucket=automq-ops&cluster-id=40ErA_nGQ_qNPDz0uodTEA" --override process.roles=broker --override node.id=4 --override controller.quorum.voters=0@192.168.0.1:9093,[email protected]:9093,[email protected]:9093 --override listeners=PLAINTEXT://192.168.0.5:9092 --override advertised.listeners=PLAINTEXT://192.168.0.5:9092

TIPS: Start controllers first and then the brokers.
Step 3: Start AutoMQ
To initiate the cluster, sequentially execute the command list from the previous step on the designated CONTROLLER or BROKER host. For instance, to start the first CONTAINER process at 192.168.0.1, execute the first command template from the list of startup commands.
bin/kafka-server-start.sh --s3-url="s3://s3.cn-northwest-1.amazonaws.com.cn?s3-access-key=XXX&s3-secret-key=YYY&s3-region=cn-northwest-1&s3-endpoint-protocol=https&s3-data-bucket=automq-data&s3-path-style=false&s3-ops-bucket=automq-ops&cluster-id=40ErA_nGQ_qNPDz0uodTEA" --override process.roles=broker,controller --override node.id=0 --override controller.quorum.voters=0@192.168.0.1:9093,[email protected]:9093,[email protected]:9093 --override listeners=PLAINTEXT://192.168.0.1:9092,CONTROLLER://192.168.0.1:9093 --override advertised.listeners=PLAINTEXT://192.168.0.1:9092Parameter description
When initiating the startup command, any parameters not specified will default to the default configuration of Apache Kafka®[5]. For new parameters introduced by AutoMQ[6], the default values set by AutoMQ will apply. To customize these settings, add --override key=value parameters at the end of the command.
| Parameter Name | Mandatory | Description |
|---|---|---|
| s3-url | Yes | Generated by the bin/automq-kafka-admin.sh command line tool, which includes authentication, cluster ID, and other information. |
| process.roles | Yes | The options are CONTROLLER or BROKER. If a host serves as both CONTROLLER and BROKER, then the configuration value is CONTROLLER, BROKER. |
| node.id | Yes | An integer used to uniquely identify BROKER or CONTROLLER within a Kafka cluster. It must maintain uniqueness within the cluster. |
| controller.quorum.voters | Yes | An integer used to uniquely identify BROKER or CONTROLLER within a Kafka cluster. It must maintain uniqueness within the cluster. |
| listeners | Yes | Listening IP and Port |
| advertised.listeners | Yes | The BROKER provides the access address for the Client. |
| log.dirs | No | The directory for storing KRAFT and BROKER metadata. |
| s3.wal.path | No | In a production environment, it is recommended to store AutoMQ WAL data on a separately mounted new data volume raw device. This can result in better performance, as AutoMQ supports writing data to raw devices, thereby reducing latency. Please ensure to configure the correct path for storing WAL data. |
| autobalancer.controller.enable | No | The default value is false, with traffic rebalancing disabled. Upon enabling automatic traffic rebalancing, the AutoMQ's auto balancer component will automatically migrate partitions to ensure overall traffic balance. |
Tips: If you need to enable continuous traffic rebalancing or run Example: Self-Balancing When Cluster Nodes Change, it's recommended to explicitly specify the parameter --override autobalancer.controller.enable=true when starting the Controller.
Background Operation
To operate in background mode, append the following code to the end of your command:
command > /dev/null 2>&1 &You have now successfully deployed an AutoMQ cluster on Tigris, characterized by low costs, minimal latency, and elastic second-level Kafka clustering. For more details on features like second-level partition reassignment and ongoing self-balancing, see official examples[7].
This article
[1] Tigris: https://www.tigrisdata.com/
[2] Features of Tigris: https://www.tigrisdata.com/docs/overview/
[3] AutoMQ 1.0.6-rc1: https://github.com/AutoMQ/automq/releases
[4] Fly: https://fly.io/
[5] WHAT IS AUTOMQ?: https://docs.automq.com/automq/what-is-automq/overview
[6] Example: Self-Balancing when Cluster Nodes Change: https://docs.automq.com/automq/getting-started/example-self-balancing-when-cluster-nodes-change
[7] AutoMQ: GETTING STARTED: https://docs.automq.com/automq/getting-started/deploy-multi-nodes-test-cluster-on-docker
[8] Tigris: Getting Started: https://www.tigrisdata.com/docs/get-started/#getting-started