.png)
Abstarct
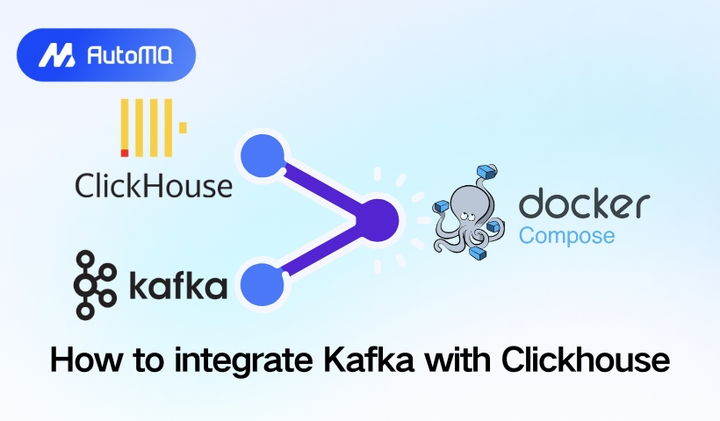
This blog details the seamless integration of Apache Kafka and ClickHouse to build a complete real-time streaming and analytics stack. The entire environment is orchestrated using Docker Compose, ensuring a fully functional and reproducible development setup.
Architecture Overview
The stack consists of four core services:
Kafka + Zookeeper
Kafka requires Zookeeper for broker coordination. We configure Kafka with two listeners:
INSIDE: For communication between Docker containers.
OUTSIDE: For communication from your host machine.
This ensures tools like Kafka‑UI and ClickHouse can talk to Kafka internally on the docker network, while you can still connect via localhost on your machine.
ClickHouse
ClickHouse provides fast analytical storage and supports Kafka integration through the Kafka Engine , which allows ClickHouse to act as a Kafka producer or consumer.
Kafka‑UI
Kafka‑UI gives you a clean interface to inspect topics, messages, consumer groups, and cluster metadata.
Final Docker Compose File
Below is the complete docker-compose.yml used to run the entire stack.
services:
  clickhouse:
    image: clickhouse/clickhouse-server:24.8
    container_name: clickhouse
    ports:
      - "9000:9000"
      - "8123:8123"
    environment:
      - CLICKHOUSE_DB=default
      - CLICKHOUSE_USER=default
      - CLICKHOUSE_PASSWORD=pass
      - CLICKHOUSE_DEFAULT_ACCESS_MANAGEMENT=1
    volumes:
      - ./data:/var/lib/clickhouse
      - ./logs:/var/log/clickhouse-server
    ulimits:
      nofile:
        soft: 262144
        hard: 262144
    restart: unless-stopped

  zookeeper:
    image: confluentinc/cp-zookeeper:7.5.0
    container_name: zookeeper
    environment:
      ZOOKEEPER_CLIENT_PORT: 2181
      ZOOKEEPER_TICK_TIME: 2000
    ports:
      - "2181:2181"
    restart: unless-stopped

  kafka:
    image: confluentinc/cp-kafka:7.5.0
    container_name: kafka
    depends_on:
      - zookeeper
    ports:
      - "9092:9092"
    environment:
      KAFKA_BROKER_ID: 1
      KAFKA_ZOOKEEPER_CONNECT: zookeeper:2181
      # Define both listeners
      KAFKA_LISTENERS: INSIDE://0.0.0.0:29092,OUTSIDE://0.0.0.0:9092
      # Advertise correct addresses
      KAFKA_ADVERTISED_LISTENERS: INSIDE://kafka:29092,OUTSIDE://localhost:9092
      # map listener names to protocol
      KAFKA_LISTENER_SECURITY_PROTOCOL_MAP: INSIDE:PLAINTEXT,OUTSIDE:PLAINTEXT
      # default listener
      KAFKA_INTER_BROKER_LISTENER_NAME: INSIDE
      KAFKA_OFFSETS_TOPIC_REPLICATION_FACTOR: 1
    restart: unless-stopped

  kafka-ui:
    container_name: kafka-ui
    image: provectuslabs/kafka-ui:latest
    ports:
      - "8080:8080"
    environment:
      DYNAMIC_CONFIG_ENABLED: "true"
    volumes:
      - ./config/config.yml:/etc/kafkaui/dynamic_config.yaml
    restart: unless-stopped
Kafka‑UI Configuration
Create a local file at config/config.yml to instruct Kafka-UI how to connect to the cluster:
kafka:
  clusters:
    - name: local
      bootstrapServers: kafka:29092
Starting the Stack
Run the following command in your terminal:
docker compose up -d
Once the containers are running, Kafka‑UI becomes available at http://localhost:8080 .
Interacting with ClickHouse via curl
ClickHouse exposes an HTTP interface on port 8123 , making it easy to run SQL queries without installing a dedicated client.
Create a standard table:
curl -u default:pass \
  -X POST "http://localhost:8123" \
  --data-binary "CREATE TABLE my_table (
    id UInt64,
    message String
  ) ENGINE = MergeTree ORDER BY id"
Insert data:
curl -u default:pass \
  -X POST "http://localhost:8123" \
  --data-binary "INSERT INTO my_table VALUES (1, 'hello'), (2, 'world')"
Query data:
curl -u default:pass \
  "http://localhost:8123/?query=SELECT+*+FROM+my_table+FORMAT+Pretty"
Streaming Data from ClickHouse → Kafka
This is the core feature: ClickHouse acting as a Kafka producer using the Kafka Engine.
Step 1 — Create a Kafka sink table
This table doesn't store data on disk; it acts as a pipe to the Kafka broker.
Bash
curl -u default:pass \
  -X POST "http://localhost:8123" \
  --data-binary "CREATE TABLE kafka_output (
    id UInt64,
    message String
)
ENGINE = Kafka
SETTINGS
    kafka_broker_list = 'kafka:29092',
    kafka_topic_list = 'clickhouse_out',
    kafka_group_name = 'ch_producer',
    kafka_format = 'JSONEachRow'"
Step 2 — Insert data into Kafka via ClickHouse
When you insert into this table, ClickHouse serializes the data to JSON and pushes it to Kafka.
Bash
curl -u default:pass \
  -X POST "http://localhost:8123" \
  --data-binary "INSERT INTO kafka_output VALUES (1, 'hello from clickhouse')"
Step 3 — Verify in Kafka‑UI
Open your browser to http://localhost:8080 , navigate to the clickhouse_out topic, and you will see: {"id":1,"message":"hello from clickhouse"}
Step 4 — Verify via Kafka CLI
Alternatively, verify from the command line using the Docker container:
Bash
docker exec -it kafka \
  kafka-console-consumer \
    --topic clickhouse_out \
    --bootstrap-server kafka:29092 \
    --from-beginning
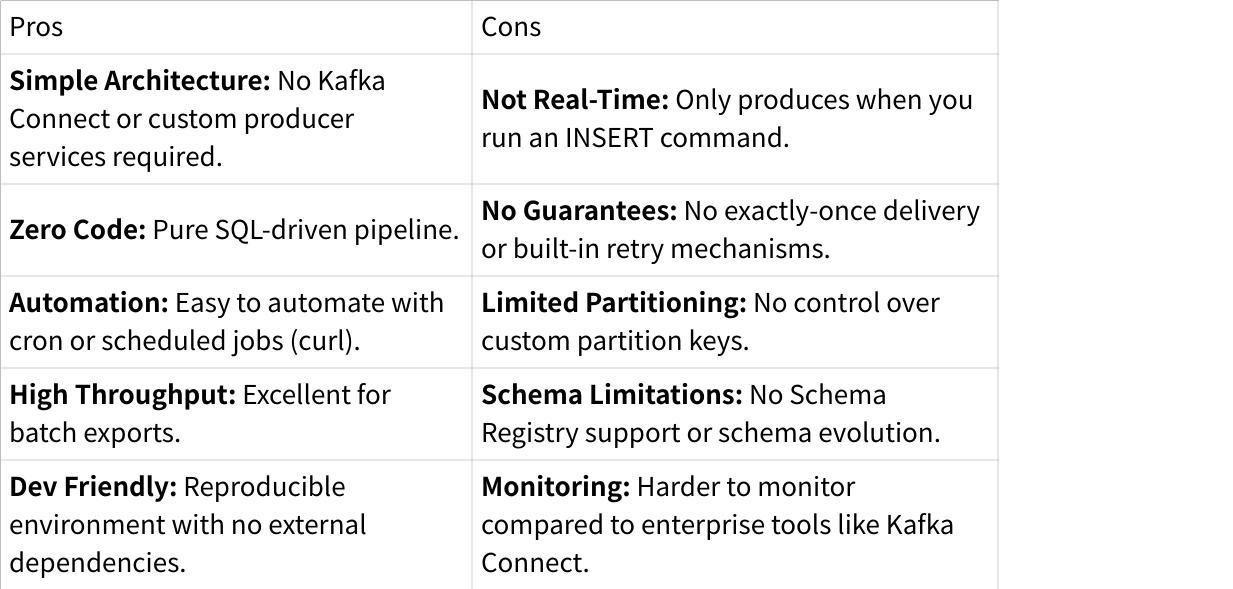
Pros and Cons
This setup gives you:
Conclusion
While this Docker-based stack is ideal for local development and lightweight ETL, running Kafka in production often brings unnecessary burdens in terms of storage costs and operational maintenance. AutoMQ addresses these issues by offloading storage to S3 without sacrificing 100% Kafka protocol compatibility. Ready to experience the next generation of cloud-native Kafka? Try AutoMQ Now .
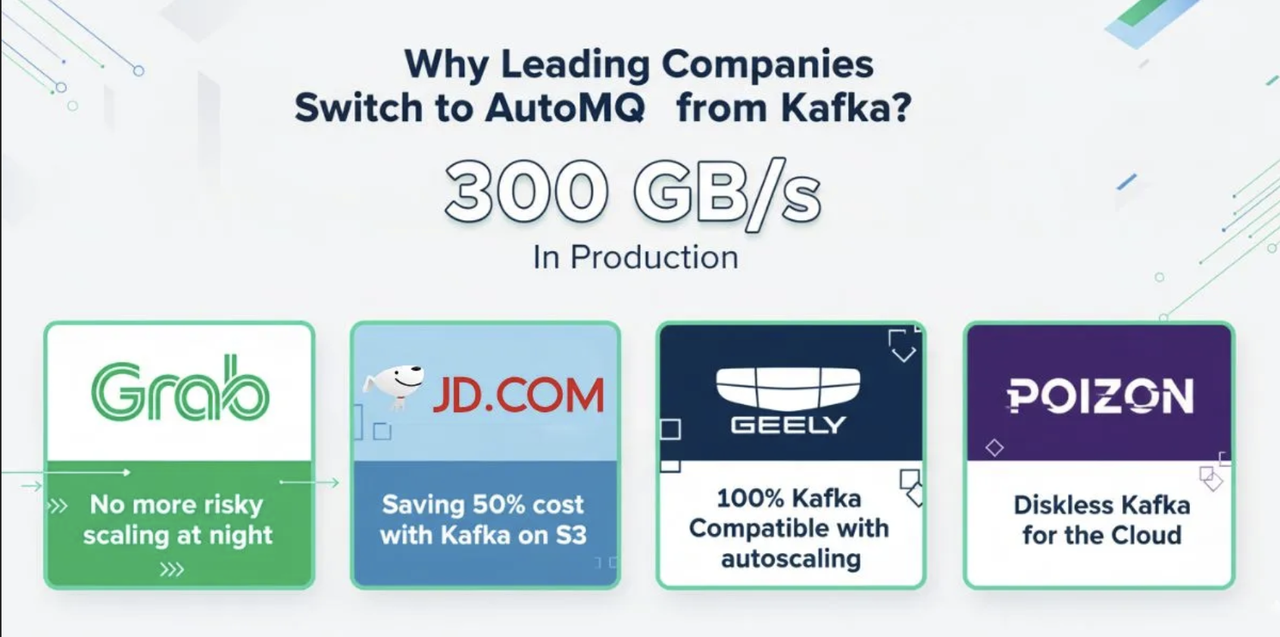
Interested in our diskless Kafka solution, AutoMQ? See how leading companies leverage AutoMQ in their production environments by reading our case studies. The source code is also available on GitHub.
Grab: Driving Efficiency with AutoMQ in DataStreaming Platform
Palmpay Uses AutoMQ to Replace Kafka, Optimizing Costs by 50%+
How Asia’s Quora Zhihu uses AutoMQ to reduce Kafka cost and maintenance complexity
XPENG Motors Reduces Costs by 50%+ by Replacing Kafka with AutoMQ
Asia's GOAT, Poizon uses AutoMQ Kafka to build observability platform for massive data(30 GB/s)
AutoMQ Helps CaoCao Mobility Address Kafka Scalability During Holidays
JD.comx AutoMQ x CubeFS: A Cost-Effective Journey at Trillion-Scale Kafka Messaging